Category Archives: SonicWall

Add Address Objects/Groups to Sonicwall

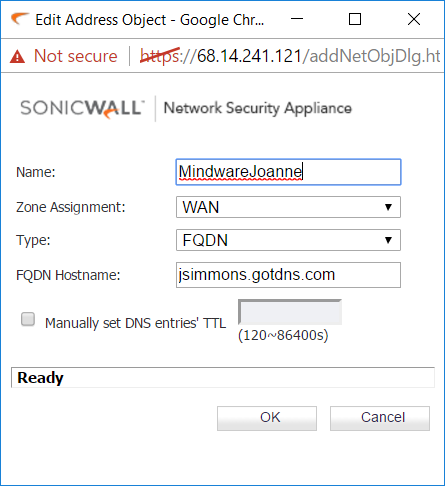
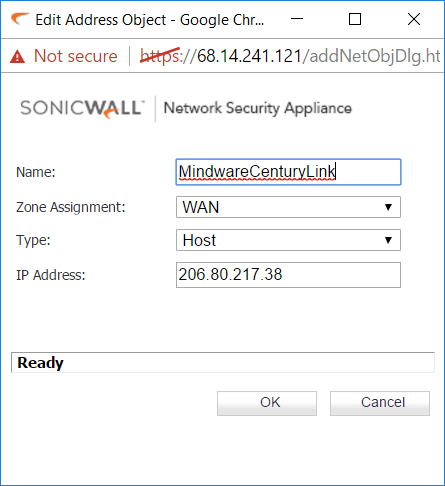
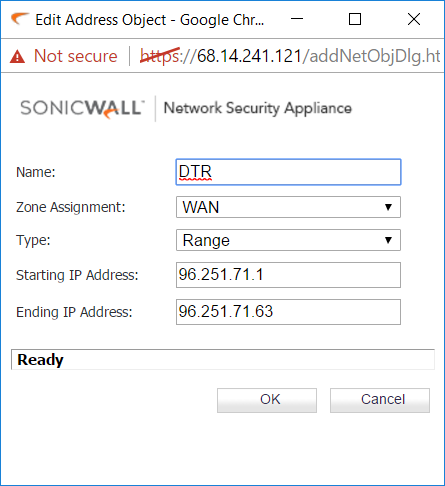
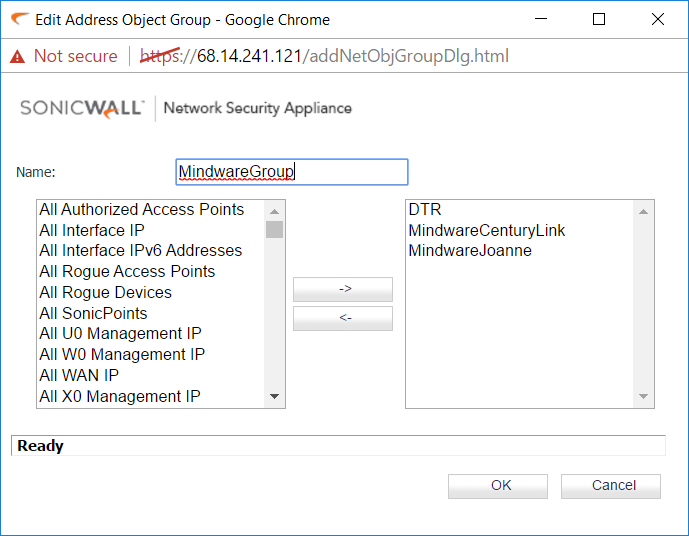
To add address objects for access to a customer’s Sonicwall, you will need to login to their unit and follow the instructions below:

In your browser, enter  https:// plus the WAN IP address

Select Network  –>  Address Objects to display the current Address Objects and Groups

Click on Add to enter either one or the other – below are the screen shots for each:

object1object2 object3 object4

Sonicwall Firmware Update

Install SonicWall FIrmware Upgrade Download Firmware Upgrade From SonicWall

  1. Open your internet browser
  2. Enter www.mysonicwall.com
  3. Enter customer username and password
  4. Select Submit
  5. Select Download Center
  6. Select Software Type (example, TZ 100 Firmware)
  7. Click on download file description (example, TZ 100 Firmware) under Firmware sub heading
  8. Select Save for Do You Want To Save This File (if Chrome select file at bottom and select Show In Folder) ?
  9. Select location to save file (example, C:\TEMP)
  10. Select Save
  11. Wait for download to complete
  12. Select Close
  13. Select Logout

Note: Once you download file you can use the same file to upgrade other SonicWall units that are the same model. Backup Settings

  1. Open your internet browser
  2. Enter Sonicwall IP address (example, 192.168.1.1)
  3. Enter admin for name
  4. Enter password (example, superXXX, where XXX is customer code in caps)
  5. Select System on left side of screen
  6. Under System select Settings
  7. Select Create Backup Settings

Export Settings

  1. Open your internet browser
  2. Enter Sonicwall IP address (example, 192.168.1.1)
  3. Enter admin for name
  4. Enter password (example, superXXX, where XXX is customer code in caps)
  5. Select System on left side of screen
  6. Under System select Settings
  7. Select Export Settings
  8. Select Export (Default name of the file will be ‘sonicwall.exp’ message will display)
  9. Save to folder.

Install Firmware Upgrade

  1. Open your internet browser
  2. Enter Sonicwall IP address (example, 192.168.1.1)
  3. Enter admin for name
  4. Enter password (example, superXXX, where XXX is customer code in caps)
  5. Select System on left side of screen
  6. Under System select Settings
  7. Select Upload New Firmware button
  8. Select Choose File
  9. Select folder for firmware upgrade file (example, C:\TEMP)
  10. Select downloaded file name from list box (example, sw_tz150w_s_eng_3.1.6.6.sig)
  11. Select Open
  12. Select Upload
  13. Status will display Please wait…
  14. When completed status will display Firmware uploaded successfully
  15. Select Icon under Boot column for Uploaded Firmware – New!
  16. Select Ok for install message
  17. Status will display Please wait…
  18. Sonicwall will automatically restart

Small Business Network Security

Two_CentsMy Two Cents, by Archie Tucker


The new Dell™ SonicWALL™ TZ Series is the most secure Unified Threat Management (UTM) firewall for small businesses, retail deployments, government organizations, remote sites and branch offices. Unlike consumer-grade products, the TZ Series delivers the most effective anti-malware, intrusion prevention, content/URL filtering and application control capabilities along with the broadest most secure mobile platform support for laptops, smartphones and tablets. It provides full deep packet inspection (DPI) at very high performance levels, eliminating the network bottleneck that other products introduce, and enabling organizations to realize increased productivity gains. The TZ Series is the most secure, sophisticated and widely-deployed security platform on the market today.

Router/Modem Bridge Mode

Bridge mode is a configuration that disables the NAT and DHCP functions. Placing your ISP’s router/modem into bridge mode allows the SonicWall to control those functions on your network. Bridge mode also allows for remote management of the SonicWall. You will need to call your ISP (Internet Service Provider) for the bridge mode settings. Sometimes you can find them on the internet for your router/modem.

NAT (Network Address Translation) allows multiple devices on a private network to access the internet using a single WAN or public address.

DHCP (Dynamic Host Configuration Protocol) is a network protocol that is used to configure network devices so that they can communicate on your network. DHCP allocates IP addresses to devices on your network. Without DHCP, you are required to setup static IP addresses for each device. We normally setup servers and printers to use static IP addresses and PC’s to use DHCP.

Verizon FiOS Setup

Verizon FiOS is a bundled Internet access, telephone and television service that operates over a fiber-optic communications network. If you are not using the television service, you can bypass the Verizon modem/router and connect your SonicWall WAN port directly to the cable that was connected to the WAN port on the Verizon modem. The SonicWall will need to be setup for DHCP if your Verizon FiOS is setup with a dynamic IP address. After you connect the SonicWall, you will need to have Verizon reset the line. If you require the Verizon modem/router, it will need to setup in bridge mode.

Installing A New SonicWall

After you receive your pre-configured SonicWall from Mindware, follow the steps below:

  1. Turn your internet modem and the old SonicWall off
  2. Connect SonicWall WAN (or X1) port to modem WAN port
  3. Connect SonicWall LAN (or X0) port to your network switch
  4. Power the internet modem and SonicWall on
  5. After they have completed coming back up, you should be able to get back on the internet
  6. Contact Mindware to access the SonicWall to complete the setup

Notes:

  • If this is your first SonicWall installation, your internet modem will need to be setup for bridge mode
  • Need to let us know when you plan on doing the install to make sure we are available
  • It should take less than 30 minutes