Category Archives: TOP Accounts Receivable

Print Customer Mailing Labels

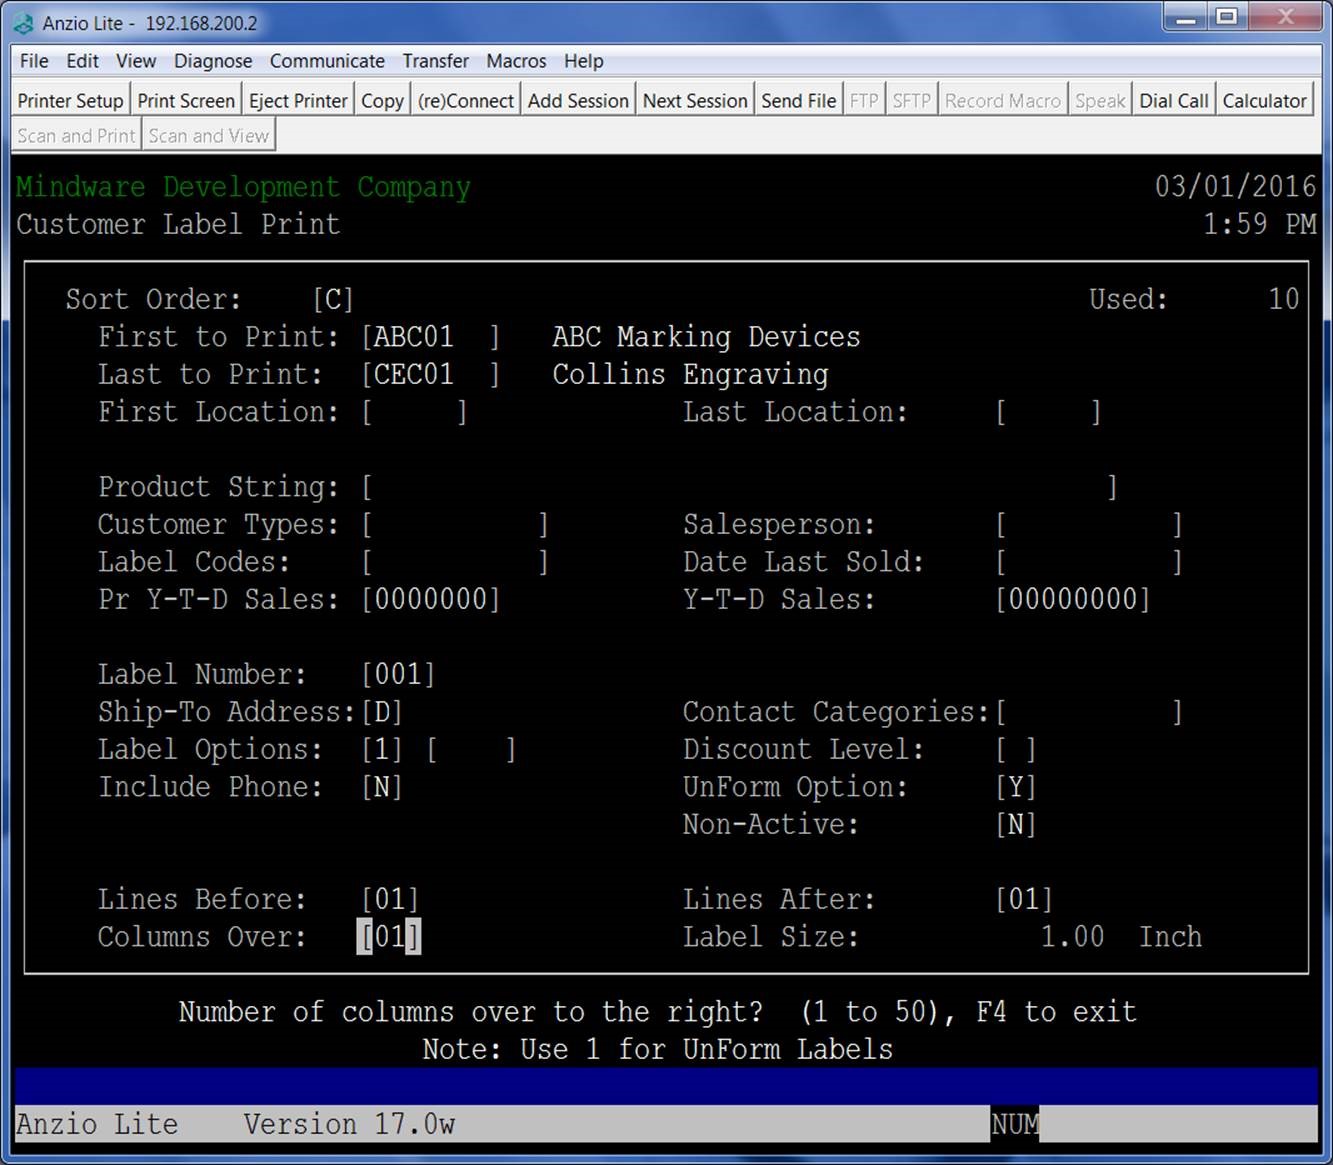
At the TOP Main Menu, select Accounts Receivable  –>  Accounts Receivable Report Menu  –>  Customer Mailing Labels

Customer mailing labels can be printed in (A)lpha sort order, (C)ustomer code order, (L)ocation by zip code order, (S)tate code order, sales(P)erson by zip code order or last sold (D)ate. You can use the location by zip code order to meet bulk mailing requirements.

Type the first customer code and the last customer code to print.  A ? will display the Customer Code selection window.

Notes:  If the first and last customer codes are the same, you will have an option to edit the label information prior to label print.

Type the first and last location (zip) codes – leaving the fields blank will include all zip codes.

To sort label print by product code, enter product codes (3 characters side by side) to include or leave blank to include all.

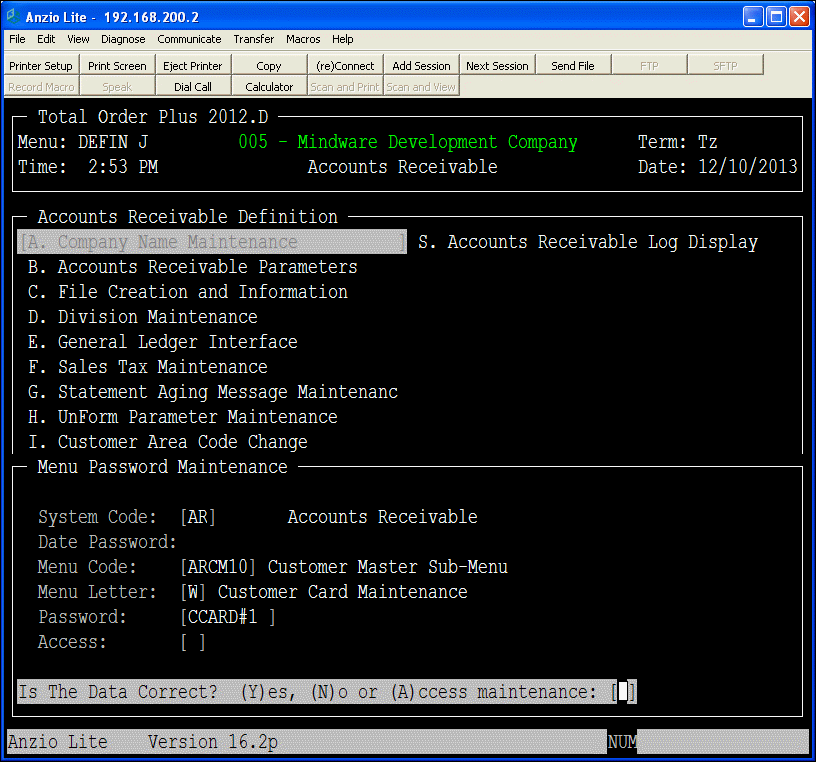
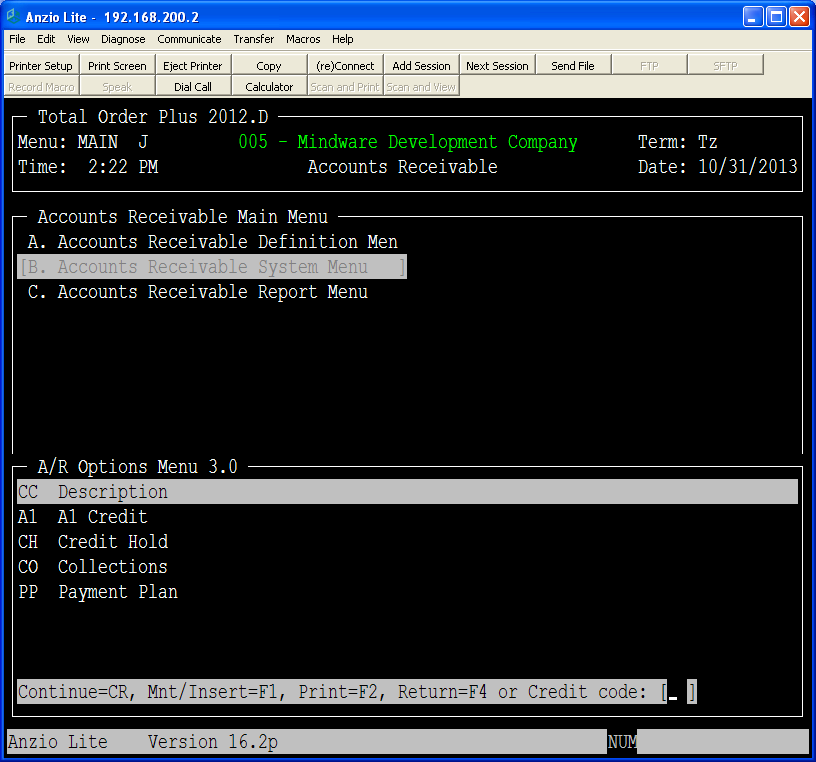
To sort label print by customer type code, type 2 characters per customer type. A ? will display the A/R Options Menu –>  Select Customer Type option.

Type the salesperson to include or type ? to display the Salesperson selection window. Leaving the field blank will include all salespersons.

Label codes can be assigned in the Customer Master. To sort label print by label code, type up to 5 label codes, two characters each or leave blank to include all.

To sort by Date Last Sold, only customers having a last date sold equal to or greater will be included.

To sort by Prior Year To Date sales, type an amount to include or leave field blank to include all.

If you enter Year to Date sales dollars, only customer with sales equal to or greater will be included. To include only customers with zero sales, type ZERO in this field.

Number of labels per customer can be from 1 to 999.

You have an option to include or not include ship to addresses in the label print or only print labels for ship to addresses.

There are multiple sort options that will allow you to limit the number of labels that print or you can leave the option blank not to include any options. Select 1 to print customer code on the label, 2 to print last sold date, 3 to print YTD sales and last sold date, 4 to print last sold date and YTD sales, 5 to include contact name, 6 to print telephone number, 7 to include contact name for a specific year in the history file or 8 to include notary.

You can specify if you want to print the customer’s telephone number on each label.

Each customer has a contact type in their master record. If you want to print only certain customer types, enter two characters per type code.

Type a discount level code to include or leave field blank to include all.

You must select whether or not you are using UnForm formats to print the labels.

Note:  If you select to use UnForm, you must select a printer on the TOP printer menu that is set up for UnForm labels. You can also select to print labels to a PDF file which will allow you to review label information before printing, print on another printer not connected to TOP, print a single page or range, email to another user to print labels, etc.

Select to include all customers or to exclude inactive customers.
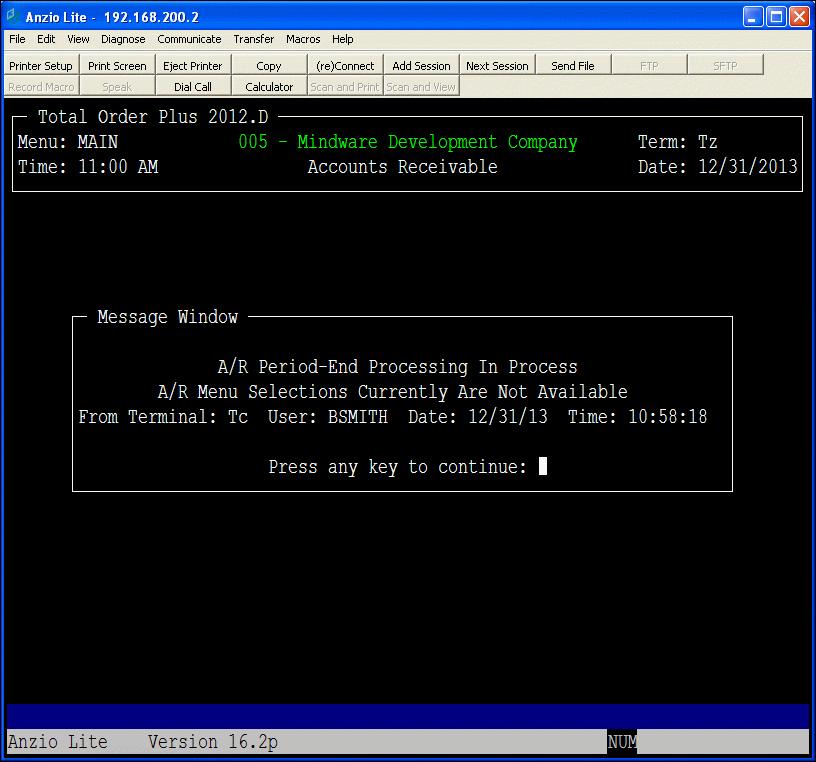
Note:

If you select to not print inactive customers, please note that customers who are also not active for a mailing list will not print a label either.

To format the label size, select the number of lines before and after each label.

 Note:  There are 6 lines per inch.  For example, a 3 inch label would have 18 lines

Type the number of columns to the right where you want the label information to print.

Note:   If you are using UnForm, the number of columns must be one. The size of the label calculated will display on your screen.

CUST_LABELS


Customer Product Sales Purge

Total Order Plus accumulates important invoice data into multiple history files on a daily basis. The files are of a dynamic, multi-keyed structure, which means they continue to increase in size and should be purged on some kind of a time table. In the Business Basis language, there is a maximum file size limit. If a file reaches the maximum, you will not be able to access the file or to down size it to it’s current size. As the file capacity increases, the size of the hard drive decreases as well.

The Customer Product Sales Purge program is located on the PM Options Menu. To access the purge programs, type ?PM at the TOP Main Menu and Select C. Cust Prod Sales. You will be asked to enter a year to purge. All product sales for that year will be purged.

The Customer Sales by Product display program is on the Customer Master Sub-Menu . There is also a hard copy print program on the Accounts Receivable Customer Sales Report Menu.

Cash Receipts History Purge

Total Order Plus accumulates important invoice data into multiple history files on a daily basis. The files are of a dynamic, multi-keyed structure, which means they continue to increase in size and should be purged on some kind of a time table. In the Business Basis language, there is a maximum file size limit. If a file reaches the maximum, you will not be able to access the file or to down size it to it’s current size. As the file capacity increases, the size of the hard drive decreases as well.

The Cash Receipts History Purge program is located on the PM Options Menu. To access the purge program, type ?PM at the TOP Main Menu and Select B. A/R C/R History. You will be asked for the year to purge.  The last year purged information is displayed on the right side of your screen. You will have the option of saving the purged data to a history folder in case you want to have access to the data through a history search.

There is a Cash Receipts History display program on the Accounts Receivable Options Menu as well as in the Find Order/Invoice Utility on the Order Entry System Menu. There are hardcopy print programs on the Accounts Receivable Report Menu.

Cash_Receiipts_purge

How to Use ‘MISC’ Cash Receipts Option

When entering cash receipts in TOP, there are instances when you need to allocate a receipt to a General Ledger account number. You may have an insurance refund check, a rent payment returned, a customer that will not pay an entire invoice or only pay a partial payment, a vendor that may refund a discount, etc. These instances are when you need to be able to distribute monies to a G/L account.

The screen below displays when you are at the Invoice Number field. Type MISC to display a second input screen.

AR_MISC_CASH

ar_misc_cash2

Reset Accounts Receivable Period-End Flag

Total Order Plus has added an option on the Accounts Receivable Period-End Processing menu that sets a flag when you begin the End-of-Month procedure. This prevents another user from accessing the Accounts Receivable module during this process until it is complete.

When you set the flag in Begin Period End Process menu selection, you will be asked ‘Set End-of-Period Status? (Y)es or (N)o – Note: This Will Lock Other Users Out Of Accounts Receivable’. If you do not want to continue closing the month, you must answer No to return to the menu. If you answer Yes, TOP sets the flag and does not remove it until the Period End is complete. You will see this message flashing on your screen once the flag is set –  ‘A/R Period-End Processing in Process’ and it will remain on your screen until the entire procedure is completed. If another user tries to access the A/R module during the closing, you will see the message below.

ar_end_of_month_flag

If you accidentally answer Yes, you can remove the flag by going to the A/R Definition Menu  ->  Select Accounts Receivable Parameters and answer Yes to remove the flag. The user that sets the flag is the only one that can remove the flag.

ar_end_of_month_flag


Password Protect Customer Credit Card Information

Some of our customers have been apprehensive about using Customer Card Maintenance on the Customer Sub-Menu. They do not want the credit card information to be available for all employees to see. Total Order Plus allows you to set up a password to prevent anyone without authorization to access the information.

To set up the password, access the Total Order Plus Main Menu  ->   Accounts Receivable  ->  Accounts Receivable Definition Menu  ->  Password Maintenance.

The System Code is AR, Menu Code is ARCM10 and the Menu Letter will be W on the Customer Sub-Menu. Type your password for Customer Card Maintenance and leave the Access Code blank. Whenever anyone tries to access the maintenance program, they will need to be aware of the password in order to see the customer credit card information.

For more information on credit card security, click on the link below.

www.mindwarecorp.info/top-accounts-receivable/credit-card-access/

credit_card_passwd

TOP Contacts

Two_CentsMy Two Cents, by Archie Tucker


Are you getting the most out of your contact information? Each customer and vendor can have up to 99 contacts. Besides the obvious uses, this information can be used for emailing, sending UPS tracking information and updating contacts on other systems. Updating contacts on other systems is what we will be covering in this post.  Examples of other systems would be:

  • PC
  • Smartphone
  • Tablet
  • Google Plus
  • Web Based Newsletter

To export customer contacts, use the Export Contacts for Outlook on the A/R Import/Export File Menu. For vendor contacts, use the Export Contacts for Outlook on the A/P Import/Export File Menu. Both programs have numerous options for exporting. A new file format, vCard (format for electronic business cards) has just been added to both contact exports.

Accounts Receivable Credit Codes

TechLine

The Tech Line, by Joanne Simmons

Question:

Several of our customers are having credit issues on paying their invoices. Some of them are past due by many months, some are making partial payments, others on a payment plan, etc.  How can we designate which ones have these different issues?

Answer:

Total Order Plus allows you to set up various credit codes in Credit Code Maintenance on the A/R Options Menu. If you have a customer that is past due by many months, you should assign the credit code CH (Credit Hold) to their account by accessing the Credit Code field under Customer Status Maintenance on the Customer Master Sub-Menu. TOP will not allow any orders or invoices to be processed for that customer until the code is altered or removed. Any credit code that has a ‘C’ as the first character will be treated as a Credit Hold during Invoice Entry but not Order Entry.

CH can be automatically set using the Credit Hold Update on the A/R System Menu. It uses the Order Entry Terms Code Maintenance Credit Hold value for the number of days before putting an account on credit hold. There is an override flag in the Customer Master (Update CH) that allows you to bypass an account during the Credit Hold Update.

To categorize the other customers, you can set up multiple credit codes to describe their situation. For example, CO – Collections, PP – Payment Plan, WO – Write Off, etc.

AR_Credit_Code

UnForm Parameter Maintenance

The Accounts Payable, Accounts Receivable, Purchase Order and Order Entry modules each have an UnForm Parameter Maintenance program on each of the above mentioned Definition Menus. You are able to set up parameters for each form you want printed in TOP:  checks, statements, purchase orders, orders, invoices and quotes.

Forms names to be used are displayed at the bottom of your screen: CHECK, PO, STATEMENT, ORDER, INVOICE and QUOTE. You can set up a maintenance screen for each division of your company, if applicable, and assign a specific printer for each form.

You can have a custom logo file made with your company information and assign column and line print positions of where you want the logo to print on each form.

You can have up to four copy descriptions, pricing or no pricing, screening or no screening and designate which paper tray on each printer.

You can enter up to two message lines and select either plain, bold or italic or a combination for the message lines format.

Notes:

To view the TOP Help Menu, you can press CTRL+Y at each input field to view the help options.

UNFORM_PARAM

Cash Receipts Rebuild Utility

The Rebuild Options Menu provides utility programs that are necessary to reconstruct data files under certain conditions for A/R, P/O, A/P, I/C, O/E and S/A modules. Among those selections is the Accounts Receivable Cash Receipts rebuild option.

During Cash Receipts Data Entry, the payment amount is stored in the invoice record in the open invoice file as cash paid today. In case of a power outage, error in processing or an intermittent problem, the cash receipt could be out of balance and won’t allow you update the deposit or to access the deposit to make corrections.

The rebuild utility program will read the open invoice file and reset the payment status for each open invoice. You will want to delete the current deposit that is out of balance before running the rebuild.

To access the rebuild utility, go to the TOP Main Menu, enter ? to display an options menu and type RB as the options menu code. You can also type a ? at any of the other modules options menu and enter RB. You will select option C. A/R Cash Receipts.

You have an option to print a listing of the invoices you will be clearing and then you can re-enter the deposit again.

CASH_RECEIPTS_REBUILD