Author Archives: Archie Tucker

Steps Prior to Entering a New Inventory Item

Prior to entering a new inventory item, you must first set up segment one codes (and segment two codes, if applicable) and distribution codes located on the Inventory Control Definition Menu. You must also enter product categories and discount classes, located on the Inventory Control Options Menu.

Segment One codes can be used for pricing only, tracking items in inventory, a kit item or manufactured item code. Segment Two defines the manufacturer.

Distribution Code Maintenance is used to tell the system which General Ledger accounts to debit and credit when posting inventory transactions, physical count or sales data. You must set up distribution codes whether or not you are interfaced to the G/L. When you add a new item to the Inventory Master, you assign one of your distribution codes to that item. This tells the system which set of accounts to use when posting the daily transactions.

The product category can be up to 3 characters, with a description of up to 30 characters.  The product code is used to maintain product categories which are used for reporting sales figures for customers on a monthly basis.

The  discount class code is 2 characters in length and the description is 24 characters.  Discount levels are used to automate the discount process in order entry. During order entry, the system checks the customer for a discount level and the item for a discount class to find a discount percentage in the Item Discount Class file.

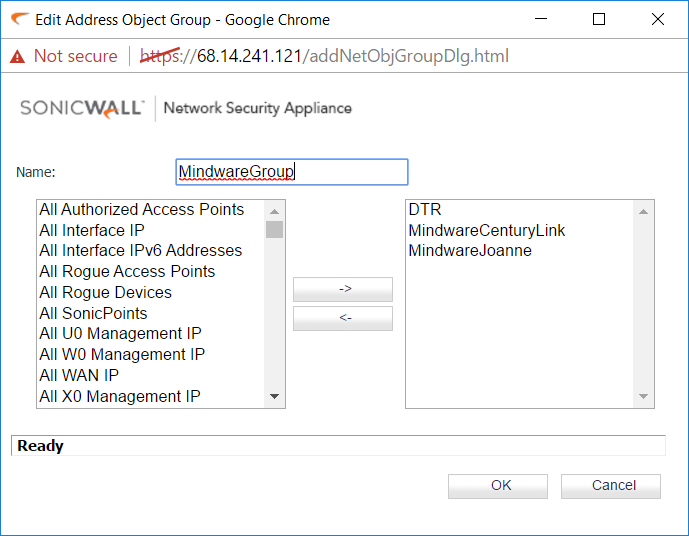


Add Address Objects/Groups to Sonicwall

To add address objects for access to a customer’s Sonicwall, you will need to login to their unit and follow the instructions below:

In your browser, enter  https:// plus the WAN IP address

Select Network  –>  Address Objects to display the current Address Objects and Groups

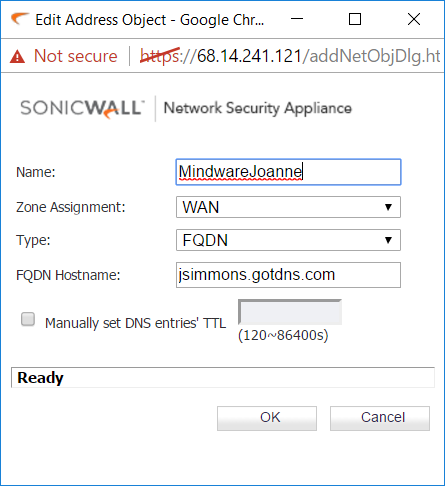
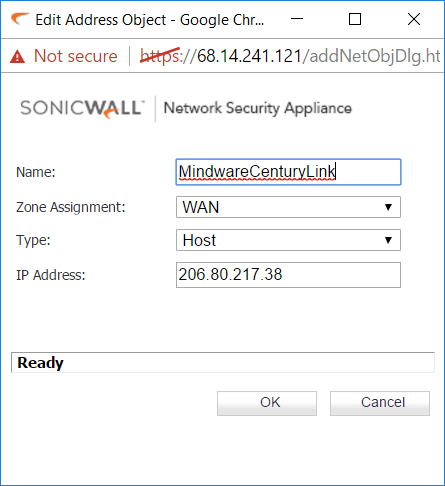
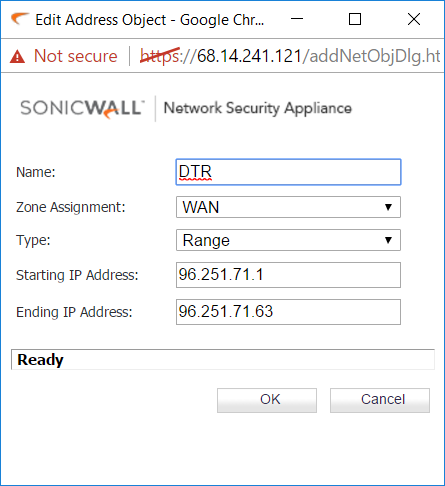
Click on Add to enter either one or the other – below are the screen shots for each:

object1object2 object3 object4

How to Remove the BackupEdge schedule.lck file(s)

When BackupEdge begins a scheduled Job, it checks for the existence of a lock file called /usr/lib/edge/lists/(jobname)/schedule.lck. If this file exists, it assumes that another instance of the Job is currently running, and terminates without beginning a backup. An appropriate email message is sent to the user designated to receive failure notifications. If the /usr/lib/edge/lists/(jobname)/schedule.lck file does not exist, BackupEdge creates it. If a backup terminates properly, with either a pass or fail status, the schedule.lck file is automatically deleted. If the file is not deleted prior to the next scheduled backup, it will create an additional lock file schedule.lck00, etc. until the lock files are removed.

Login:   root

Password superXXX

To remove the lock files, you can enter this command:

cd  /usr/lib/edge/lists/(jobname)  (i.e.  A, TOP, TOP_DATA001, etc.)

To list the files and see if there are multiple lock files, enter this command:

ls   -l

Remove the lock file(s) using this command:

rm  schedule.lck  schedule.lck00, etc.

Type exit to return to the login prompt.


Basis BLM Install Instructions

Log in to www.basis.com  ->  Select Products  ->  Downloads  ->  Basis License Manager  ->  Platform/Availability  ->  Microsoft Windows AMD64  ->  Oracle JDK Download and agree to license agreement.  Select Windows x64 download.

Open Java Download  ->  Select Next  ->  Next  ->  Next for destination folder  -> Close

Under Downloads select BBj Package (includes BLM)

Enter Contact info (use customer information except for Name and Email)  ->  Select Download

Open Java Installation file (JAR)

Language Selection Window

Select Next

Welcome Window

Select Next

License Agreement Window

Select Accept  ->  Select Next

Directory Selection Window

Enter C:\TOP\bbj  ->  Select Next

JVM Selection Window

Select Next

Installation Type Selection Window

Select Typical  ->  Select Next

Configure Web Start Window

Select Trust Basis  ->  Select Next

Web Start Certificate Window

Enter Company Name

Jetty Host (External) defaults to top2-PC

Jetty Port defaults to 8888

Select Next

Installation Summary Window

Select Next

Basis UAC Configuration Window

Select Use standard privileges  –>  Select Next

Retrieve a License Option WIndow

Select Retrieve a license  –>  Select Next

Registration Window

Company Name:  Enter company name

First Name:  Archie

Last Name:  Tucker

Email Address:  [email protected]

Phone:  480-282-2078  ->  Select Next

License Registration Information

Serial Number:

Authorization:

User Count:  (Skip)

Host Name: (Default)

Host ID:  (Default)  ->  Next

License Registration and Delivery Methods Window

Select Registration and install a license automatically  ->  Select Next

Configure BLM Startup Window

Configure the BLM to run as a Windows service

Startup Type:  Automatic  –>  Select Next

Stop/Start the Basis License Manager

Start the Basis License Manager  ->  Select Next

Configure BBj Services should run automatically after user login  ->  Select Next

Start/Stop BBj Services Window

Start BBj Services  ->  Select Next

The Wizard Process Complete Window

Select Finish


Anzio Lite .bash_profile Red Hat Linux

Below is an example of what should be set up in each user’s profile in order to be able to login to TOP using multiple sessions but only one BBx license.

Login as root and enter this command:

cd /home/user_name

vi .bash_profile

Add the following code:

# Get the aliases and functions

if [ -f ~/.bashrc ]; then

. ~/.bashrc

fi

# User specific environment and startup programs

PATH=$PATH:$HOME/.local/bin:$HOME/bin

export PATH

FACETTYPE=FacetWin;export FACETTYPE

FACETWININFOSEQ=ENABLED;export FACETWININFOSEQ

printf “\034env/s anz ip\035”

read FACETWINIPADDRPC

export FACETWINIPADDRPC

cd /a/top

exec /a/top/top

exit


NNA01 – Montana Stamp Manual

NNA01 – Montana Stamp Manual

Montana System Overview
Stamp text is entered using Microsoft Word. InDesign is used to format the text into stamp images.

Naming and Location Information
Data and templates are located in: C:\Users\mfg\Desktop\Montana Stamps
Word text document: MTData.docx
InDesign template: New MT_Page.indt

How To Information
Open MTdata.docx and edit stamp text
Open New MT Page.indt
Click on Text tool
Select text box in upper-right-hand corner
Push CTRL+D and select MTData.docx
Data from MTData.docx will automatically flow into text boxes to create stamp artwork

Sample Information
Below is a sample for the text entered in Word for MTData.docx. The text is AvantGarde Md BT 8 point centered, except for the first name line which is 6 point. The text begins with the word MONTANA, and each stamp is 7 lines. the example below is for 2 stamps.

MONTANA
John Doe
JOHN DOE
NOTARY PUBLIC for the
State of Montana
Residing at Billings, MT
My Commission Expires
December 31, 2018
Jane Smith
JANE SMITH
NOTARY PUBLIC for the
State of Montana
Residing at Great Falls, MT
My Commission Expires
March 22, 2019

General Ledger End of Year Closing Procedure

Select General Ledger on the TOP Main Menu  –>  Select General Ledger System Menu  –>  Press F5 to set your date to the last day of the year you are closing  –>  Select General Ledger End-Of-Year Processing

Messages will display on your screen to make sure you have made all journal entries for the year prior to closing:

YOU HAVE SELECTED TO CLOSE THE YEAR
Entries Cannot Be Made To A Closed Year

Press any key to continue:

      Warning! Entries Cannot Be Made To A Closed Year
All Posting And Journal Entries
Must Be Completed Before Closing The Year

 Press any key to continue:

Type Yes to begin the year-end update for the year-end date displayed  –>  Type Yes to clear yearly summary of postings for the current year

Select a printer for the Period Summary of Postings —>  TOP will post closing entries to all income and expense accounts so the beginning balance for the new year will be zero

Type Yes if the summary of postings printed correctly  –>  Type Yes if the trial balance printed correctly

Message on your screen displays that the Year-End Processing has been completed. The current period and the date for the new year is updated in Accounting Period Maintenance.

General Ledger End of Month Procedure

Select General Ledger on the TOP Main Menu  –>  Select General Ledger System Menu  –>  Press F5 to set your date to the last day of the month you are closing  –>  Select End-Of-Period Processing

Current Accounting Period and Ending Date will display on your screen  –>   Type Yes to continue

EOM_PROCEDUREPeriod End Processing Procedures display on your screen  –>  Type Yes to continue with the period-end procedure

TOP will check to make sure all journal entries, recurring entries, allocating entries and tax provisions are updated for the current month. You have the opportunity to select to print the summary of postings, trial balance and financial statements to a printer or to a PDF file stored in the EXPORT folder.

Notes:

TOP will keep track of each procedure as it is completed. If you exit the process at any time, the end of month process will continue where it left off upon reentry. System will automatically update the current period in Accounting Period Maintenance upon completion.


NNA01 – Round Stamp Manual

Auto Layout – Adding a New Style
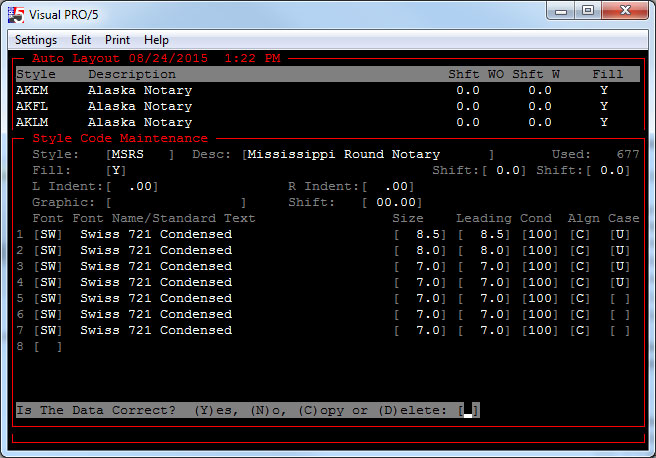
The style number is the State Code plus the Group Code (example ARRS, Arkansas + Round Self-Inking). It’s easier to use the (C)opy option to add a new style (see bottom of screen below).

MSRSStyleScreen

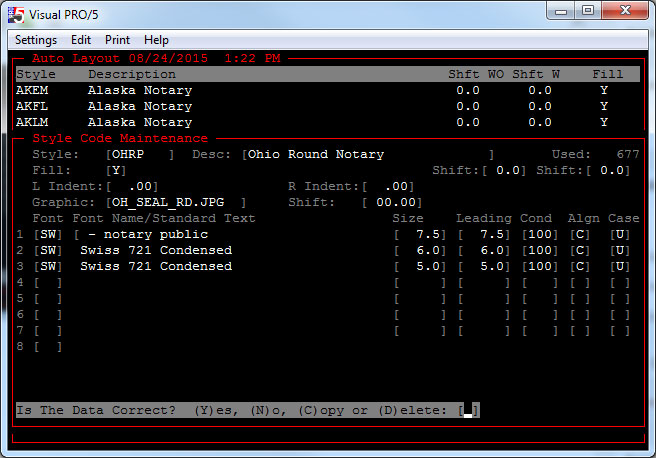
This is an example of a round notary that includes a graphic (Ohio). The ” – notary public” below adds the next to the end of the text line from the NNA system. The NNA system can only add text to the beginning.

OHRPStyleScreen


OMS Blank Line
To export a blank line from OMS system enter <BLANK_LINE>

OMS MEMO Codes

  • MEMO1 – Commission Name (John Doe)
  • MEMO2 – County (Los Angeles County)
  • MEMO3 – Comm Exp Date (Jan 31, 2018)
  • MEMO4 – Comm Number (123456.)
  • MEMO5 – Comm Exp Date, Full Month (March 1, 2018)
  • MEMO6 – Addt’l Info
  • MEMO7 – Street Address
  • MEMO8 – City, State, Zip Code

InDesign Creative Cloud Account
Email: [email protected]
Password: P@ssw0rd1

InDesign Text Box Mapping
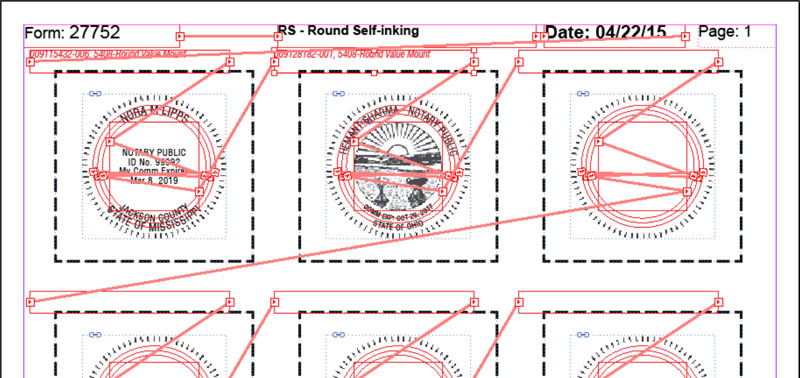
Line numbers also correspond to line numbers in OMS setup

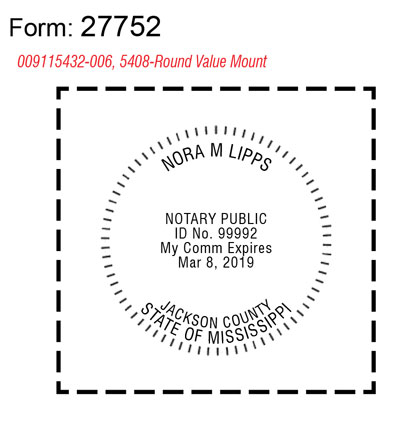
  • Line 1: Top Arch (NORMA M LIPPS) – OMS: MEMO1
  • Line 2: Bottom Arch, Bottom Line (STATE OF MISSISSIPPI) – OMS: STATE OF MISSISSIPPI | blank
  • Line 3: Bottom Arch, Top Line (JACKSON COUNTY) – OMS: blank | MEMO2
  • Line 4: 1st Line Center Text Box (NOTARY PUBLIC) – OMS: blank | NOTARY PUBLIC
  • Line 5: 2nd Line Center Text Box (ID No. 99992) – OMS: ID No. | MEMO4
  • Line 6: 3rd Line Center Text Box (My Comm Expires) – OMS: My Comm Expires | blank
  • Line 7: 4th Line Center Text Box (Mar 8, 2019) – OMS: blank | MEMO3
  • Line 8: 5th Line Center Text Box – OMS: blank | blank

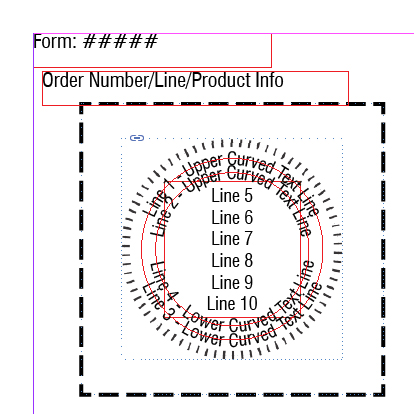
Line Mapping For Round Template

RoundStampTemplateSample

RS_27752


Text Links

RoundTextLinks


Creating Text On A Path

Select Ellipse Tool. Hold Shift Key while using mouse to create frame (to keep circle round). Then select Type On A Path Tool (Shift + T) and click on the path (circle created above). To flip the text path select Type > Type On A Path > Options. From the Options select Center for Align.

Breaking Text Thread

Double-click on an in port or out port to break the connection between frames.

Files/Programs Changed

  • ALIF60 – AL File Import Program
  • ALCE60.BBJ – AL Create Batches for InDesign
  • RS_Round_Page.indt – InDesign Template
  • RP_Round_Page.indt – InDesign Template
  • RS script – InDesign script file

Sample InDesign VB Script

Rem RS Script

Rem  SCRIPT INFO
Rem  ———–

Rem  Copyright Mindware Corporation Of America
Rem  Author:  Archie O Tucker
Rem  Created: 03/25/15
Rem  Revised:
Rem  Description:
Rem  Calls CreateBatch

Rem  SET VALUES
Rem  ———-

Dim myInDesign

Set myInDesign = CreateObject(“InDesign.Application.CC”)

Set FileSys = CreateObject(“Scripting.FileSystemObject”)

myGroupCode = “RS”

myTemplateForm = “RS_Round_Page”
myPrintPercent = “100”

Rem  CALL CREATEBATCH SCRIPT
Rem  ———————–

myInDesign.DoScript “C:\Program Files\Adobe\Adobe InDesign CC (64 bit)\Scripts\Scripts Panel\CreateBatch.vbs”,idScriptLanguage.idVisualBasic,Array(myGroupCode,myTemplateForm,myPrintPercent)

InDesign VB Script Notes

To trouble shoot script errors, add message prompts like below:
MsgBox “Batch File ” & myTextFile & ” Not Found”

Sample STAMPS.TXT File

1234567890123456789012345678901234567890 (Position Ruler)
00607221400100000015405NP_________APTXCATHLEEN FLANIKEN<r>My Commission Expires<r>April 14, 2019

Round Stamp Graphics

R_DT_BD.JPG
DOT_BORDER


R_DT_WNG.JPG

R_DT_WNG


R_DT_WNG_NOT.JPG
DOT_SYMBOL


R_WNG.JPG

R_WNG


R_OH_SEAL.JPG
OH_SEAL_RD


Windows Character Map
Enter charmap from the Run Command dialog box or the command line. Also from the Accessories > System Tools.

NNA01 – 2015/08/24 Trip – Round Notary Stamps – Additional New States

Next Trip

  • Complete new RS_Round_Page and RP_Round_Page templates (will require changing AL styles and OMS styles
  • Fix IOWA, missing commission number on manuscript, but is in file from OMS
  • Test KANSAS, bottom underline, sending x from OMS
  • Test MAINE, spacing in middle
  • Add additional states

08/24 – Monday

  • Add style for AK and do test run
  • Work on Arizona Seal – AZ_SEAL_RD.JPG
  • Create WordPress Post for Round Stamp Documentation
  • Add Post for Setting up a new Style
  • Create InDesign page for new round stamp samples
  • Get login/password for Adobe
  • Install InDesign CC 2015 Upgrade

08/25 – Tuesday

  • Work on AZ Round Seal logo
  • Work on Wings logo
  • Add styles for AZ & ME for both RS & RP
  • Do testing on AZ & ME
  • Delays because of Auto Layout PC problems
  • Work on problem with scripts and InDesign CC 2015
  • Get new email/password for Adobe
  • Reload InDesign CC (x64), problems with scripts and InDesign CC 2015
  • Work on new InDesign template for 2 lines on top of round stamps

08/26 – Wednesday

  • Add logo new logo for just wings
  • Rename all round logos to begin with a R_
  • Add styles for AK and ID
  • Test new styles AK and ID, plus ME
  • Add styles for CT, DE, IA, KS & KY
  • Copy changes

InDesign Text Box Mapping
Line numbers also correspond to line numbers in OMS setup

  • Line 1: Top Arch (NORMA M LIPPS)
  • Line 2: Bottom Arch, Bottom Line (STATE OF MISSISSIPPI)
  • Line 3: Bottom Arch, Top Line (JACKSON COUNTY)
  • Line 4: 1st Line Center Text Box (NOTARY PUBLIC)
  • Line 5: 2nd Line Center Text Box (ID No. 99992)
  • Line 6: 3rd Line Center Text Box (My Comm Expires)
  • Line 7: 4th Line Center Text Box (Mar 8, 2019)
  • Line 8: 5th Line Center Text Box

RS_27752


Text Links

RoundTextLinks

Graphics

  • OH_SEAL_RD.JPG – Ohio Seal for Round Notary
  • DOT_BORDER.JPG – Inter border made of dots used with some states

Files/Programs Changed

  • ALIF60 – AL File Import Program
  • ALCE60.BBJ – AL Create Batches for InDesign
  • RS_Round_Page.indt – InDesign Template
  • RP_Round_Page.indt – InDesign Template
  • RS script – InDesign script file

Sample InDesign VB Script

Rem RS Script

Rem  SCRIPT INFO
Rem  ———–

Rem  Copyright Mindware Corporation Of America
Rem  Author:  Archie O Tucker
Rem  Created: 03/25/15
Rem  Revised:
Rem  Description:
Rem  Calls CreateBatch

Rem  SET VALUES
Rem  ———-

Dim myInDesign

Set myInDesign = CreateObject(“InDesign.Application.CC”)

Set FileSys = CreateObject(“Scripting.FileSystemObject”)

myGroupCode = “RS”

myTemplateForm = “RS_Round_Page”
myPrintPercent = “100”

Rem  CALL CREATEBATCH SCRIPT
Rem  ———————–

myInDesign.DoScript “C:\Program Files\Adobe\Adobe InDesign CC (64 bit)\Scripts\Scripts Panel\CreateBatch.vbs”,idScriptLanguage.idVisualBasic,Array(myGroupCode,myTemplateForm,myPrintPercent)

Sample STAMPS.TXT File

1234567890123456789012345678901234567890 (Position Ruler)
00607221400100000015405NP_________APTXCATHLEEN FLANIKEN<r>My Commission Expires<r>April 14, 2019

Round Stamp Graphics

DOT_BORDER.JPG
DOT_BORDER


DOT_SYMBOL.JPG
DOT_SYMBOL


OH_SEAL_RD.JPG
OH_SEAL_RD


Next Trip

  •  Add additional states that offer round notaries
  • Some additional states may be a problem since they have wrapped text within the inter text box