Category Archives: Technical Documention

Install New Basis License

This is for installing a new license file (for example, to increase the number of user licenses).

Start Basis Utility

Go to the bin folder, example cd /usr/local/basis/bin
Enter ./admin to start the utility script

Enter 1 to select License Registration, then press ENTER
Press 1 for Next and ENTER

Register for a License

Press 1 to Continue and ENTER
Enter Product License Information (Company, Name, Email, Phone)
Press 1 for Next and ENTER

License Registration Information

Press 1 for Continue and ENTER
Requesting a 30-day evaluation license? [no]
This is a notebook computer? [no]
Product License Information
Serial Number:[BBX######]
Auth Number:[##########]
User Count:[]
Host Name:[top.rh.local] (example)
Host ID:[COMPOSITE=A2F8CD3C1D3B] (example)
Press 1 for Next and ENTER

License Registration and Delivery Methods

Press 1 to Continue and ENTER

Automatic Licensing

Register and install a license automatically?[yes]
Press 1 for Next and ENTER
Information: License file renamed for safekeeping….

Wizard Process Complete

Press 1 to continue and ENTER
The wizard process is now complete

Remote Desktop Client PC Setup in Windows 10

Remote Desktop Host PC Setup in Windows 10

How to Remove the BackupEdge schedule.lck file(s)

When BackupEdge begins a scheduled Job, it checks for the existence of a lock file called /usr/lib/edge/lists/(jobname)/schedule.lck. If this file exists, it assumes that another instance of the Job is currently running, and terminates without beginning a backup. An appropriate email message is sent to the user designated to receive failure notifications. If the /usr/lib/edge/lists/(jobname)/schedule.lck file does not exist, BackupEdge creates it. If a backup terminates properly, with either a pass or fail status, the schedule.lck file is automatically deleted. If the file is not deleted prior to the next scheduled backup, it will create an additional lock file schedule.lck00, etc. until the lock files are removed.

Login:   root

Password superXXX

To remove the lock files, you can enter this command:

cd  /usr/lib/edge/lists/(jobname)  (i.e.  A, TOP, TOP_DATA001, etc.)

To list the files and see if there are multiple lock files, enter this command:

ls   -l

Remove the lock file(s) using this command:

rm  schedule.lck  schedule.lck00, etc.

Type exit to return to the login prompt.


Basis BLM Install Instructions

Log in to www.basis.com  ->  Select Products  ->  Downloads  ->  Basis License Manager  ->  Platform/Availability  ->  Microsoft Windows AMD64  ->  Oracle JDK Download and agree to license agreement.  Select Windows x64 download.

Open Java Download  ->  Select Next  ->  Next  ->  Next for destination folder  -> Close

Under Downloads select BBj Package (includes BLM)

Enter Contact info (use customer information except for Name and Email)  ->  Select Download

Open Java Installation file (JAR)

Language Selection Window

Select Next

Welcome Window

Select Next

License Agreement Window

Select Accept  ->  Select Next

Directory Selection Window

Enter C:\TOP\bbj  ->  Select Next

JVM Selection Window

Select Next

Installation Type Selection Window

Select Typical  ->  Select Next

Configure Web Start Window

Select Trust Basis  ->  Select Next

Web Start Certificate Window

Enter Company Name

Jetty Host (External) defaults to top2-PC

Jetty Port defaults to 8888

Select Next

Installation Summary Window

Select Next

Basis UAC Configuration Window

Select Use standard privileges  –>  Select Next

Retrieve a License Option WIndow

Select Retrieve a license  –>  Select Next

Registration Window

Company Name:  Enter company name

First Name:  Archie

Last Name:  Tucker

Email Address:  [email protected]

Phone:  480-282-2078  ->  Select Next

License Registration Information

Serial Number:

Authorization:

User Count:  (Skip)

Host Name: (Default)

Host ID:  (Default)  ->  Next

License Registration and Delivery Methods Window

Select Registration and install a license automatically  ->  Select Next

Configure BLM Startup Window

Configure the BLM to run as a Windows service

Startup Type:  Automatic  –>  Select Next

Stop/Start the Basis License Manager

Start the Basis License Manager  ->  Select Next

Configure BBj Services should run automatically after user login  ->  Select Next

Start/Stop BBj Services Window

Start BBj Services  ->  Select Next

The Wizard Process Complete Window

Select Finish


Sonicwall VPN Setup

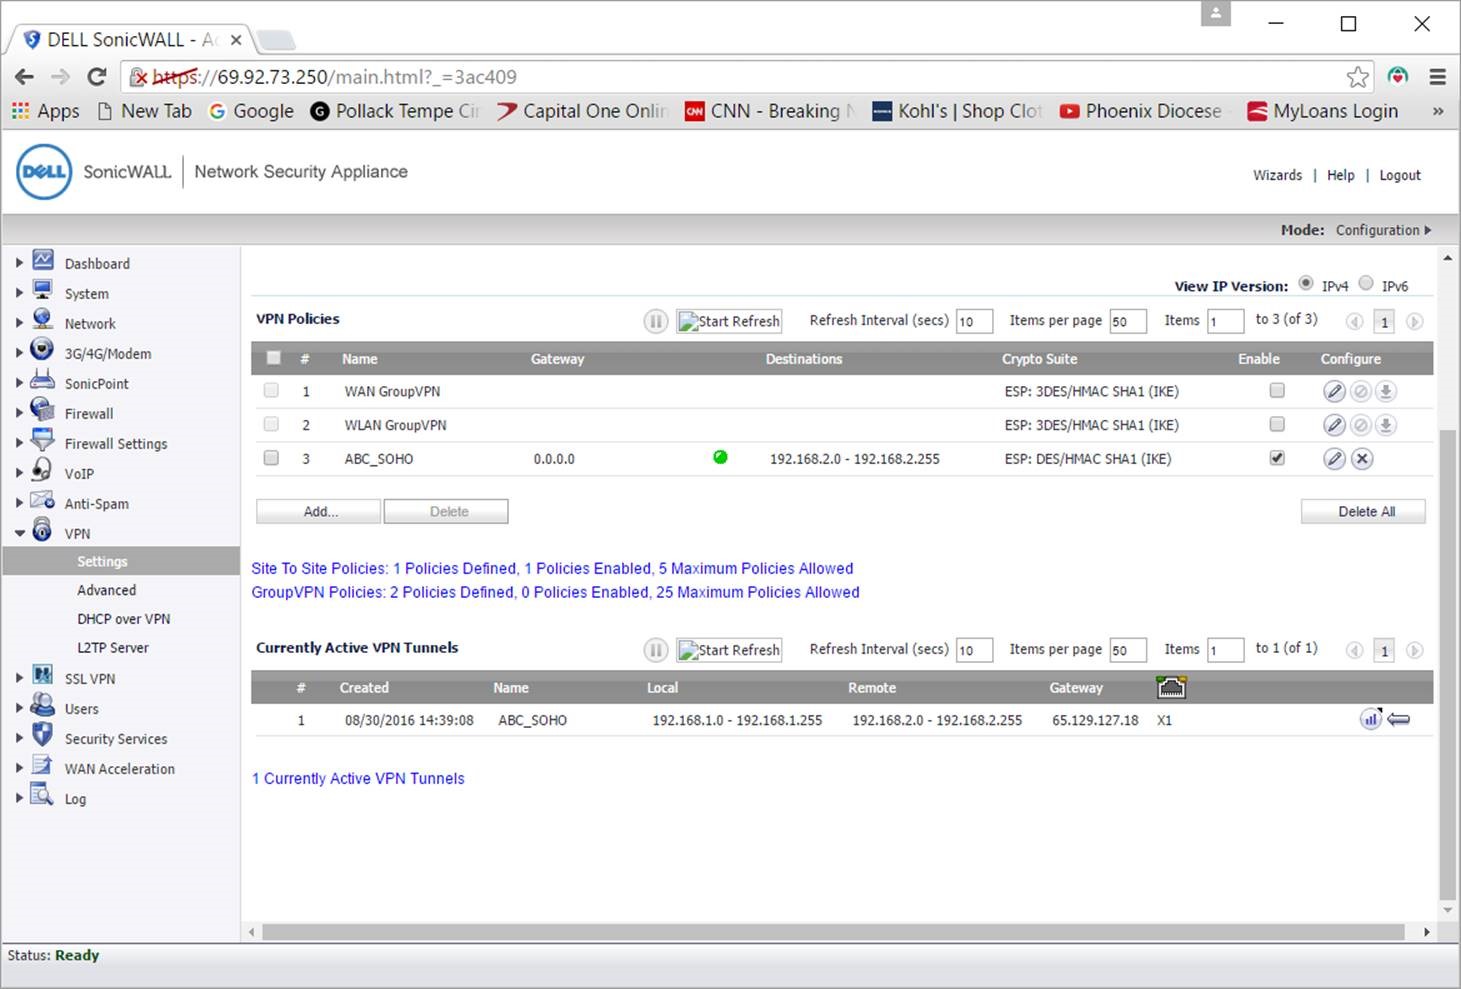
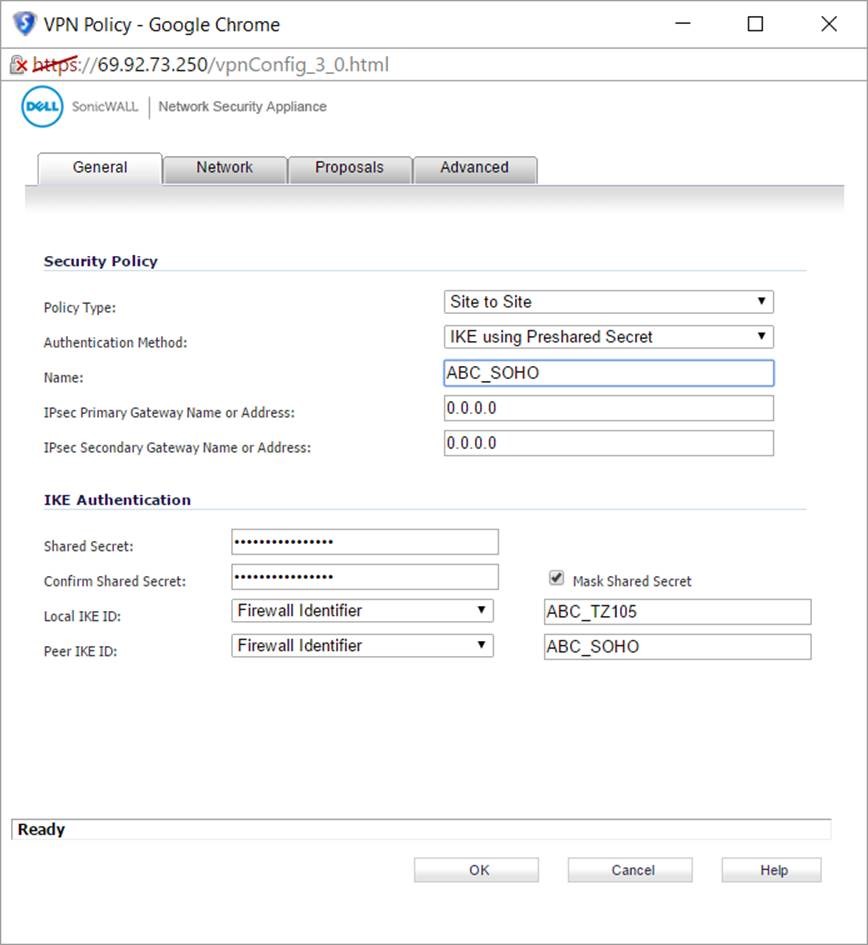
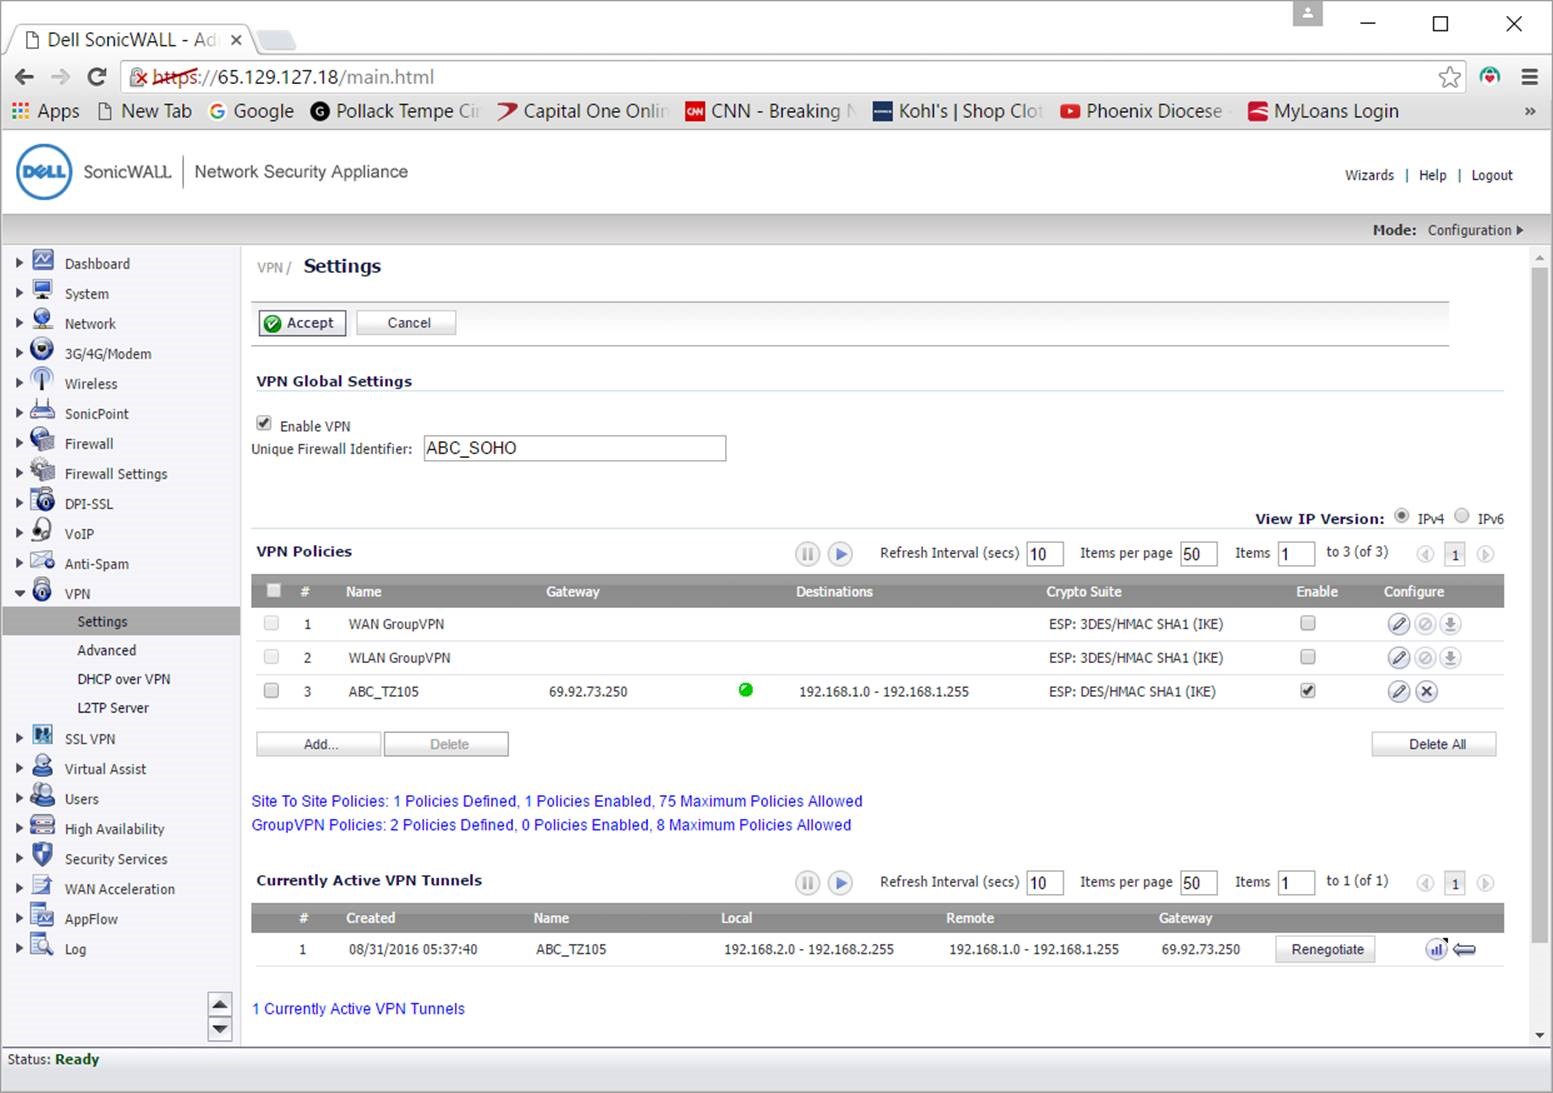
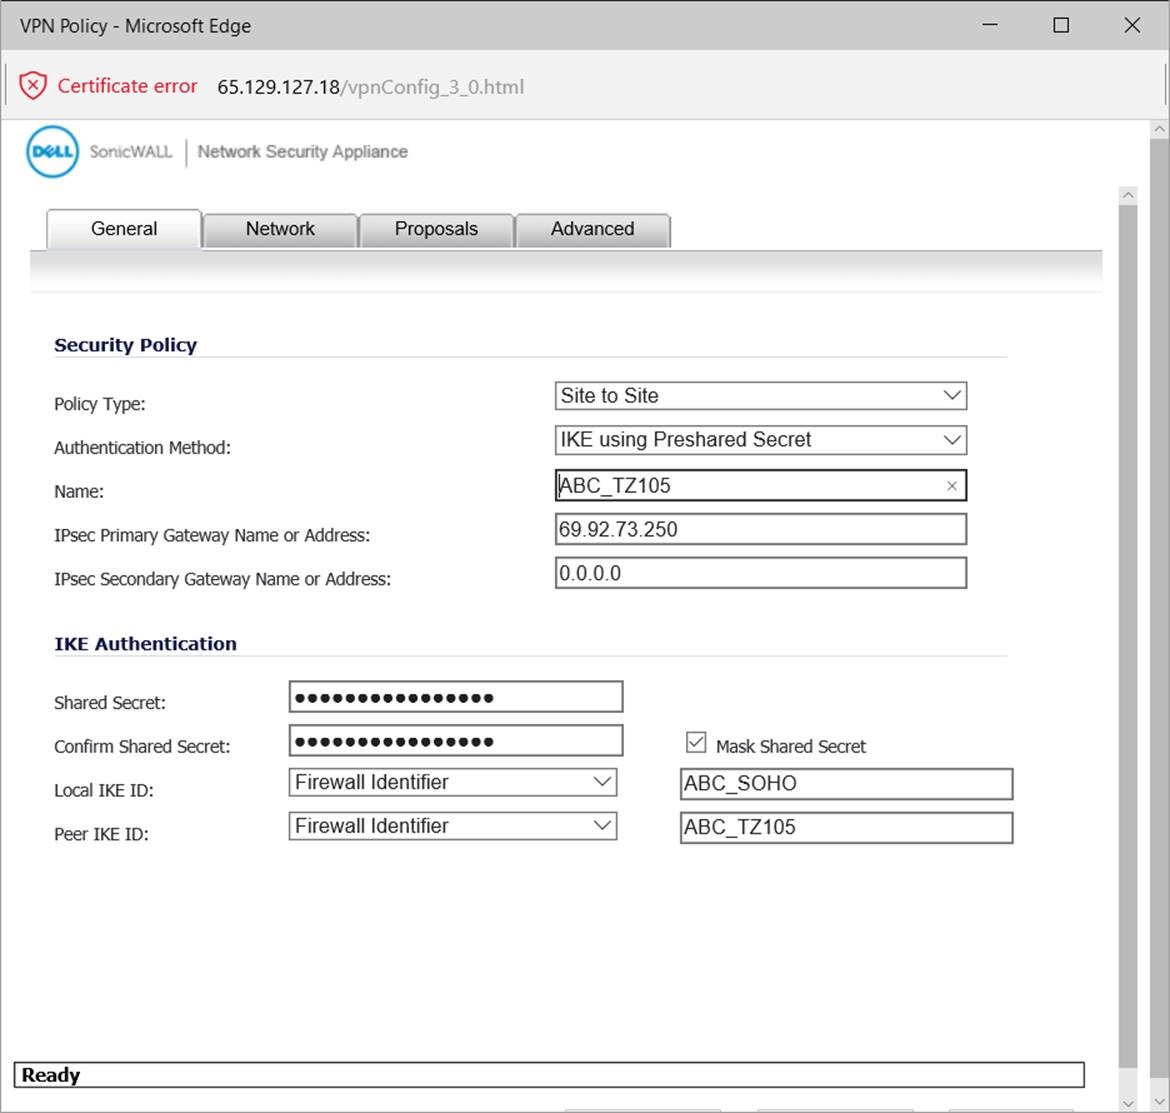
Below are screen shots from a Sonicwall unit and a second Sonicwall unit that connects to the main unit over a VPN connection.

Screen shot of the VPN Policy and Settings setup on the main unit:

VPN _Main

VPN_Policy


Screen shot of the VPN Policy and Settings setup on the remote unit:

Remote_VPN_Main

Remote_VPN

VPRO Windows Network Installation

Notes:  

It is assumed that the network is setup and the printers are configured on the local PC’s.

Create Folders

1.             Create TOP folder

2.             Create TOP\BASIS folder

3.             Create TOP\BASIS\DOWNLOAD folder

4.             Create TOP\BASIS\DOWNLOAD\BLM folder

5.             Create TOP\BASIS\DOWNLOAD\VPRO5 folder

 Install BLM (Basis License Manager)

1.             Download BLM from www.basis.com to TOP\BASIS\DOWNLOAD\BLM folder

2.             Unzip exe file to same folder

3.             Run setup

4.             Select Register for a license  ->  select Next

5.             Select Yes for Software License Agreement

6.             Select Browse and select TOP\BASIS  ->   select Next

7.             Select Next for Program Folder

8.             Select Register for a license  ->   select Next

9.             Enter Contact Info and License Info from License Registration Form  ->  select Next

10.          Select Register and license automatically and select Next

11.          After License successfully istalled message displays  ->  select OK

12.          For Would you like to register for another BASIS License  ->  select No

13.          Select Finish from Installation Complete window

14.          Select OK from Reboot window

15.          Unselect View the readme.txt file and select Finish.

16.          Select Yes for I want to restart my computer now  ->   select Finish

 Install VPRO5

1.             Download VPro5 from www.basis.com to TOP\BASIS\DOWNLOAD\VPRO5 folder

2.             Unzip exe file to same folder

3.             Run setup

4.             Select English  ->  select Next

5.             Select Next from Welcome window

6.             Select Yes for License window

7.             Select Typical Setup  ->  select Next

8.             Select TOP\BASIS folder  ->  select Next

9.             Select Next from Select Program Folder window

10.          Enter name of server  ->  select Next

11.          Select Use standard privileges  ->  select Next

12.          Select Finish from Installation Complete window

Install Total Order Plus On Server

1.             Insert TOP Network Disk into server

2.             Go to MS-Dos Prompt (Start > Programs > MS-Dos)

3.             Make TOP directory, example: MKDIR  C:\TOP

4.             Change directory to TOP, example: CD  C:\TOP

5.             Copy files, example: COPY A:\*.*  C:\TOP

6.             Install each TOP module disk, example: PROGRAM UP

 Setup Configuration File For Server

Sharing A Windows Drive

On server (PC with VPRO5.EXE & TOP) set drive as shareable.

1.             Right click on Start

2.             Select Explore

3.             Right click on Drive to share, example: local C drive

4.             Select Sharing

5.             Select Share As

6.             Enter share name, example: Disk_C

7.             Enter description, example: Server C Drive

8.             Select Full for access

9.             Select OK

Notes:

For sharing to be available it must be set under networking. Right click on Network Neigborhood > Properties > File and Print Sharing >  option to share files. If you change settings, you must restart computer. If a drive is shared, there will be a hand under the drive icon.

 Map Server Drive On Work Station As Drive T

1.             Right click on start button from work station

2.             Select Explore

3.             Select Tools from the menu bar

4.             Select map network drive

5.             Enter drive letter T

6.             Push tab key to advance to path

7.             Enter path, example: \\Server\Disk_C

8.             Be sure reconnect at login is checked

9.             Click on OK button

Setup Config File For Work Station

1.             Insert Windows Network Disk into work station drive

2.             Go to MS-Dos Prompt (Start > Programs > MS-Dos)

3.             Make BASIS directory, example: MKDIR C:\BASIS

4.             Copy config file  to BASIS directory, example:

copy A:\CONFIG.S1 C:\BASIS\CONFIG.BBX

Notes:

The config.s1 is for a laser on lpt1 & okidata on lpt2 (both on the server), config.s2 is for okidata on lpt1 & lpt2 (both on the server), config.s3 is for a laser on lpt1 & okidata on lpt2 (both on the server) and laser on lpt1 (on the work station), config.s4 is for a laser on lpt1 & okidata on lpt2 (both on the server) and okidata on lpt1 (on the work station).

 Create TOP Icon On Work Station

1.             Right click on blank desktop

2.             Select New

3.             Select Shortcut

4.             Enter command line, example:

T:\BASIS\VPRO5\vpro5.exe -q -tT1 -uuser_name

-cC:\BASIS\CONFIG.BBX OSMONR

5.             Select Next

6.             Enter icon name: Total Order Plus

7.             Select Finish

8.             Right click on Total Order Plus Icon

9.             Select properties

10.          Enter start in field T:\TOP

11.          Select OK

Setup Server Printers On Work Station

1.             Double click on My Computer Icon

2.             Double click on Printer Icon

3.             Double click on Add Printer Icon

4.             Select Next

5.             Select Network Printer

6.             Select Browse

7.             Double Click on server (name of server PC)

8.             Select printer to use

9.             Select OK

10.          Select option to print from MS-DOS based programs

11.          Select Next

12.          Select Capture Printer Port

13.          Select LPT port, example: LPT3 for LPT1 printer on server, LPT4 for LPT2 printer on server

14.          Select Printer from list or use disk from printer manufacturer

15.          Except printer name and choose default printer if desired

16.          Select print a test page  -> select Finish