Author Archives: Joanne Simmons

Total Order Plus Version 2018 Features

The features listed below are included in the latest version of TOP 2018:

  • Backorder mask increased to 999,999.99 on the Backorder Report
  • Several reports have been added to print to a PDF:
  1. Accounts Payable Check Register
  2. Accounts Payable Payment Selection Register
  3. Accounts Payable Check Reconciliation
  4. General Ledger Chart of Accounts
  5. General Ledger Journal Entry Report
  • Correction made to General Ledger Retained Earnings at the end of a year
  • TOP Welcome screen displays the number of BBx licenses in use and if the license is currently up to date
  • Maintain Address Data in Order Entry now contains a new option ‘Is The Address Information Correct?  (CR-N-EMAIL-End). Type EMAIL to enter Other Order Information – Job Description, Customer Email and Ship-To Email
  • Added order Revision Date to Order Entry Header Data and all Order Entry history files
  • Added salesperson email address to the Salesperson Masterfile Maintenance on the Sales Analysis System Menu
  • Expanded the title and telephone extension fields for the Accounts Receivable Customer Contact Maintenance


Remote Desktop Client PC Setup in Windows 10

Remote Desktop Host PC Setup in Windows 10

Unlock Terminals in SCO Admin

To unlock a terminal in SCO Admin, following the instructions below:

Login:  root     Password:  superXXX

At the # prompt, type  scoadmin  –>  Use the down arrow key to highlight System  –>  Use the down arrow key to highlight Terminal Manager  –>  Use the right arrow key to highlight Unlock

Type the name of the terminal you wish to unlock – i.e.   ttyp0

You can continue with the same process using the terminal types  ttyp1, ttyp2, ttyp3,  etc.

Once the process is complete. press the ESC key to end

Use the right arrow key to highlight Quit  –>  Press the Enter key and select Yes  –>  Press the TAB  key to File  –>  Press the Enter key to Exit  –>  Select x to go back to the # prompt and press CTRL_D key to return to the login


Sonicwall VPN Setup

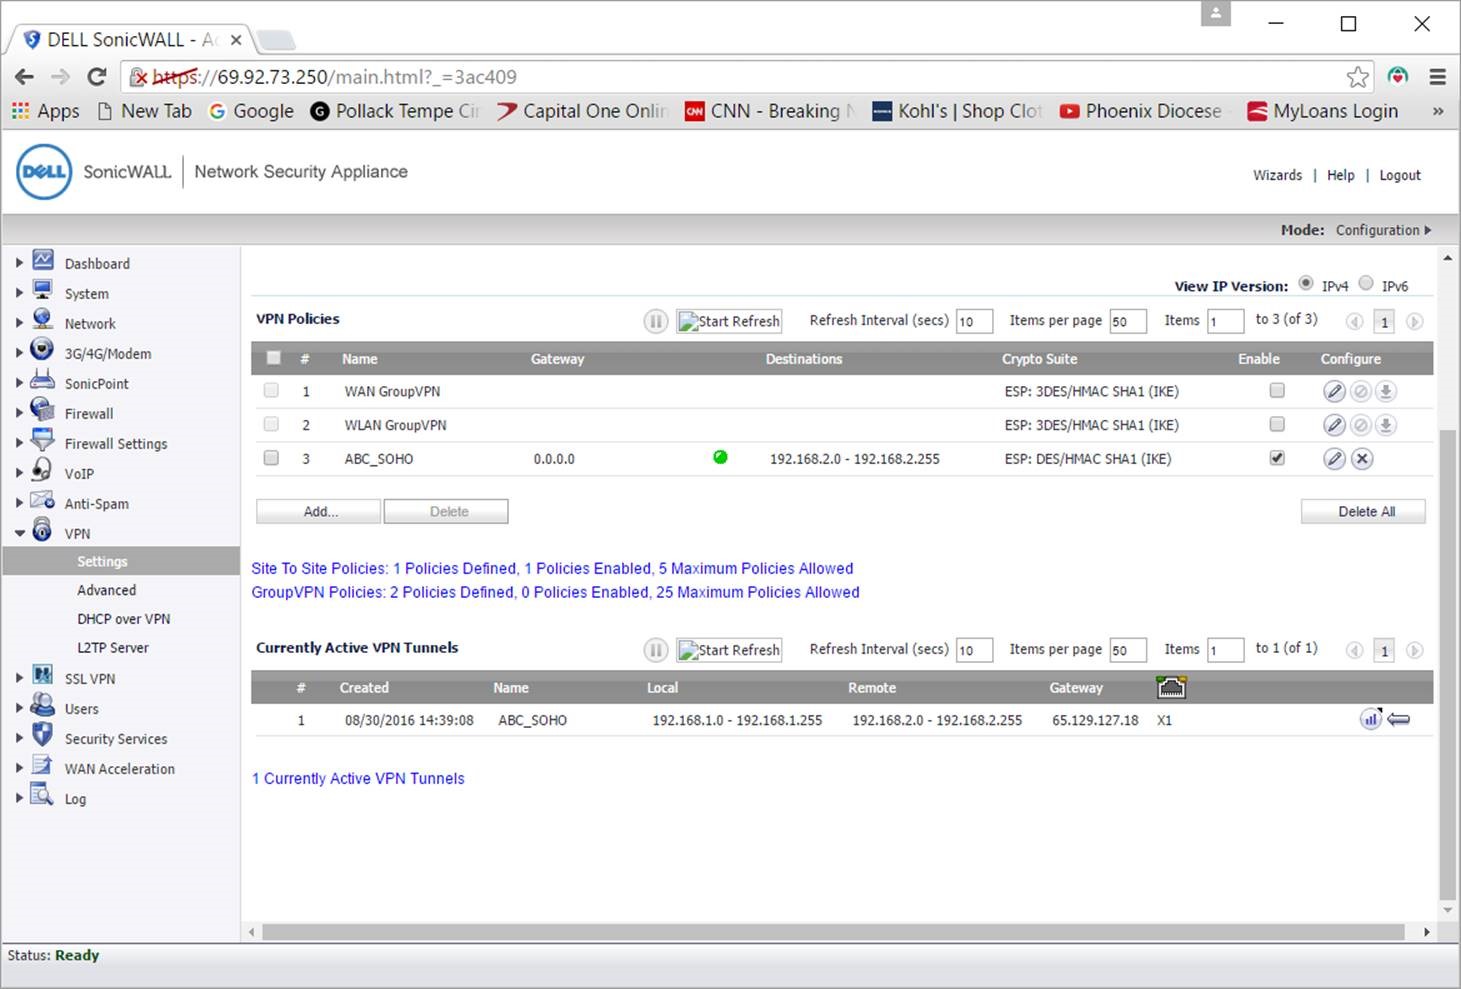
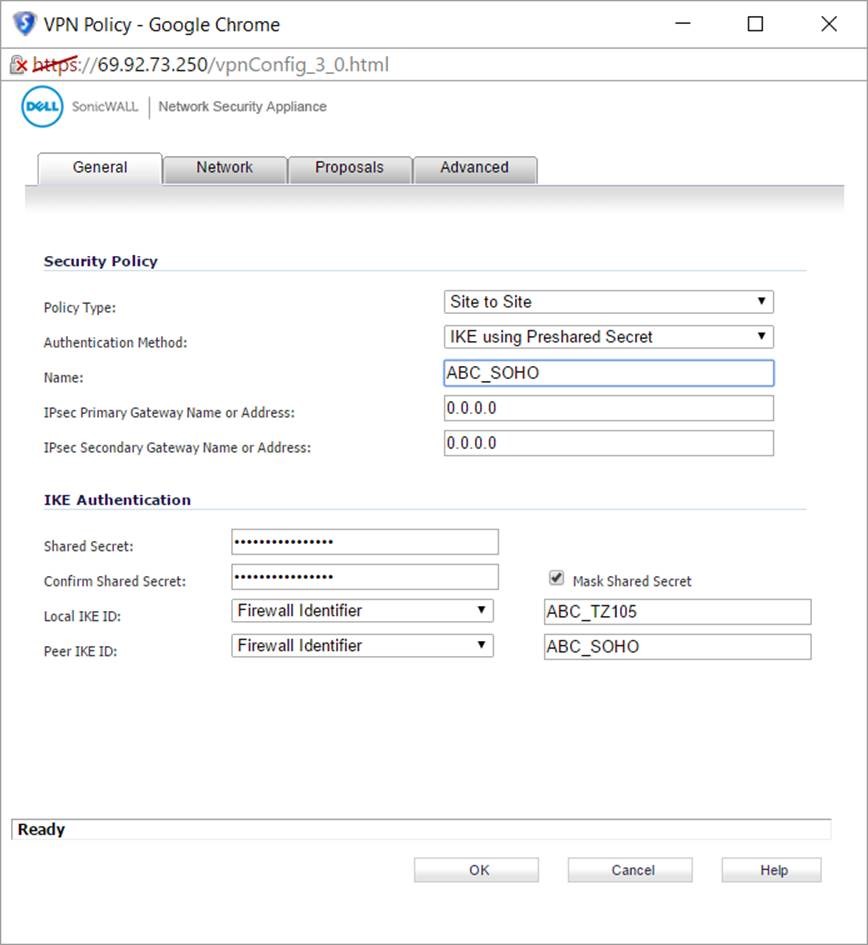
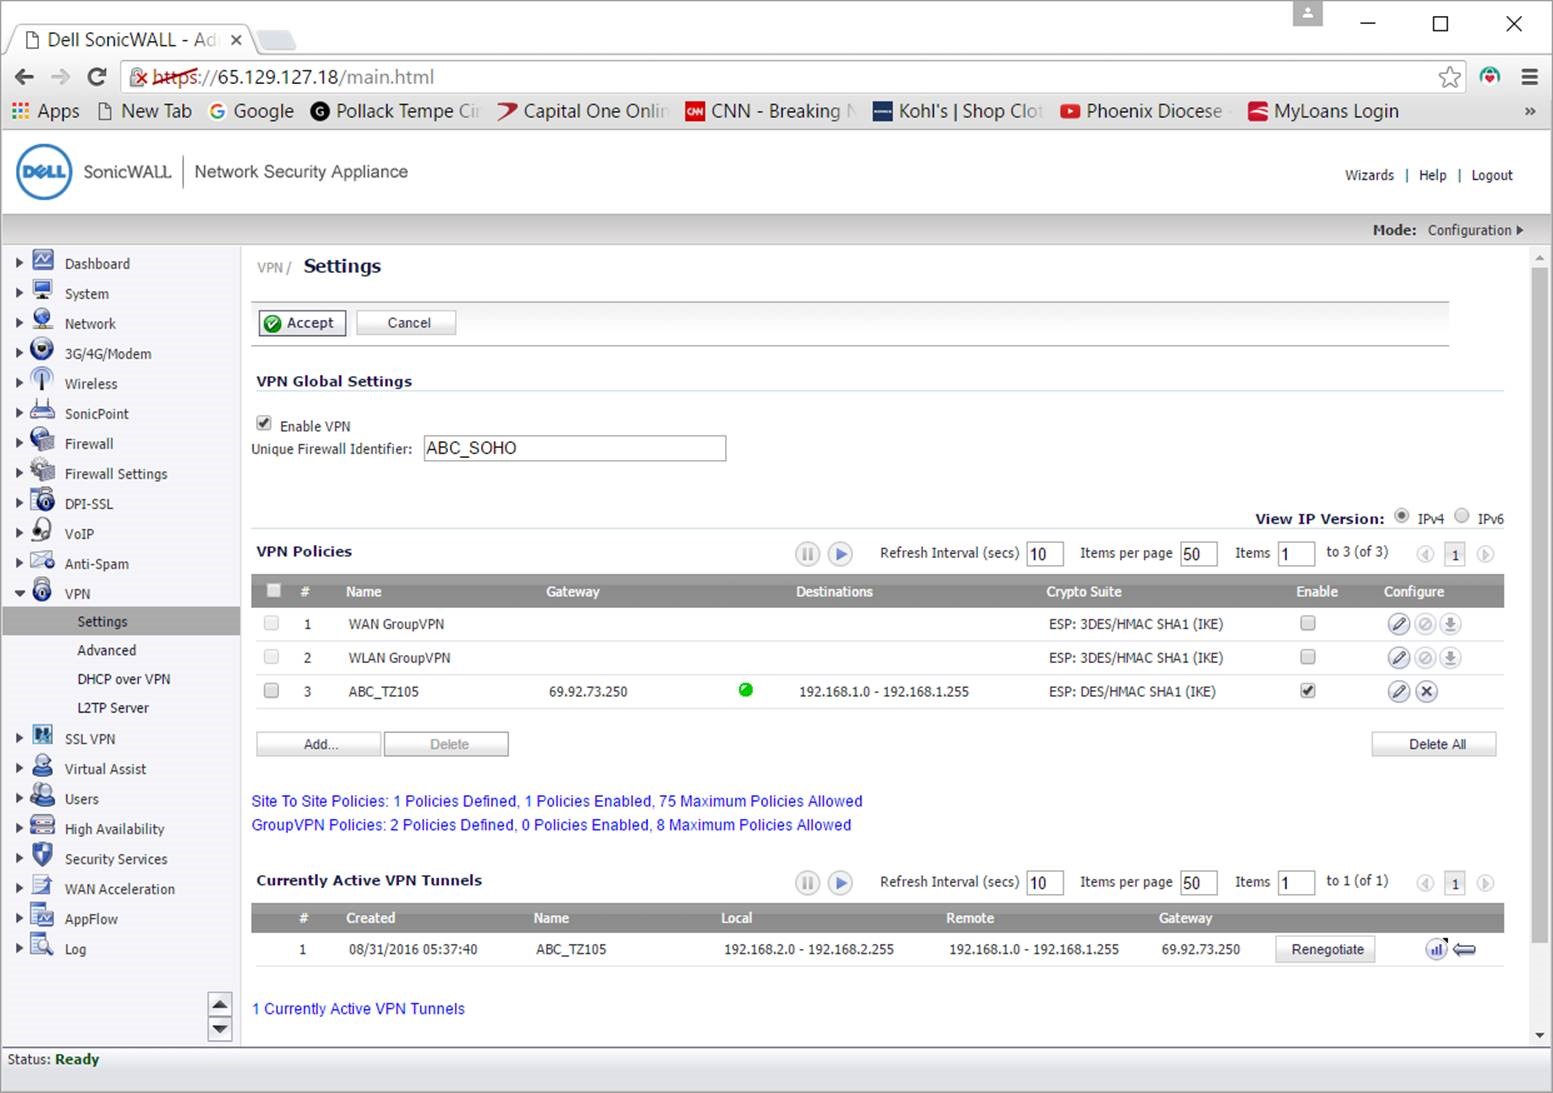
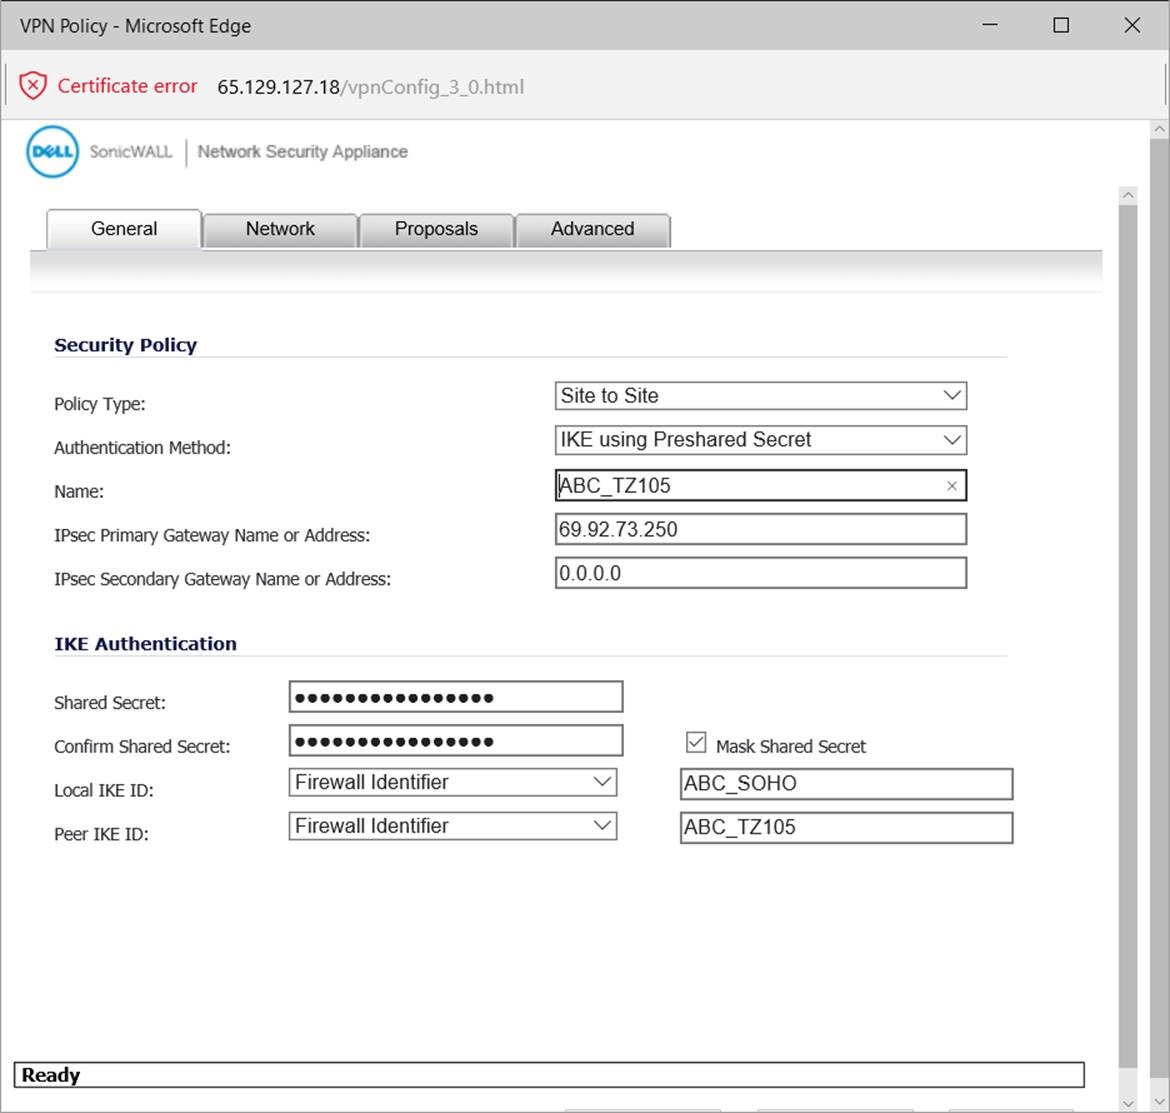
Below are screen shots from a Sonicwall unit and a second Sonicwall unit that connects to the main unit over a VPN connection.

Screen shot of the VPN Policy and Settings setup on the main unit:

VPN _Main

VPN_Policy


Screen shot of the VPN Policy and Settings setup on the remote unit:

Remote_VPN_Main

Remote_VPN

Mapping Network Drives in Windows 10

Below are the mapped network drive settings used with Linux and Unix. A valid Linux/Unix user/password must be used to map a drive to the Windows PC. The Windows PC will use the Windows user/password as the default. User should be set as administrator.

  • Drive Letter: R   Path: \\192.168.1.2\top (Used for UPS Worldship and FedEx Interface)
  • Drive Letter: S   Path: \\192.168.1.2\share
  • Drive Letter: T   Path: \\192.168.1.2\top_text
  • Drive Letter: U   Path: \\192.168.1.2\top_export
  • Drive Letter: V   Path: \\192.168.1.2\top_import
  • Drive Letter: W  Path: \\192.168.1.2\top_remote

Click on This PC  ->  Select Computer Tab  ->  Click Map Network Drive

Select the drive letter to map or click on the down arrow to display the drive letters (i.e. S for share drive)

Enter one of the specified folders listed above (i.e. \\192.168.1.2\share)

Click Reconnect at sign-in  ->  Click Finish

Note: To disconnect a network drive,  Click on This PC  –>  Select Computer Tab  –>  Select Map Network Drive  –>  Select Disconnect Drive and enter the drive letter to disconnect  –>  Select OK

Kit Item Detail Maintenance

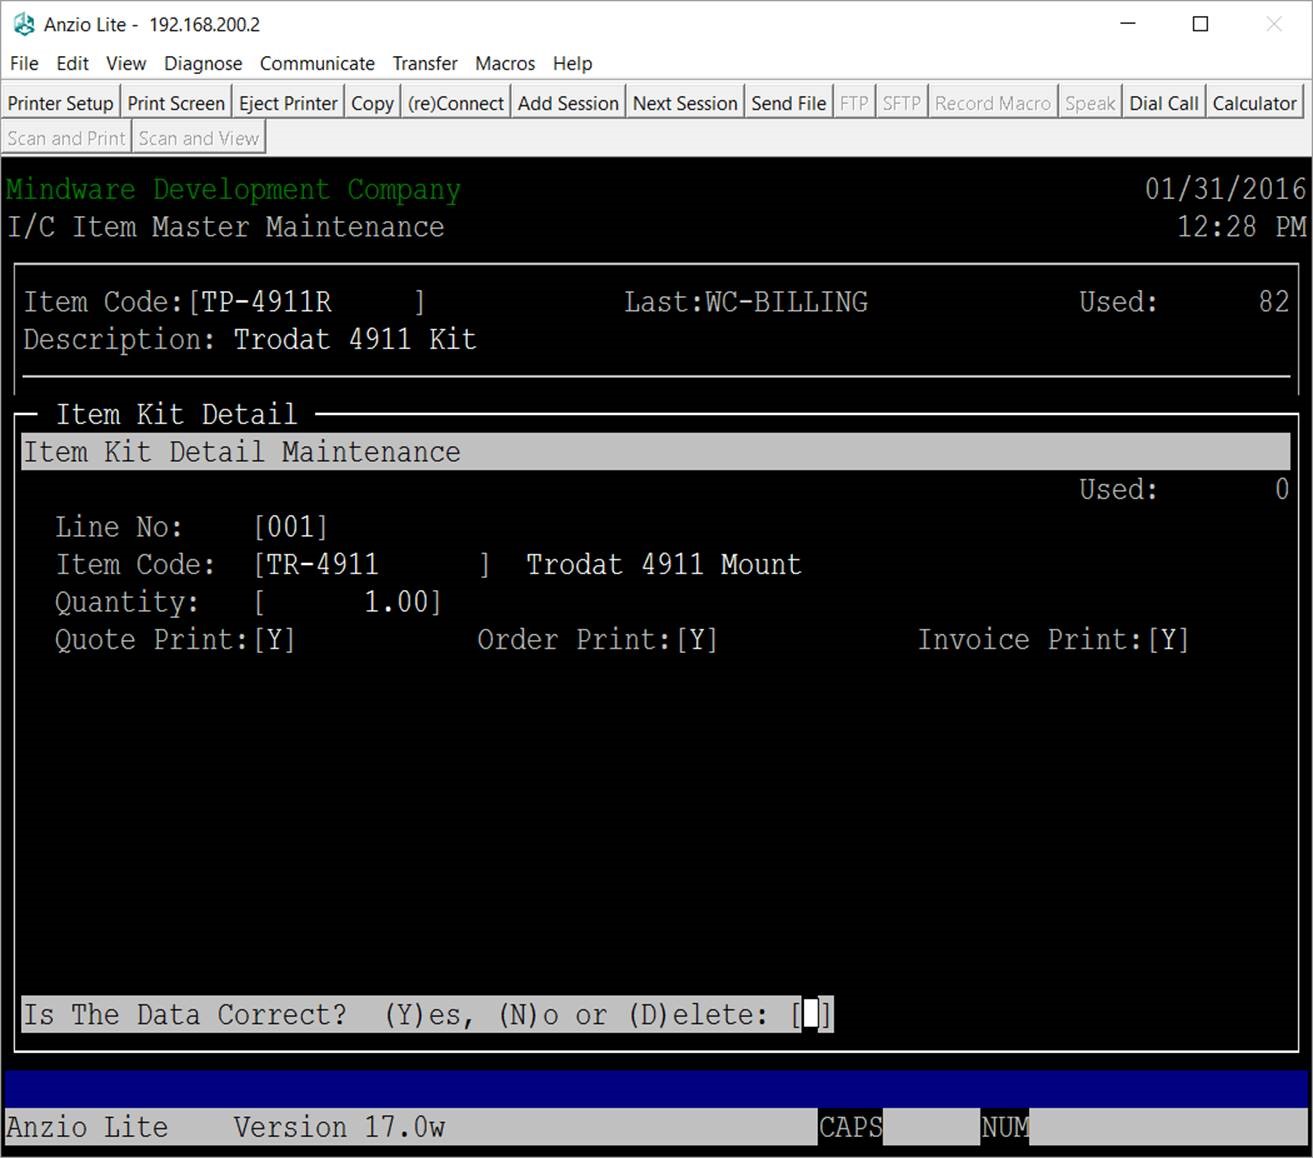
The Item Kit Detail Maintenance allows you to enter each component item number that is used to make up a finished kit item and the quantity of each component that will make up the kit.

The first step is to make sure the Item Type is a ‘K’ in Item Masterfile Maintenance for the finished item. This allows you to be able to enter the Item Kit Detail items that make up the kit.

Each kit item is automatically assigned an line number. You can enter an item code component part number or type a ? to insert an item code. You will enter the quantity that you want included in the kit.

You will be asked if you want the kit item code to print on quotes, orders and invoices.

KIT_ITEM

Password Setup in Total Order Plus

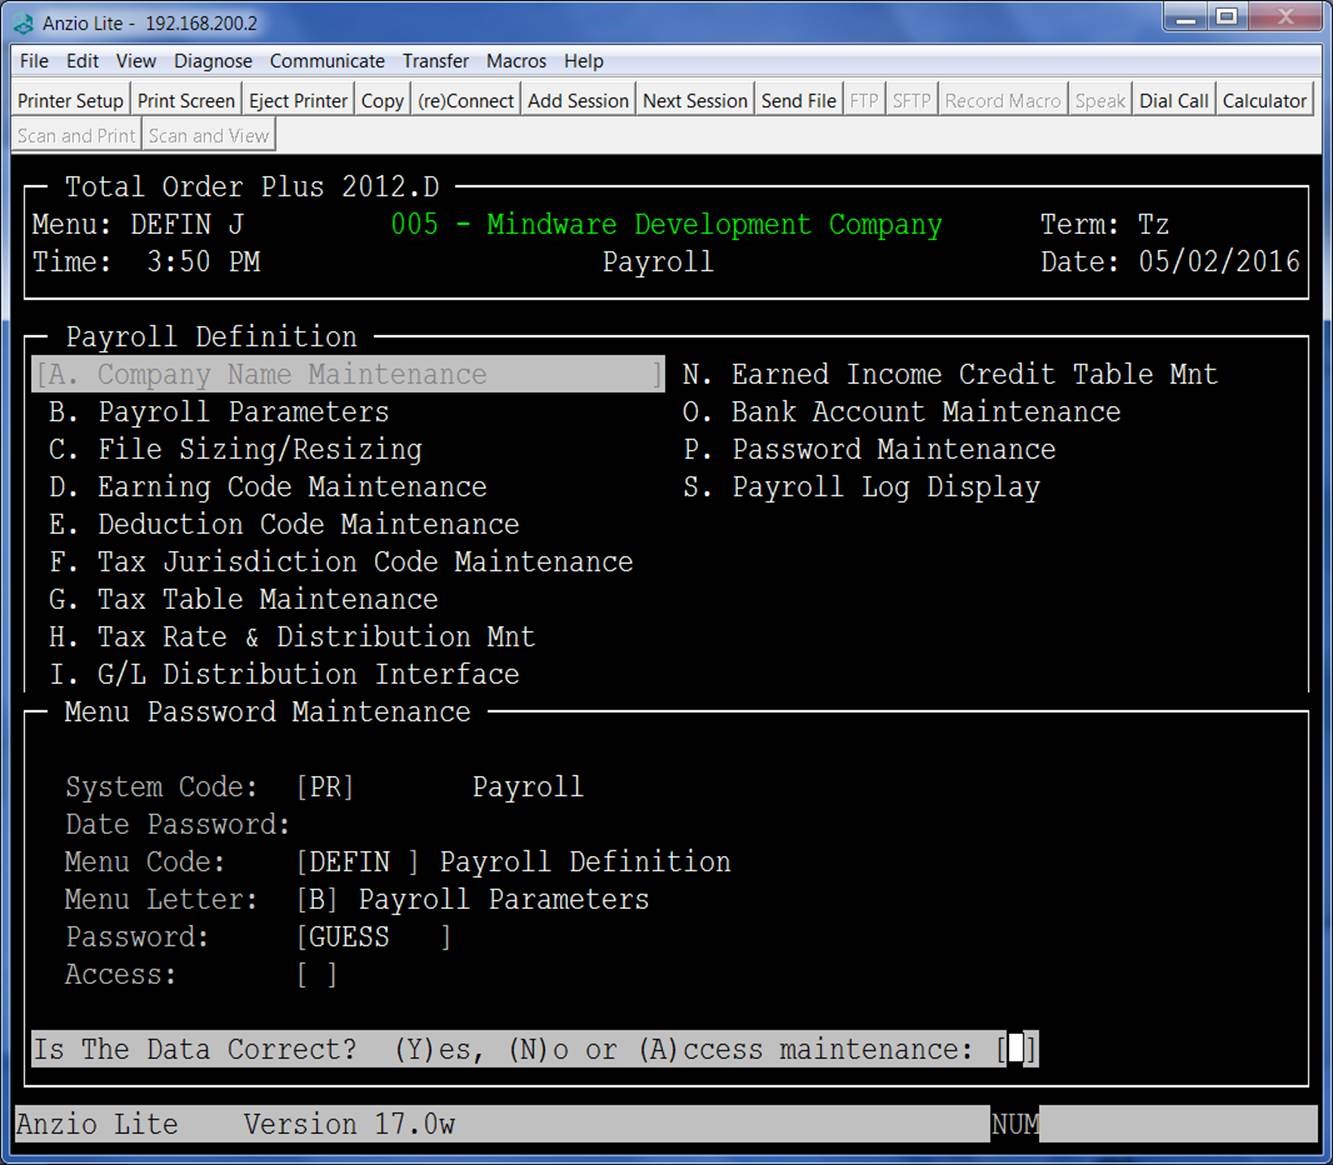
TOP users can access the Password Maintenance program on the Definition Menu in each accounting module to setup passwords in TOP. You can also use this feature to view current passwords already setup in TOP – sometimes we forget!

The System Code module name displays automatically.

You will need to know the name of the menu which is located in the upper left hand corner of each screen.  You can press F1 to display all of the menu names within the module or press F2 to enter a date password for the module displayed.

Enter the letter on the menu that corresponds to the menu item you want to password or press F1 to display all of the items on the menu selected.

Type the password for your selection. Upper or lower case does not apply.

Access options are to leave the field blank so all users are allowed to access this menu selection or you can select the Allow option to let specific users access this menu selection or the Disallow option to keep them from accessing this selection.

Notes:

If you select the allow or disallow options, you will need to specify which users will be or not be allowed to access this menu selection, which will require you to know the user’s TOP login name. You will need to decide if the user will be able to make changes to this menu selection of just have Read Only rights.

MENU SETUP TOP


Print Customer Mailing Labels

At the TOP Main Menu, select Accounts Receivable  –>  Accounts Receivable Report Menu  –>  Customer Mailing Labels

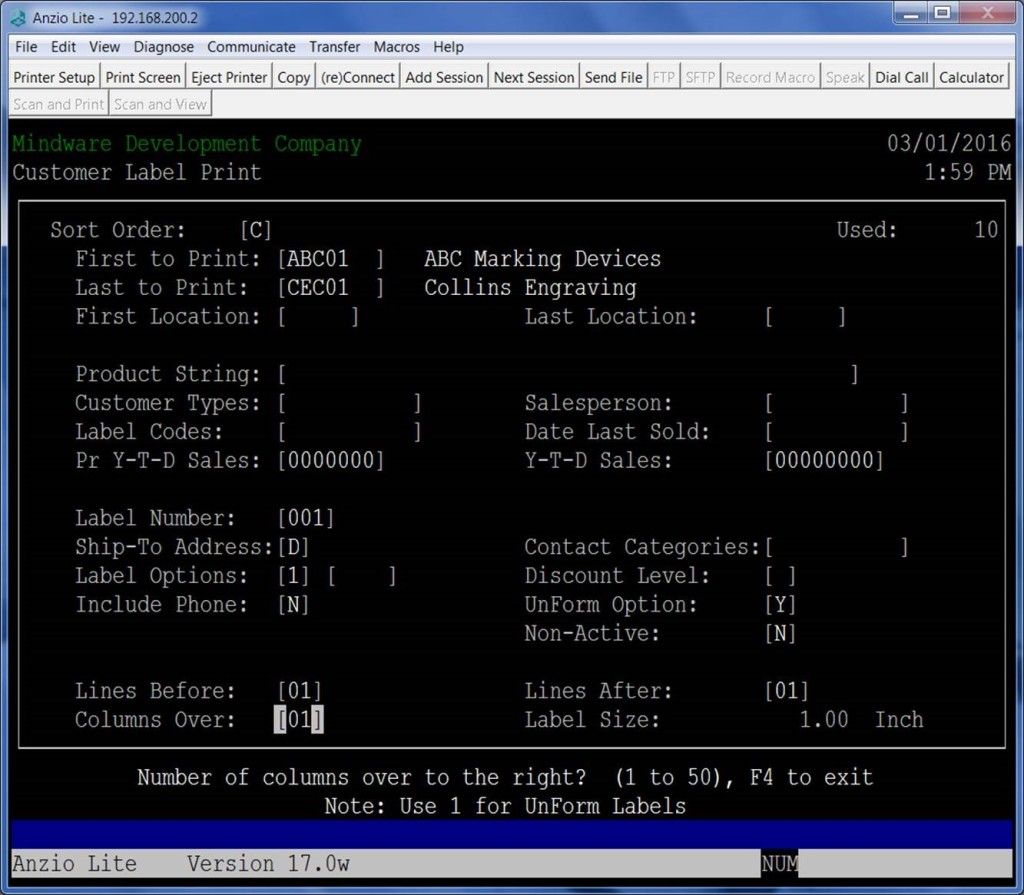
Customer mailing labels can be printed in (A)lpha sort order, (C)ustomer code order, (L)ocation by zip code order, (S)tate code order, sales(P)erson by zip code order or last sold (D)ate. You can use the location by zip code order to meet bulk mailing requirements.

Type the first customer code and the last customer code to print.  A ? will display the Customer Code selection window.

Notes:  If the first and last customer codes are the same, you will have an option to edit the label information prior to label print.

Type the first and last location (zip) codes – leaving the fields blank will include all zip codes.

To sort label print by product code, enter product codes (3 characters side by side) to include or leave blank to include all.

To sort label print by customer type code, type 2 characters per customer type. A ? will display the A/R Options Menu –>  Select Customer Type option.

Type the salesperson to include or type ? to display the Salesperson selection window. Leaving the field blank will include all salespersons.

Label codes can be assigned in the Customer Master. To sort label print by label code, type up to 5 label codes, two characters each or leave blank to include all.

To sort by Date Last Sold, only customers having a last date sold equal to or greater will be included.

To sort by Prior Year To Date sales, type an amount to include or leave field blank to include all.

If you enter Year to Date sales dollars, only customer with sales equal to or greater will be included. To include only customers with zero sales, type ZERO in this field.

Number of labels per customer can be from 1 to 999.

You have an option to include or not include ship to addresses in the label print or only print labels for ship to addresses.

There are multiple sort options that will allow you to limit the number of labels that print or you can leave the option blank not to include any options. Select 1 to print customer code on the label, 2 to print last sold date, 3 to print YTD sales and last sold date, 4 to print last sold date and YTD sales, 5 to include contact name, 6 to print telephone number, 7 to include contact name for a specific year in the history file or 8 to include notary.

You can specify if you want to print the customer’s telephone number on each label.

Each customer has a contact type in their master record. If you want to print only certain customer types, enter two characters per type code.

Type a discount level code to include or leave field blank to include all.

You must select whether or not you are using UnForm formats to print the labels.

Note:  If you select to use UnForm, you must select a printer on the TOP printer menu that is set up for UnForm labels. You can also select to print labels to a PDF file which will allow you to review label information before printing, print on another printer not connected to TOP, print a single page or range, email to another user to print labels, etc.

Select to include all customers or to exclude inactive customers.

Note:

If you select to not print inactive customers, please note that customers who are also not active for a mailing list will not print a label either.

To format the label size, select the number of lines before and after each label.

 Note:  There are 6 lines per inch.  For example, a 3 inch label would have 18 lines

Type the number of columns to the right where you want the label information to print.

Note:   If you are using UnForm, the number of columns must be one. The size of the label calculated will display on your screen.
CUST_LABELS


Add User to Total Order Plus

At the Total Order Plus Main Menu, type ? + US to display the User Services Options Menu  -> Select D. User Master Maintenance  ->  Press F1 to add a new user

Notes:

The User ID must be the same login user name you enter to log into Total Order Plus.

Type the User first and last name  -> Group code is used for security reasons only (i.e. Ability to enter credit card information – must match the credit password code set up in the A/R Parameters).

Type the birth date in MMDD format  ->  Warehouse code will default to 000 if you do not specify a code.

Employee code should be the first and last initial of the user name  ->  The default menu selection determines which selection on the TOP main menu for the cursor to highlight.

Leave the terminal field blank to use the system terminal ID  ->  Type Y or N for decimal for number entry default to decimal.

User login message is optional  ->  email address should be entered if the user is going to send emails out of TOP.

All of the calendar, to do lists, contacts are optional fields. TOP will display the dates automatically if these fields are displayed.

User_MaintenanceHere is an example of a user record: