Author Archives: Joanne Simmons

Accessing The DOS Prompt From Windows

Windows XP

To open the Command Prompt (DOS Prompt), click Start -> click Run -> type cmd -> Click OK

Windows 7

To open the Command Prompt (DOS Prompt), click Start  ->  type cmd in the Search programs and files window

That will open up a character based window. To exit the character based window, enter the exit command.


How to Create a User PDF Icon

Every user in Total Order Plus can have their own desktop icon that allows you to print and view forms and reports from your own PDF file. The file is created using your TOP login user name. Your PC must be mapped to the EXPORT folder (U Drive) on the server.

To create your icon, follow the steps below:

Right Click on your desktop to display a drop down list  ->  Select New  ->  Select  Shortcut

Type in the name of the file, folder, drive letter or Internet address or Click on Browse to select your option  (i.e.  U:\JSIMMONS.PDF  –  EXPORT drive letter+:\+login name+PDF extension)

Type in the name of your icon  ->   Click on Finish  ->  Your icon will display on your desktop

Notes:

If your browser is Microsoft Edge, You may have to right click on the icon and choose Adobe Reader to make it the default to open all PDF files.

To test creating a PDF file, your config.bbx file must contain an alias that allows the file creation. Contact Mindware Corporation to make sure this option is on your TOP printer menu:  ‘Create Adobe User PDF File ‘.

Notes:

You can create a shortcut to access any drive letter on the server – i.e. S for share drive, U for export. This will allow you quick access to these folders without having to open them using Explore.


Accounts Payable Check Reconciliation

To activate this feature, you have to answer yes to Check Reconciliation in the Accounts Payable Parameters on the Accounts Payable Definition Menu. Then select File Creation and Information  to create the check reconciliation file.

Check Reconciliation matches the bank balance in your General Ledger with the balances on your monthly bank statement. Before starting this procedure, you should examine your bank statement and note which checks are outstanding. Do the same with deposit slips. Note any adjustments to your bank balance such as returned check charges, service charges, etc.

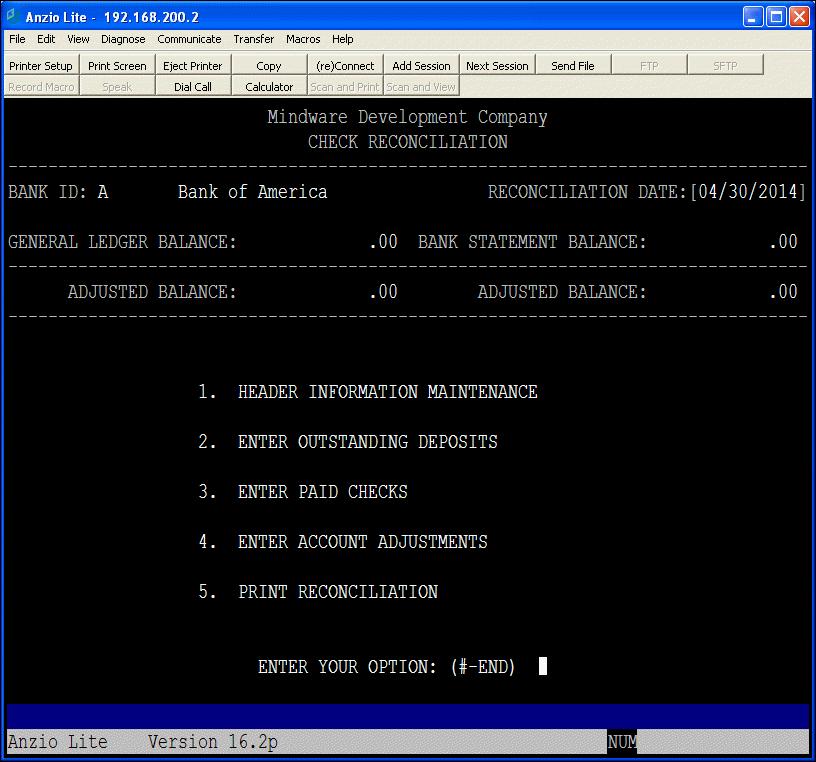
At the end of each month, you will select Check Reconciliation on the Accounts Payable System Menu. Enter the Bank ID, Month-End date, General Ledger balance and the Bank Balance. Then you will proceed with entering outstanding deposits, paid checks that have cleared the bank and any account adjustments. Once all of the information is entered, you may print out the reconciliation report. The processing steps are listed below in this screen display.

 AP_CHECK_REC

Order Entry Credit Memo

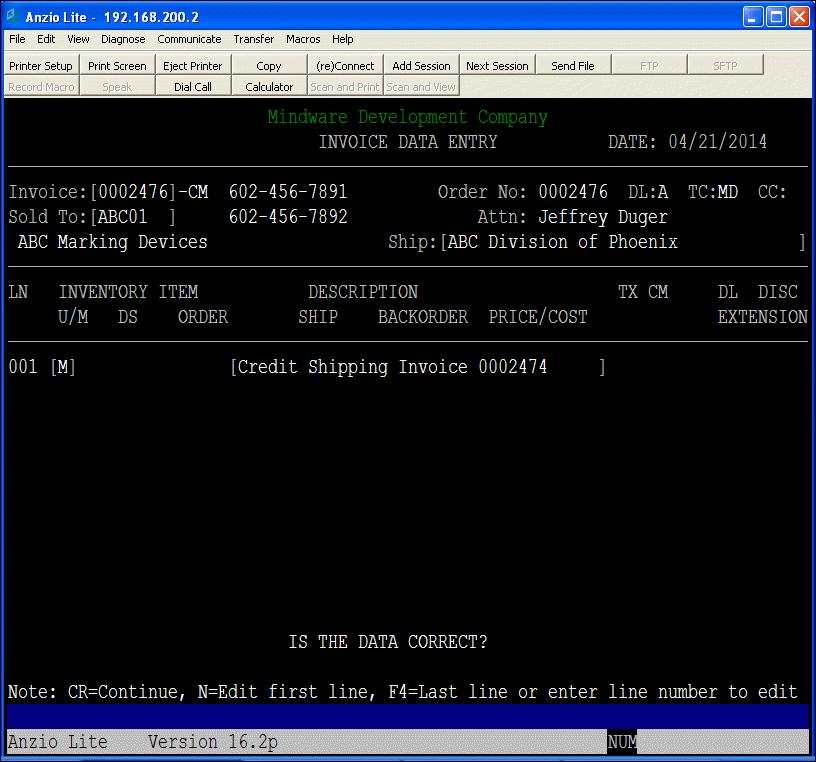
A credit memo can be entered in TOP using Invoice Data Entry on the Order Entry System Menu. At the Invoice number field, type a ‘C’ for the invoice number and TOP will assign a credit memo number followed by a ‘CM’. All amounts on the credit memo will automatically display as a credit so do not enter any negative numbers. A messsage line can be used to reflect the invoice number for which the credit is being issued.

Below is an example of a credit memo entry for crediting shipping charges only, reflecting the original invoice number:

OE_CREDITMEMO


Notes:

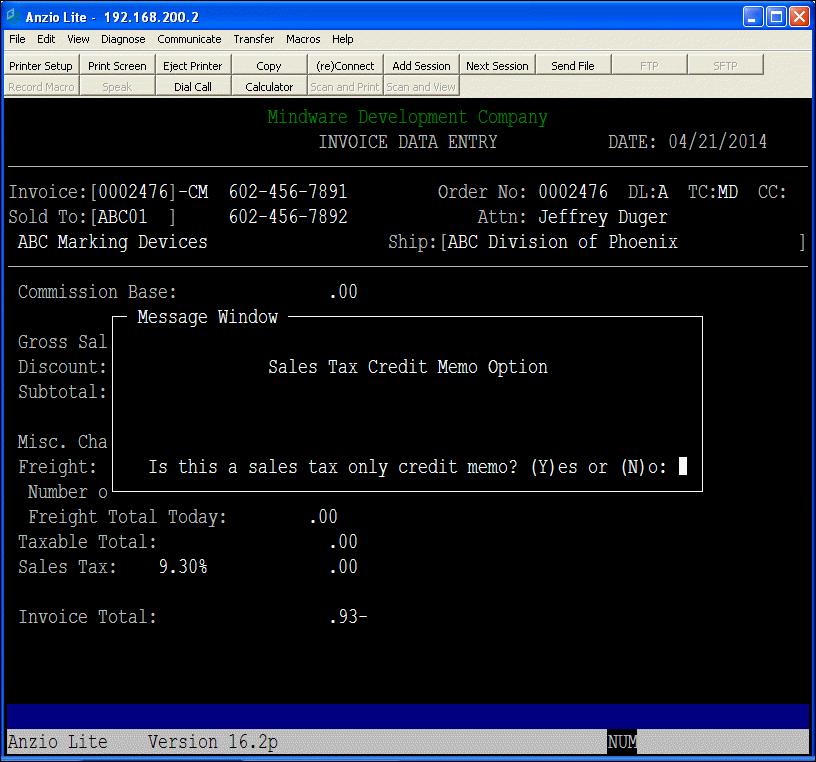
If the credit memo does not include billable line items, you will be asked if this is a sales tax only credit memo. Answer No to proceed with the credit memo entry.

OE_CREDITMEMO


Add/Delete User in Red Hat Linux

To add a user to Red Hat Linux, you can enter a command from the # prompt. You will need the first and last name of the user and the user password. You will need to login as root.

Enter this command:

#  useradd  -c  ‘First and Last Name’  login_name

#  passwd login_name

Enter the password for this user.

To remove a user, enter this command:

#  userdel  -r  login_name

Add/Delete Printer in Red Hat Linux

To add a printer in Red Hat Linux, you can enter a command from the # prompt. You will need the print server name and the IP address to assign to the printer. You will need to login as root.

Below is an example (jd01=print device, 192.168.1.101=printer IP address):

# lpadmin  -p  jd01 -E  -v  socket://192.168.1.101  -m  raw  -D  “Printer Name/Model”

To delete a printer, you will need only the print device name. Example:

# lpadmin  -x  jd01

Configure Remote Desktop Host PC in Windows 7

To configure remote access on the host PC, follow these steps:

1. Click on Start  ->  Select Control Panel ->  click System
2. On the System page, click Remote Settings in the left pane

Note:

This opens the System Properties dialog box to the Remote tab.

3. To disable Remote Desktop, select Don’t Allow Connections To This Computer -> Click OK and skip the remaining steps
4. To enable Remote Desktop, you have two options. You can:

Select Allow Connections From Computers Running Any Version Of Remote Desktop (less secure)

or

Select Allow Connections Only From Computers Running Remote Desktop With Network Level Authentication (more secure)

5. Click Select Users to display the Remote Desktop Users dialog box
6. To grant Remote Desktop access to a user, click Add

This opens the Select Users dialog box. In the Select Users dialog box, click Locations to select the computer or domain in which the users you want to work with are located. Type the name of a user you want to work with in the Enter The Object Names To Select field, and then click Check Names. If matches are found, select the account you want to use and then click OK. If no matches are found, update the name you entered and try searching again. Repeat this step as necessary and then click OK.

7. To revoke remote access permissions for a user account, select the account and then click Remove
8. Click OK twice when you have finished

Using eFax Software

There are still a lot of customers whose end user clientele are using a fax machine and prefer receiving their orders, quotes, invoices and statements via that method.

There is a software service available that will allow you to send a document via a fax number and send it as an email attachment. You will be able to send or receive a fax from your computer, tablet or smartphone. To understand how the software works and for pricing, click on this link www.efax.com for more comprehensive information.

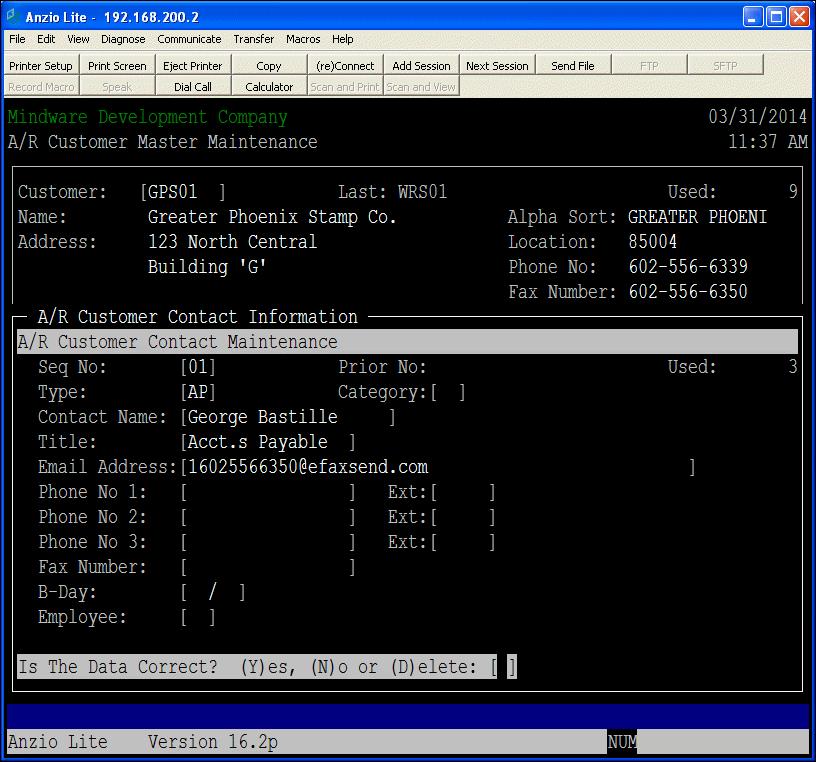
Below is an example of how you would set up a contact in Total Order Plus with an email address comprised of the customer’s fax number and the eFax send information.

EFAX

Anzio Lite ‘License Will Not Stick’ Windows 7/8/10

On some Windows 7, 8 and 10 systems, the problem of “license will not stick” occurs when Windows has UAC (user access control) enabled due to various combinations of security settings on the computer. It may also cause the user name and password not to be verified when the user logs in.

A quick solution to the problem is to run Anzio on elevated security privileges while registering Anzio by entering the Serial Number and License Code. The following steps should allow the license information to be accessed for all users with elevated privileges. Even though you may be logged in as an Administrator at the computer, this is the only way to make the Anzio license registration stick on Windows 7 and 8 computers.

1. Close all current active Anzio sessions

2. Move your mouse/cursor over to the Anzio icon on the desktop -> Right click on the mouse -> Select “Run as Administrator”

3. Re-enter your Anzio serial number and license code (under the Help menu, select on “Enter license number…”)

4. Close down Anzio then restart Anzio

Configure Printing To A Print Server

Configure printing directly to a print server instead of printing through a file server:

1.             Select Start

2.             Select Settings

3.             Select Printers

4.             Select Add Printer

5.             Select Next for Welcome to the Add Printer Wizard

6.             Select Local Printer

7.             Do not check Automatically detect and install my plug and play printer

8.             Select Next

9.             Select Create new port option

10.          Select Standard TCP/IP port for type

11.          Select Next

12.          Select Next for Welcome to the Add Standard TCP/IP Printer Port Wizard

13.          Enter printer IP address (print test page from JetDirect box to get IP address, example: 192.168.1.101)

14.          Port name will display below. If a 3 port print server is used, add a letter A thru C after the port name.

15.          Select Next

16.          Enter Device port (Parallel 1for single ports, Parallel 1, 2 or 3 for 3 port)

17.          Select Next

18.          Select Finish for Completing the Add Standard TCP/IP Printer Port Wizard

19.          Chose manufacturer and printer model

20.          Select Next

21.          Select printer name and printer default option

22.          Select Next

23.          Select Do not share the printer

24.          Select Next for Printer Sharing

25.          Select Next to print test page

26.          Select Finish