Author Archives: Archie Tucker

Small Business Network Security

Two_CentsMy Two Cents, by Archie Tucker


The new Dell™ SonicWALL™ TZ Series is the most secure Unified Threat Management (UTM) firewall for small businesses, retail deployments, government organizations, remote sites and branch offices. Unlike consumer-grade products, the TZ Series delivers the most effective anti-malware, intrusion prevention, content/URL filtering and application control capabilities along with the broadest most secure mobile platform support for laptops, smartphones and tablets. It provides full deep packet inspection (DPI) at very high performance levels, eliminating the network bottleneck that other products introduce, and enabling organizations to realize increased productivity gains. The TZ Series is the most secure, sophisticated and widely-deployed security platform on the market today.

Sending Attachments From TOP

TechLineThe Tech Line, by Joanne Simmons


Question:

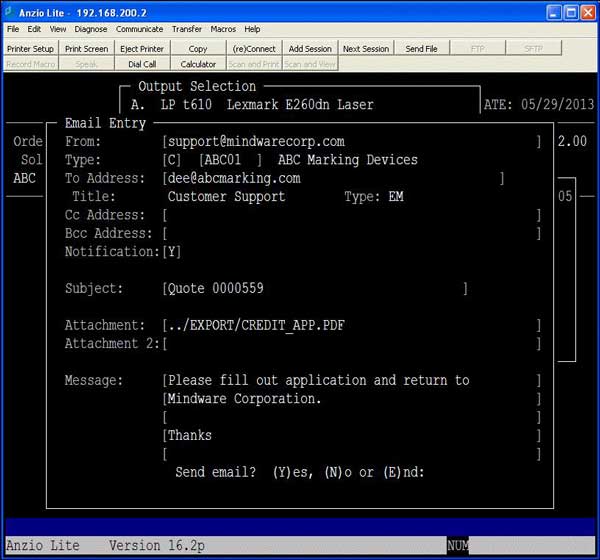
Several times a year we mail out fliers listing new products with pricing, items that are currently on sale, other documents like credit applications, etc. It would be cost efficient if we could send them as an attachment to an email from within Total Order Plus.

Answer:

TOP provides sending attachments within an email in multiple places. You can attach up to two files to each purchase order, quote, order, invoice or statement. The file(s) must be placed in the EXPORT folder (U drive). When you are sending an attachment, you will include the name of the file as displayed in the input screen below:

OE_CREDIT_APP


SCO Unix Print Device Commands

There is a SCO Unix command  lpstat  -t  that will list all of the system print devices. If there are too many devices or print jobs to completely display on the screen, use the command  lpstat  -t |more.

Each print device has a device name and an individual IP address for each one. Each device will show it is accepting requests and whether or not the device is idle , enabled or currently executing a print job.

TOP_PRINTER_MENUThe Total Order Plus printer menu will have the print device name before the description of each printer so you can cross reference the two print device names.

Login as root and enter the system password.

#  lpstat -t |more

If a print device shows disabled, you will be able to see the device name i.e.  ps01 disabled. If there are numerous print jobs listed for the disabled print device, you will need to cancel all of them prior to executing the enable command.

# cancel  -a  ps01

# enable ps01

Notes:

There are reasons why a print device might be disabled. If a user takes a printer offline during a print job, if a printer is turned off to try and cancel a print job or CUPS (Common UNIX Printing System) will disable a printer if it doesn’t respond after a certain amount of time.

If you want to cancel an individual print job, enter this command:

# cancel ps01-1234  (1234 being the number of the print job)

If you see Network host ‘192.168.1.101’  is busy, it usually means the device is not connected to the network. You can execute the following command to test the connection:

# ping  192.168.1.101

If the device is connected, you will see the data packets that are transmitted and received.

PING 192.168.1.101: 56 data bytes
64 bytes from 192.168.1.101 (192.168.1.101): icmp_seq=0 ttl=60 time=150 ms
64 bytes from 192.168.1.101 (192.168.1.101): icmp_seq=1 ttl=60 time=101 ms

— 192.168.1.101 ping statistics —
2 packets transmitted, 2 packets received, 0% packet loss
round-trip min/avg/max = 101/125/150 ms


Setup TOP/UPS WorldShip Interface

Install ODBC Driver On UPS PC

The Basis ODBC or JDBC driver will need to be installed to interface with the UPS Worldship software. Below are links for both.

ODBC: https://mindwarecorp.com/top-interfacing/install-basis-odbc-driver/

JDBC: https://mindwarecorp.com/top-interfacing/basis-jdbcodbc-installation/

UPS Worldship Installation

Notes:
Where ever you see ### you will need to replace that with the TOP company number, example 001 for company 1.

Follow the UPS Worldship instructions to install the software on the UPS Worldship CD-Rom if it has not already been installed.

Map Drive on UPS PC

Notes:
It will be necessary to map the UNIX top directory to the R drive on the UPS PC.

Click on this link for how to map TOP drives.

Create Folders on UPS PC

  1. Create the following folders on the UPS PC (this can be done from the DOS prompt using the MKDIR command or by using the My Computer icon). You will need to create a CO### folder for each TOP company that is going to be interfaced with UPS.
  • C:\TOP_DATA (contains cpy_ups###.bat)
  • C:\TOP_DATA\CO### (contains top_ups.tpm)
  • C:\TOP_DATA\SGDIR (contains *.1 files)

Download UPS interface files from Mindware website

1. Go to https://mindwarecorp.com/downloads-top-shipping-interface/. Click on Save Target AS -> Click on Browse -> Save files in C:\TOP_DATA\SGDIR folder

2. Unzip the interface files in the C:\TOP_DATA\SGDIR folder

3. Copy C:\TOP_DATA\SGDIR\cpy_ups.bat to the C:\TOP_DATA\CO### folder. The contents of the file is below. You will need to do this for each TOP company.

COPY R:\CO001\OEST1 C:\TOP_DATA\CO001

Notes:
If you are using a company number besides 001, you will need to use NotePad to edit the file. Change the 001 in both places to the correct company number.

4. Copy C:\TOP_DATA\SGDIR\top_ups.tpm to the C:\TOP_DATA\CO### folder. The contents of the file is below. You will need to do this for each TOP company.

DICTIONARY=C:\TOP_DATA\SGDIR\
DATA=C:\TOP_DATA\CO001\

Notes:
If you are using a company number besides 001, you will need to use NotePad to edit the file. Change the 001 to the correct company number.

Create an Icon to Copy the Ship-To File

1. Create an icon for copy command:

Right Click on desktop -> Select New -> Select Shortcut
Use browse to select the C:\TOP_DATA\CO###\CPY_UPS.BAT file
Enter icon name: Copy TOP ### Ship-To File
Select Finish

Create UPS Map
1. Start UPS Worldship software

2. Select Import-Export > Tools

3. Select Connection Assistant

4. Select Create a new map for import -> Select Next

5. For Import Data Type select Shipment -> Select Next

6. Select By Known ODBC Source

7. Select Launch the ODBC Administrator (then follow the steps below)

  • Select System DSN Tab
  • Select Add Button
  • Select BBj ODBC Driver
  • Select Finish Button
  • Name: TOP_SHP###
  • Description: Total Order Plus Shipping – ###
  • Server: Name Of PC
  • Database: TOP_SHP###
  • User Name: admin
  • Password: admin123
  • Select OK

8. Select TOP_SHP### from ODBC Sources list > Select Next

9. Select New Map

10. Enter TOP_UPS### for New Map Name -> Select Next

11. Select Finish

12. Select OE_SHIPTO for ODBC Table

13. Select Ship To for WorldShip Fields

14. Connect the following fields, first select field from OE_SHIPTOVIEW -> From Ship To Select Connect.

[one_half]

OE_SHIPTO
CC_NAME
SHIPTO_ADD1
SHIPTO_ADD2
SHIPTO_ADD3
SHIPTO_CITY
SHIPTO_NAME
SHIPTO_STATE
SHIPTO_ZIP
SHIPTO_CTRY
ORDER_NO
RECV_UPS_NO

[/one_half]

[one_half]

Ship To
Attention
Address 1
Address 2
Address 3
City or Town
Company or Name
State
Postal/ZIP Code
Country/Territory
Customer ID
Receiver UPS Account Number

[/one_half]

15. Select ORDER_NO then select Define Primary Key for Import button

16. Select Package for WorldShip Fields

[one_half]

OE_SHIPTO Package
ORDER_NO
PO_NO
INVOICE_NO
SHPMNT_VALUE

[/one_half]

[one_half]

TO Package
Reference 1
Reference 2
Reference 3
Declared Value Amount

[/one_half]

17. Select Shipment Information for WorldShip Fields

[one_half]

OE_SHIPTO
SERVICE_TYPE
BILLING_OPT
NOTIFY_FLG
NOTIFY_FLG
EMAIL_ADDR

[/one_half]

[one_half]

Shipment Information
Service Type
Billing Option
QVN Option
QVN Ship Notification Option
Notification Recipient 1 E-mail

[/one_half]

18. Select Ship From for WorldShip Fields

[one_half]

OE_SHIPTO
RETURN_NAME
RETURN_ADD1
RETURN_ADD2
RETURN_CITY
RETURN_STATE
RETURN_ZIP
RETURN_CTRY

[/one_half]

[one_half]

Ship From
Company or Name
Address 1
Address 2
City or Town
State/Province/Country
Postal/ZIP Code
Country/Territory

[/one_half]

19. Select OK

20. Select No to batch import question

Notes:
Repeat for each company beginning with step number 2.

Setup Keyed Import

  1. Select UPS OnLine Connect
  2. Select Keyed Import
  3. Select More
  4. Select TOP_UPS### (where ### is the company number)
  5. Select Import

Using UPS With TOP ODBC Interface

  1. Double Click on Copy TOP Ship-To File icon
  2. Start UPS Worldship
  3. Select Import-Export
  4. Select Keyed Import
  5. Select TOP_UPS### (where ### is the company number, if first time select More, then select TOP_UPS###)
  6. Enter TOP Order Number (Include leading zeros) and push the Enter or Tab key (below is example of keyed import entry window)

UPS_Keyed_Import

Setting Up Service Type In TOP

  1. Enter a ? from any Order Entry Menu
  2. Select Ship Via Maintenace
  3. Enter F1 for Maintenance from display mode
  4. Enter TOP ship via code for UPS
  5. Select N to edit
  6. Enter correct UPS service type for each corresponding ship via code, see list below:
  • Next Day Air Early AM
  • Next Day Air
  • Next Day Air Saver
  • 2nd Day Air AM
  • 2nd Day Air
  • 3 Day Select
  • Ground


Install Basis ODBC Driver

Download ODBC Driver & BLM
Create C:\TEMP folder if not already there
For Basis ODBC 3.01 Driver: http://njy.b6a.myftpupload.com/downloads-top-odbc-driver/
For Basis BLM License Manager:https://mindwarecorp.com/downloads-top-odbc-license/

Install BLM (BASIS License Manager)
Close all programs
Run C:\TEMP\blmgr11300.exe
UnZip to C:\TEMP
Run C:\TEMP\SETUP.EXE
Select English
Select Next for Welcome Window
Select Yes for Software License Agreement
Select Next for Location
Select Next for Select Program Folder Window
Select Next for Register for a BASIS License
Enter License Registration Information
Company Name:
First Name:
Last Name:
Email Address:
Phone Number:
Serial Number: (On License Registration Form)
Authorization Number: (On License Registration Form)
Select Next
Select Next for License Registration and Delivery Methods
Select OK for License Installed
Select No for installing another license
Select Finish for Installation Complete
Select OK to reboot
Uncheck the readme file option and select Finish
Select Finish for Setup Complete (system will reboot)

Install ODBC Driver
Run C:\TEMP\1467301.exe
UnZip to C:\TEMP
Run C:\TEMP\SETUP.EXE
Select English
Select Next for Welcome Window
Select Yes for Software License Agreement
Select Typical Setup and Next for Setup Type
Select Next for Select Program Folder
Close BASIS ODBC Driver 3.01 Window
Check box for Only check this box if using BASIS License Manager and select Next
Select Yes for Attention warning
Check option for Configure this application to use the BASIS License Manager and select Next
Enter name for PC in box and select Next (Start -> Settings -> Control Panel -> System -> Computer Name)
Select OK for Installation Successful
Select Finish for Installation Complete
Uncheck the readme file option and select Finish

Create TOP Configuration File

File name: /SGDIR/TOP.TPM

Sample TOP.TPM file:
; Top of config file
DICTIONARY=C:\TOP\SGDIR\
DATA=C:\TOP\CO001\
; Bottom of config file

Create Data Source

Select Start -> Settings -> Control Panel -> Administrative Tools

Select Data Sources (ODBC) Icon

Select Add

Select Basis ODBC Driver

Enter Data Source Name: TOP

Enter Data Source Description: Total Order Plus

Enter data source configuration file: drive_dir/SGDIR/TOP.TPM
(drive_dir examples, C:/TOP, /u/top, /<scosysv,port=1100>)

Notes:
If you need to setup ODBC for multiple companies, you will need to repeat the steps above beginning with Create TOP Configuration File. Use the company directory number after TOP (example top3.tpm, data source name top3) for each company you setup.

Credit Card Access in TOP

TechLine
Question:

When I enter credit card information for customers, I only want my customer service reps to see the entire credit card number. Can this be added to Total Order Plus for additional security?

Answer:

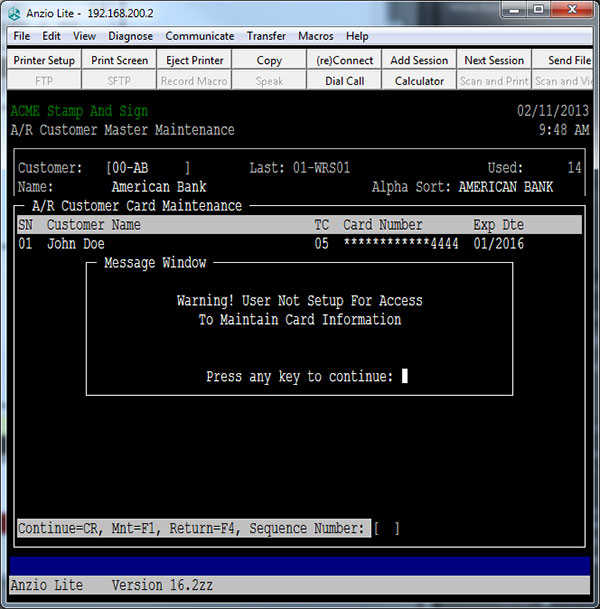
TOP now has a separate maintenance program for credit card information that allows password protection on the Customer Sub-Menu. In addition, you can set up a group code in the A/R Parameters and the group code can be put in the customer rep’s User Maintenance record for the reps you want to be able to see the entire credit card number. When the credit card displays anywhere in the system, it checks the group code to see if the group code matches. If the group code doesn’t match, the credit card is displayed with *’s. If a user without a group code tries to enter maintenance on a credit card record, a warning message will be displayed.

AR_Card_Access

Anzio Lite Setup

For more information, click on Anzio Lite product information link.

Download And Install

Click on Anzio Download link on www.anzio.com -> Select latest version of Anzio Lite 17

Notes:

Anzio 16 users download version 16.3m under ‘Archives’

Save to temp folder on C drive (if folder not present create it)

Select Save  ->  Select OK

Select Open  ->  Select Run to display Install Wizard

Select Yes to License Agreement  ->  Select Next for Location

Select Next for Program Folder  ->  Select Finish

Setup Icon

Select Start -> Programs -> Anzio 17 -> Anzio Lite 17 (New Connection)

Select SCOANSI for terminal type if using SCO, select Linux if using Red Hat Linux

If using SCO, answer No to old style if SCO 5.0.7

Select Telnet from Communications Setup Window if local connection, select ssh if remote connection

Enter IP address for server (example for local connection, 192.168.1.2)  –> Click Connect

Select Yes for Please Verify SSH Key if using SSH

Enter login name and password

Select File  ->  Save Settings As  -> Use Total Order Plus for icon name

Slave Printer Setup

Start Anzio Lite

Select File -> Printer Setup -> In Print Level section select Spooler, on printer

Select OK

Disable X box to exit TOP

Start Anzio Lite -> Select Edit -> Select Advanced Options

Select Screen tab -> Uncheck System menu close box

Select File -> Select Save Settings -> Log out and log back in to take effect

Notes:

On some networks, Anzio Lite will automatically disconnect a user after a certain amount of idle time. You can increase the amount of time that Anzio Lite checks the connection by doing the following:

Click on Communicate -> Select Network -> Select Stay Alive and increase the time to 120 or greater -> Select File -> Save Settings


Router/Modem Bridge Mode

Bridge mode is a configuration that disables the NAT and DHCP functions. Placing your ISP’s router/modem into bridge mode allows the SonicWall to control those functions on your network. Bridge mode also allows for remote management of the SonicWall. You will need to call your ISP (Internet Service Provider) for the bridge mode settings. Sometimes you can find them on the internet for your router/modem.

NAT (Network Address Translation) allows multiple devices on a private network to access the internet using a single WAN or public address.

DHCP (Dynamic Host Configuration Protocol) is a network protocol that is used to configure network devices so that they can communicate on your network. DHCP allocates IP addresses to devices on your network. Without DHCP, you are required to setup static IP addresses for each device. We normally setup servers and printers to use static IP addresses and PC’s to use DHCP.

What Is Your Microwave IQ?

Two_Cents

My Two Cents, by Archie Tucker


So, what is your Microwave IQ? Are you a Mensa microwave member, you know every feature your microwave has and you have read the manual more than once? Or, are you a not the sharpest tool in the shed microwave user? You know how to make popcorn and boil water? Maybe now you are thinking what is this !@$? trying to say? Maybe TOP users know a lot or very little about the available features in TOP. If you are a Mensa TOP member, we would like you to share some of the features in TOP, and if you are one of those Other TOP users, we are hoping to make you one of the sharper tools in the shed. That is one of the reasons for the new website, which we built using WordPress, the dominate platform for blogging. We will publish more on this next month.