Category Archives: TOP Printing And Emailing

Sending Attachments From TOP

TechLineThe Tech Line, by Joanne Simmons


Question:

Several times a year we mail out fliers listing new products with pricing, items that are currently on sale, other documents like credit applications, etc. It would be cost efficient if we could send them as an attachment to an email from within Total Order Plus.

Answer:

TOP provides sending attachments within an email in multiple places. You can attach up to two files to each purchase order, quote, order, invoice or statement. The file(s) must be placed in the EXPORT folder (U drive). When you are sending an attachment, you will include the name of the file as displayed in the input screen below:

OE_CREDIT_APP


TOP PDF Print Defaults

There are reports from most modules in TOP that can be printed and stored as a PDF file. The files are stored in the EXPORT folder+Company Number+Folder Name. To view the reports or attach a PDF to an email, you will need to map your PC to the EXPORT folder (U Drive).

Below are the reports that can be set up on the PS Options Menu. Each report is created in the EXPORT folder under the current company number and a specific folder (i.e.  /EXPORT/CO001/AP_REG would contain the Accounts Payable Invoice Data Entry Register from Company 001). Below is a list of the folder names where you can view the reports or attach them to an email:

Accounts Payable:

  • AP_PER – Open Invoice Report
  • AP_PER – Aged Open Invoice Report
  • AP_PER – Check Disbursement Regist
  • AP_REG – Invoice Data Entry Register
  • AP_MAN – Manual Check Data Entry Register
  • AP_SEL – Payment Selection Register
  • AP_CHK – Check Register

Accounts Receivable:

  • AR_CR   – Cash Receipts Data Entry Report
  • AR_PER – Aged Open Invoice Report
  • AR_REG – Open Invoice Data Entry Register
  • AR_STM – Statement Print
  • AR_PER – Monthly Sales Tax Report

General Ledger:

  • GL_JE    – General Journal Entry Report
  • GL_PER – Allocating Entry Report
  • GL_PER – Recurring Entry Report
  • GL_DS   – Daily Summary of Postings
  • GL_PER – Period Summary of Postings
  • GL_PER – Yearly Summary of Postings
  • GL_PER – Financial Statements
  • GL_PER – Trial Balance

Inventory Control:

  • IC_REG  -Transaction Data Entry Register
  • IC_PER  – Inventory Movement Report
  • IC_PER  – Transaction Audit Report
  • IC_PER  – Valued Inventory Report

Order Entry:

  • OE_SJ  –  Daily Sales Journal
  • OE_INV – Invoice Print Format 1
  • OE_INV – Invoice Print Format 2

Purchase Orders:

  • PO_REG – Transaction Data Entry Register

Sales Analysis:

  • SA_PER – Customer Analysis Report
  • SA_PER – Inventory Item Report

Payroll:

  • PR_DTE – Monthly Earnings Register

Set Up TOP Customer Email Contacts

Customer email contacts are set up the same way as other contacts with the exception of the contact type. The contact type must be the same type as in the Email Defaults on the PS Options Menu. The Email Defaults contains a TOP program name and a contact type.

For example, program ARSF40 is the statement print program and may have AP as the contact type. Your email contact would contain the same type in order to email statements to the email address contained in the contact record.

Setting Up TOP Email Parameters

Emailing TOP A/R Statements

To print statements in TOP, access the Accounts Receivable module on the TOP Main Menu -> Select Accounts Receivable System Menu -> Select Period-End Processing Menu -> Select Statement Printing.

The First and Last Customer fields display automatically on your screen. You have the option to override if you are printing statements for one customer or a different range of customers.

Aging Option allows you to print (A)ll statements, statements only with (B)alances or only with balances (O)ver 30 days or balances over (6)0 days. Other options include printing statements that have a credit balance, certain customer types, with a selection option to print (A)ll, (H)ardcopy only, or (E)mail only.

If you select to email statements, you must also select a printer on the TOP printer menu for customers without an email address. The From Address displays from the Email Parameter record or you can override. The To Address must be left blank so it uses the customer’s email address. If you want to email a few statements for testing, you can enter a To Address and they will email to that address.

If you want to send a PDF attachment with each statement, you can enter the file name. The file must be in the EXPORT folder in TOP. If you do not enter the folder name in front of the file name, it will default to the EXPORT folder automatically.

You have three lines of 50 characters each to include a statement message.

Sending Email from TOP

If you are using UnForm and MailCall with Total Order Plus, you have the option to print orders, quotes, invoices, purchase orders or statements to a PDF file that can be sent via email to your customers and vendors.

On the TOP Printer Selection Menu, you have the option ‘PP Create Adobe PDF File’ as a printer option. Once the option is selected, a file name displays on your screen and an option on the bottom of the screen to (S)end the document as an email.

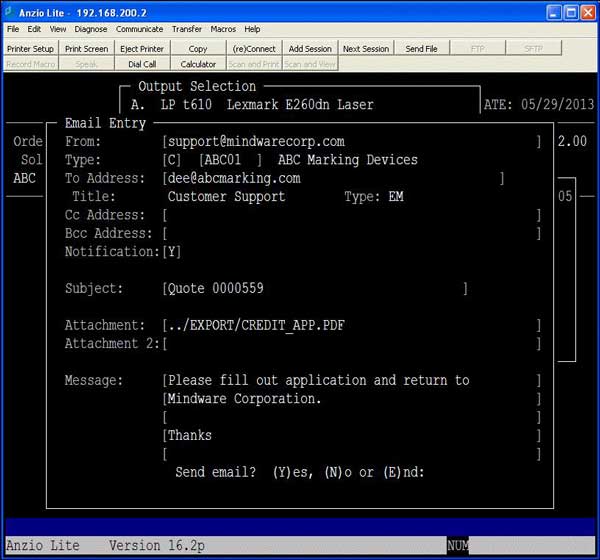
Once that option is selected, you will have an Email Entry screen that requires a From email address and a To email address for the customer or vendor. The From email address can automatically be inserted from the User Maintenance record. The To email address can be entered manually or you can press the F1 key to display a customer or vendor contact email address.

You may have multiple copies sent to a carbon copy email address and a blind carbon copy email address. You can request for a return receipt notification that the customer or vendor has received and read your email. The Subject displays the quote, order, invoice or PO number, but you have the option to override the subject line.

The Attachment displays the file name of the PDF file. Attachment 2 gives you the ability to enter a file name of an attachment that will be sent with the email.

You have five text message lines of 50 characters each.

Setting Up TOP Email Parameters

Setting Up TOP Email Parameters

– Type ?+PS at the TOP Main Menu to display the PS Options Menu
– Select D. Email Parameters
– Type an authorized login name and password that was assigned by your Internet Service Provider
– Type (Y)es if you want to receive an email notification after sending an email
– Type PP for the PDF printer device

Each time you send an email from TOP, this information is authenticated before transmission. You can check the MailCall log file to see if the email was sent. The file will be in /a/top/MAILCALL/mailcall.pl.log or /a/top/LOG/MAILCALL.