Category Archives: TOP Tools

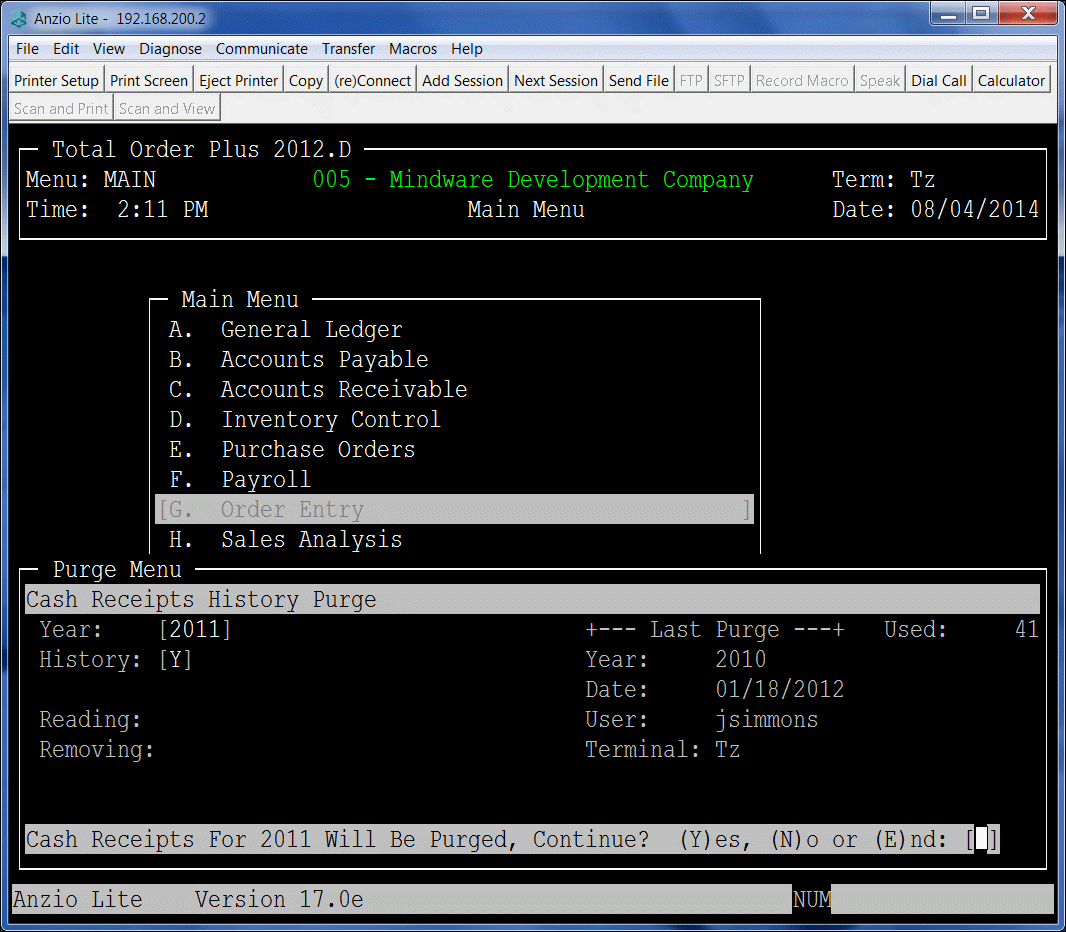
Cash Receipts History Purge

Total Order Plus accumulates important invoice data into multiple history files on a daily basis. The files are of a dynamic, multi-keyed structure, which means they continue to increase in size and should be purged on some kind of a time table. In the Business Basis language, there is a maximum file size limit. If a file reaches the maximum, you will not be able to access the file or to down size it to it’s current size. As the file capacity increases, the size of the hard drive decreases as well.

The Cash Receipts History Purge program is located on the PM Options Menu. To access the purge program, type ?PM at the TOP Main Menu and Select B. A/R C/R History. You will be asked for the year to purge.  The last year purged information is displayed on the right side of your screen. You will have the option of saving the purged data to a history folder in case you want to have access to the data through a history search.

There is a Cash Receipts History display program on the Accounts Receivable Options Menu as well as in the Find Order/Invoice Utility on the Order Entry System Menu. There are hardcopy print programs on the Accounts Receivable Report Menu.

Cash_Receiipts_purge

Order Entry Invoice History Purge

Total Order Plus accumulates important invoice data into multiple history files on a daily basis. The files are of a dynamic, multi-keyed structure, which means they continue to increase in size and should be purged on some kind of a time table. In the Business Basis language, there is a maximum file size limit. If a file reaches the maximum, you will not be able to access the file or to down size it to it’s current size. As the file capacity increases, the size of the hard drive decreases as well.

Another reason to keep the history files purged, the files are open during the order and invoice data entry programs and when you search for an invoice or item in history, the time it takes to search through thousands of invoices is considerably decreased.The purge programs are located on the PM Options Menu.

In addition to the invoice history purge, there are other purge programs for cash receipts, customer product sales,A/P invoice and check history, purchase order history and inventory history. The O/E invoice history files are the most populated and take up a lot of hard drive capacity.

The purge program gives you the option of saving the purged data to a history folder in case you want to have access to the data through an invoice history search on the Order Entry Options Menu or the Find Order/Invoice Utility on the Order Entry System Menu. TOP allows you to purge by month or by year. This parameter is a field in the Invoice Parameters on the Order Entry Definition Menu.

To purge the O/E invoice history files, go to the TOP Main Menu and type ?PM to display the Purge Options Menu. Select A. O/E Inv History. The last year purged information is displayed on the right side of your screen.

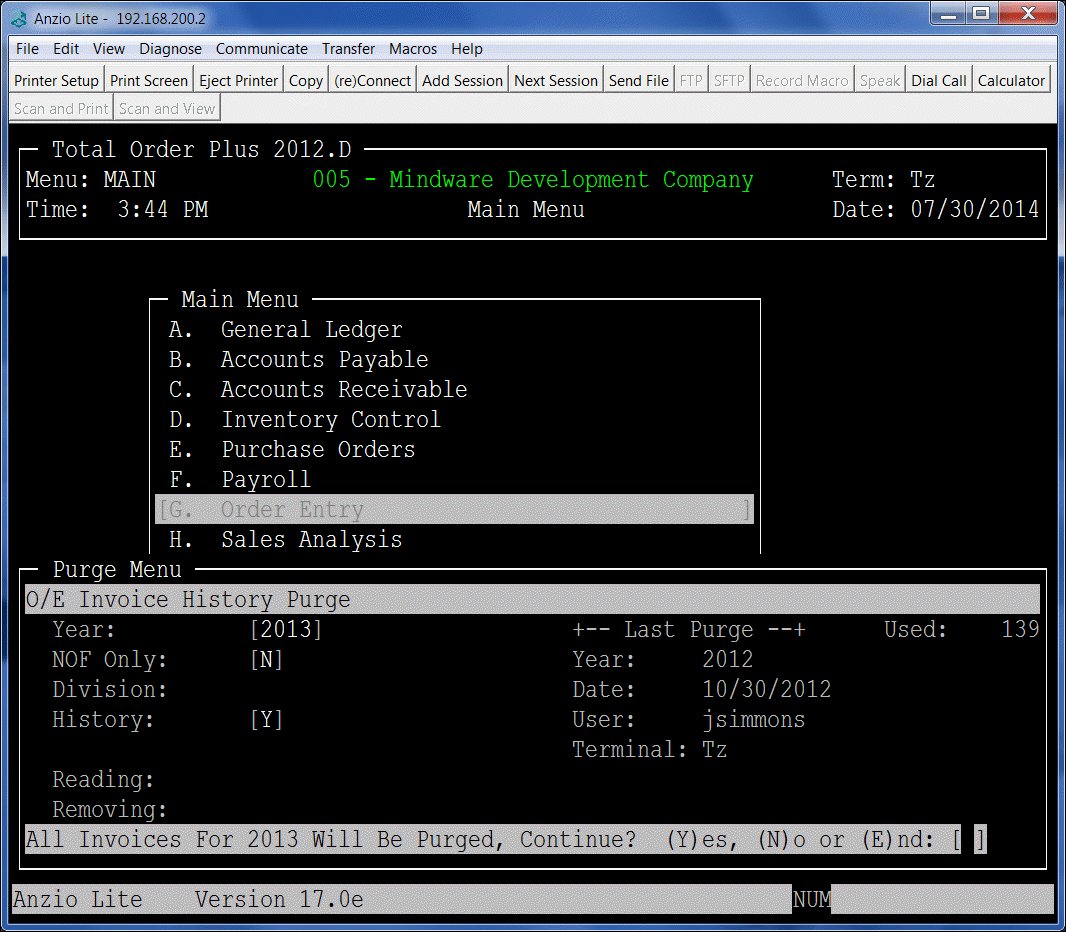
Type the year you want to purge, select Yes or No to purge only NOF customers, select division to purge (requires divisions to be set up on your system) and answer Yes or No to save the purged data to a HISTORY folder on the server (files are stored by company number).

The screen below displays the options mentioned above:

PM_Options_Menu


TOP Email Parameters Setup

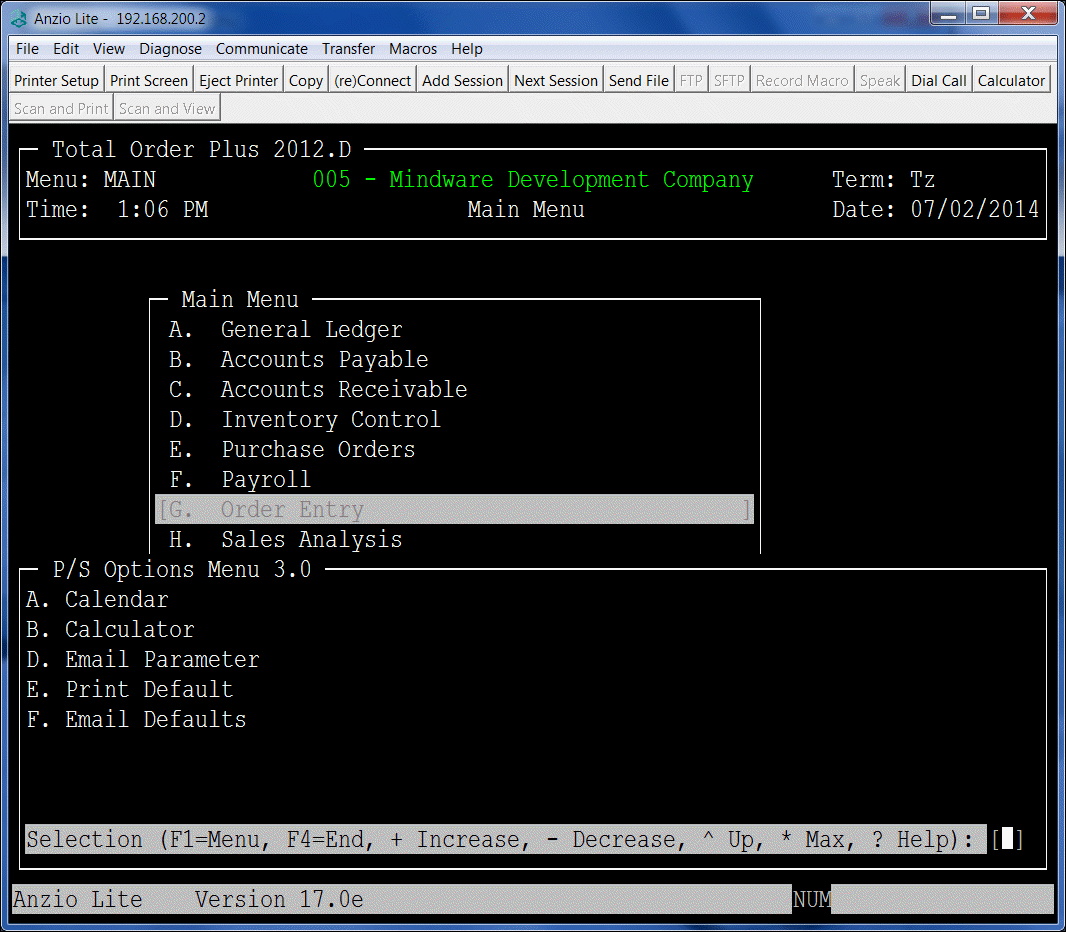
Total Order Plus provides a PS Options Menu with selections that contain a user name and password, a list of reports that can be printed to a PDF for storage in the EXPORT folder and an email default list of programs and contact types contained in the Customer Contact master.

To access the PS Options Menu, type ?PS at the TOP Main Menu.

email_main

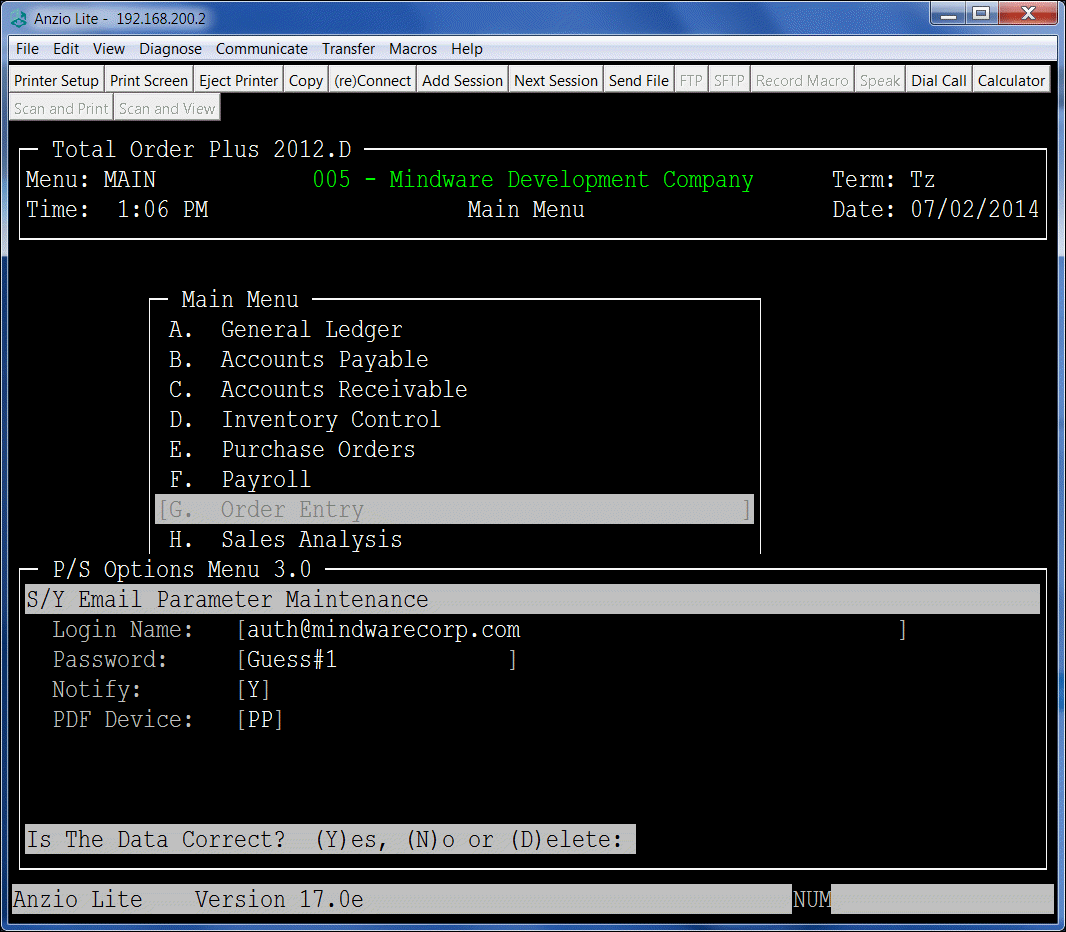
The user name and password must be validated with your Internet Provider in order to pass authentication when sending an email. If you decide to change providers or change the password, it must be a valid combination with your IP or the email will not work.

email_user_name

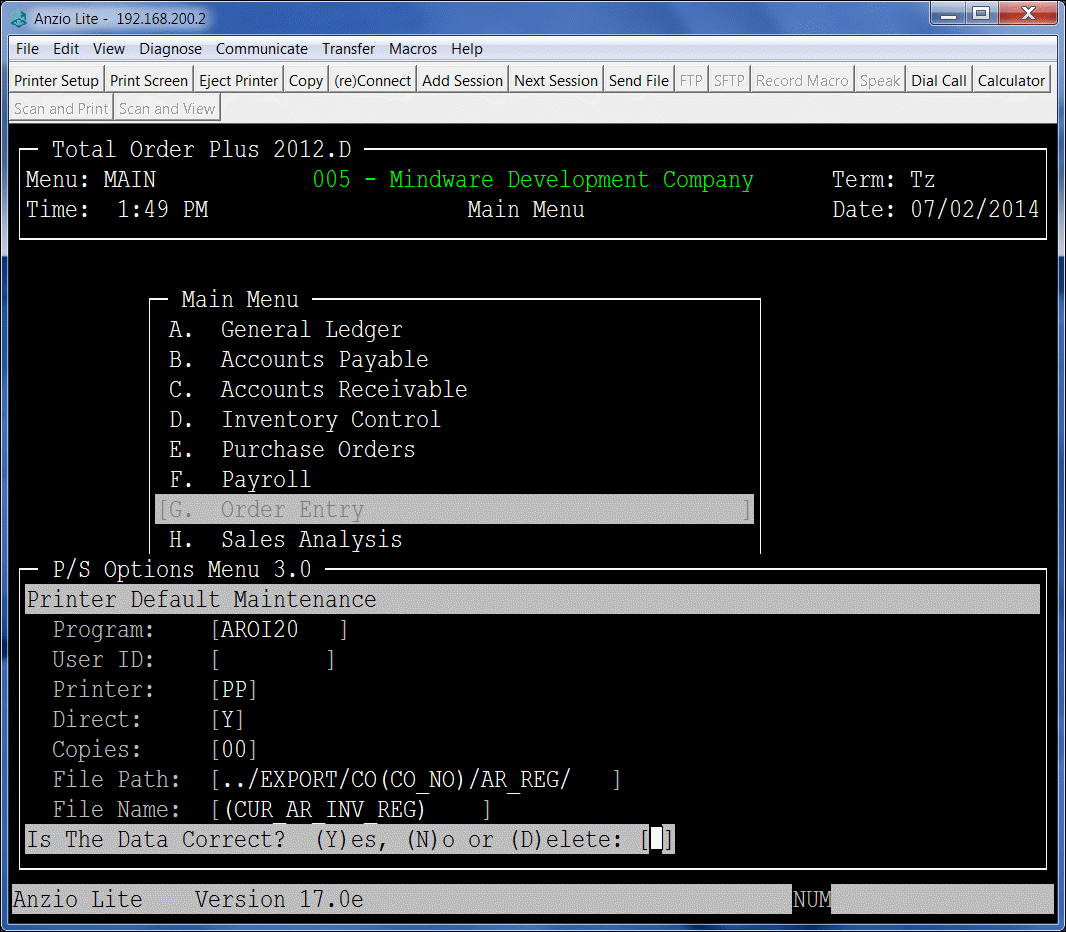
The Email Defaults allows you to print numerous TOP reports to a PDF file saving a lot of paper!  They are saved in the EXPORT (U Drive) so you can view them, attach them to an email, etc. Reports are stored by company number and register number. Below is an example of the A/R Open Invoice Data Entry Register setup.

email_pdf

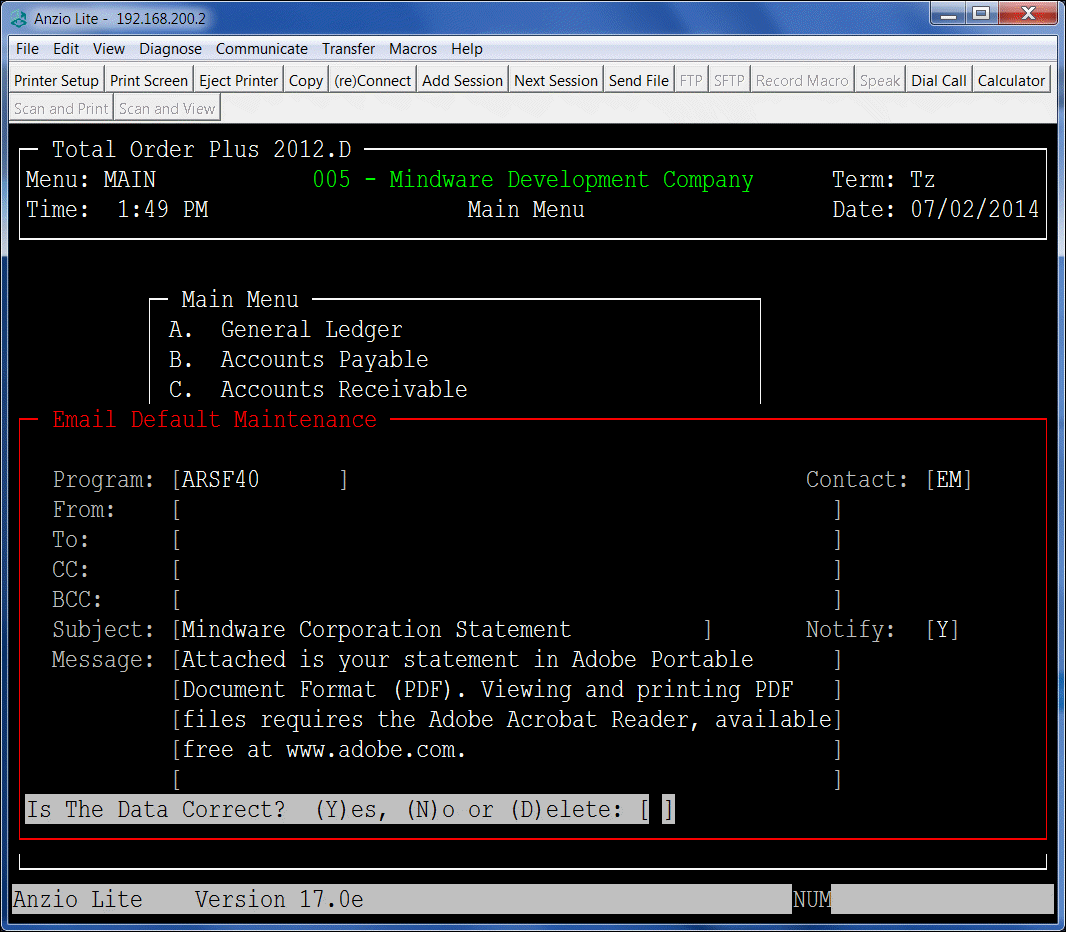
The Print Defaults screen may look familiar to you as the information you enter here will be the default info used in emailing statements, invoices, etc. when you select the (S)end option in TOP.  You can specify the type of customer contacts you want the email to go to, subject line and a message will be included with each email.

email_default


Rebuild Inventory Item Committed Quantites

The Rebuild Options Menu provides utility programs that are necessary to reconstruct data files under certain conditions. One of those conditions would be when you need to delete inventory items that show a zero ending balance but you are unable to because there are quantities displayed in the Quantity on PO, Order Committed or the Invoice Committed fields in the Item Balance & Sales Display on the Inventory Item Master Sub-Menu.

If an inventory item shows a balance in any of the committed fields, you would need to check the Item Order/Invoice Display and the Item Purchase Order Display to get the order or invoice number or the purchase order number. You can delete the open orders, invoices or purchase orders for the items you are wanting to delete. If the display does not show any open orders, invoices or purchase orders but does show a committed balance, you will need to run the utility programs to remove the outstanding balances.

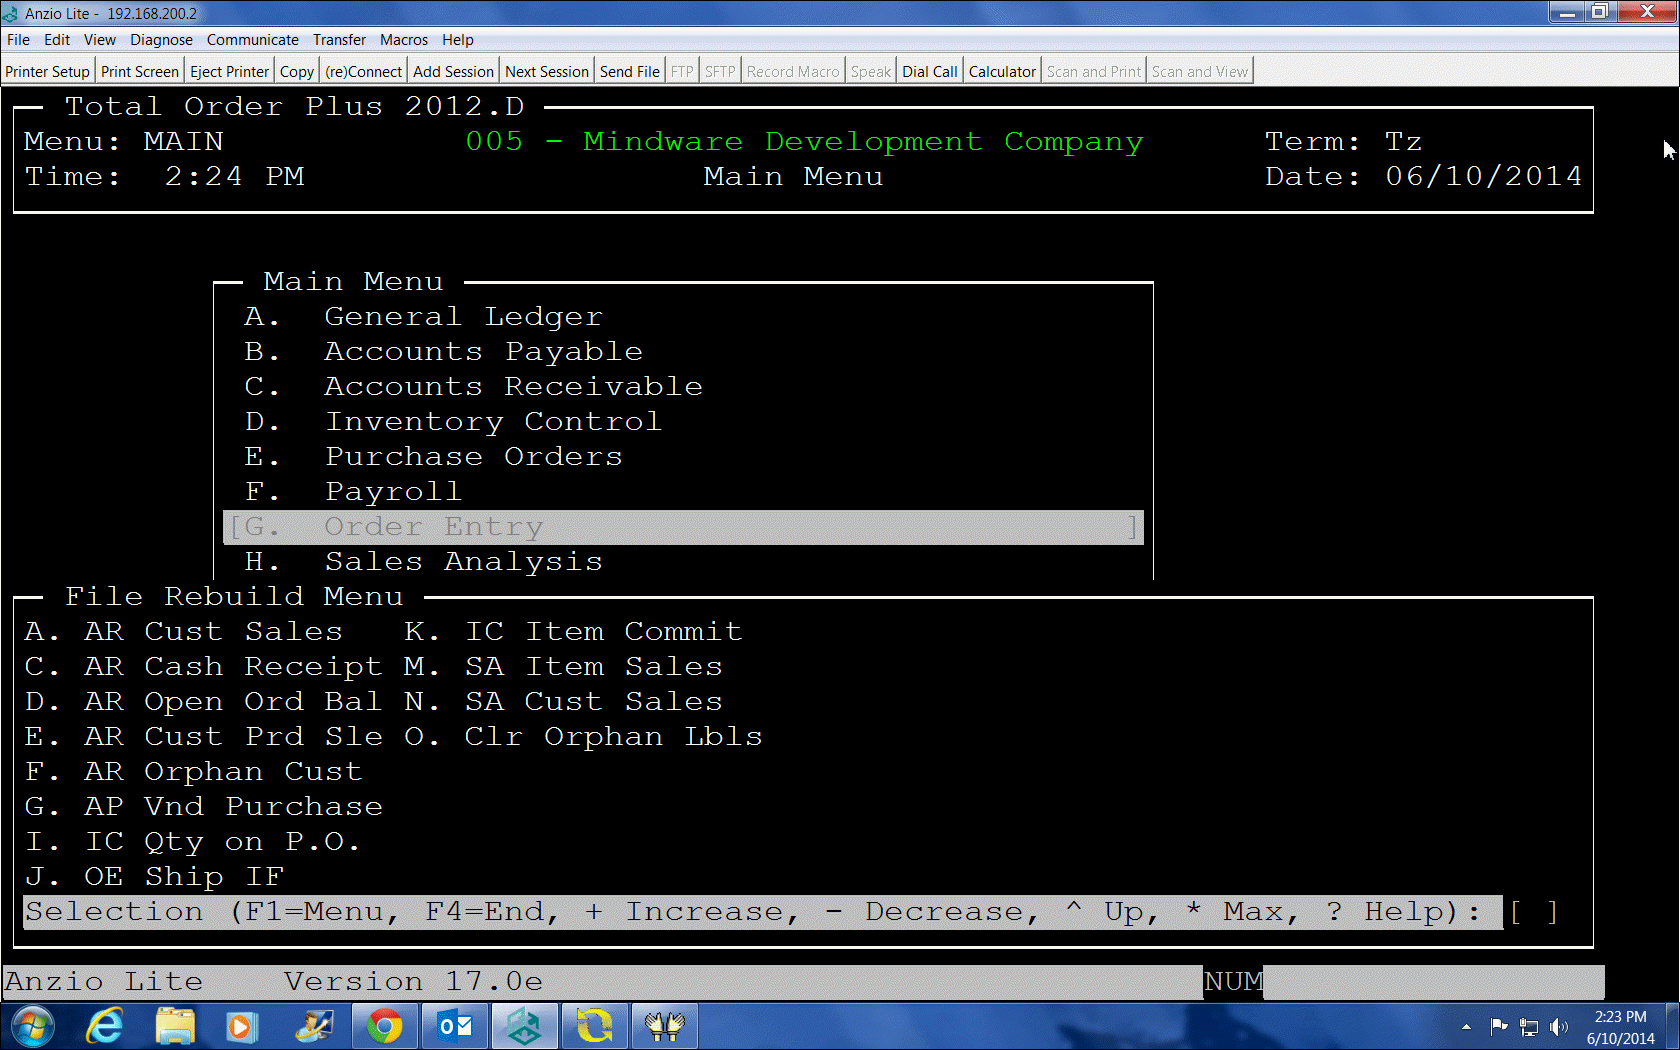
To run the utility programs, go to the TOP Main Menu and type a ? and enter RB to access the Rebuild Utility Menu. You would select I. IC Qty on P.O. and K. IC Item Committed. Once you have completed the rebuild programs, you will be able to delete the inventory items.

Notes:

You may want to run these programs periodically just to keep the committed quantities ‘in sync’. It will require all users to be out of Total Order Plus or at least at the TOP Main Menu.

rebuild_qty


Set Module Date in Total Order Plus

There are two types of dates used with each module in Total Order Plus, the current system date and the application date. The current system date is displayed at the top of the TOP Main Menu. The application date is the date that displays at the top of each TOP Main Menu in each module.

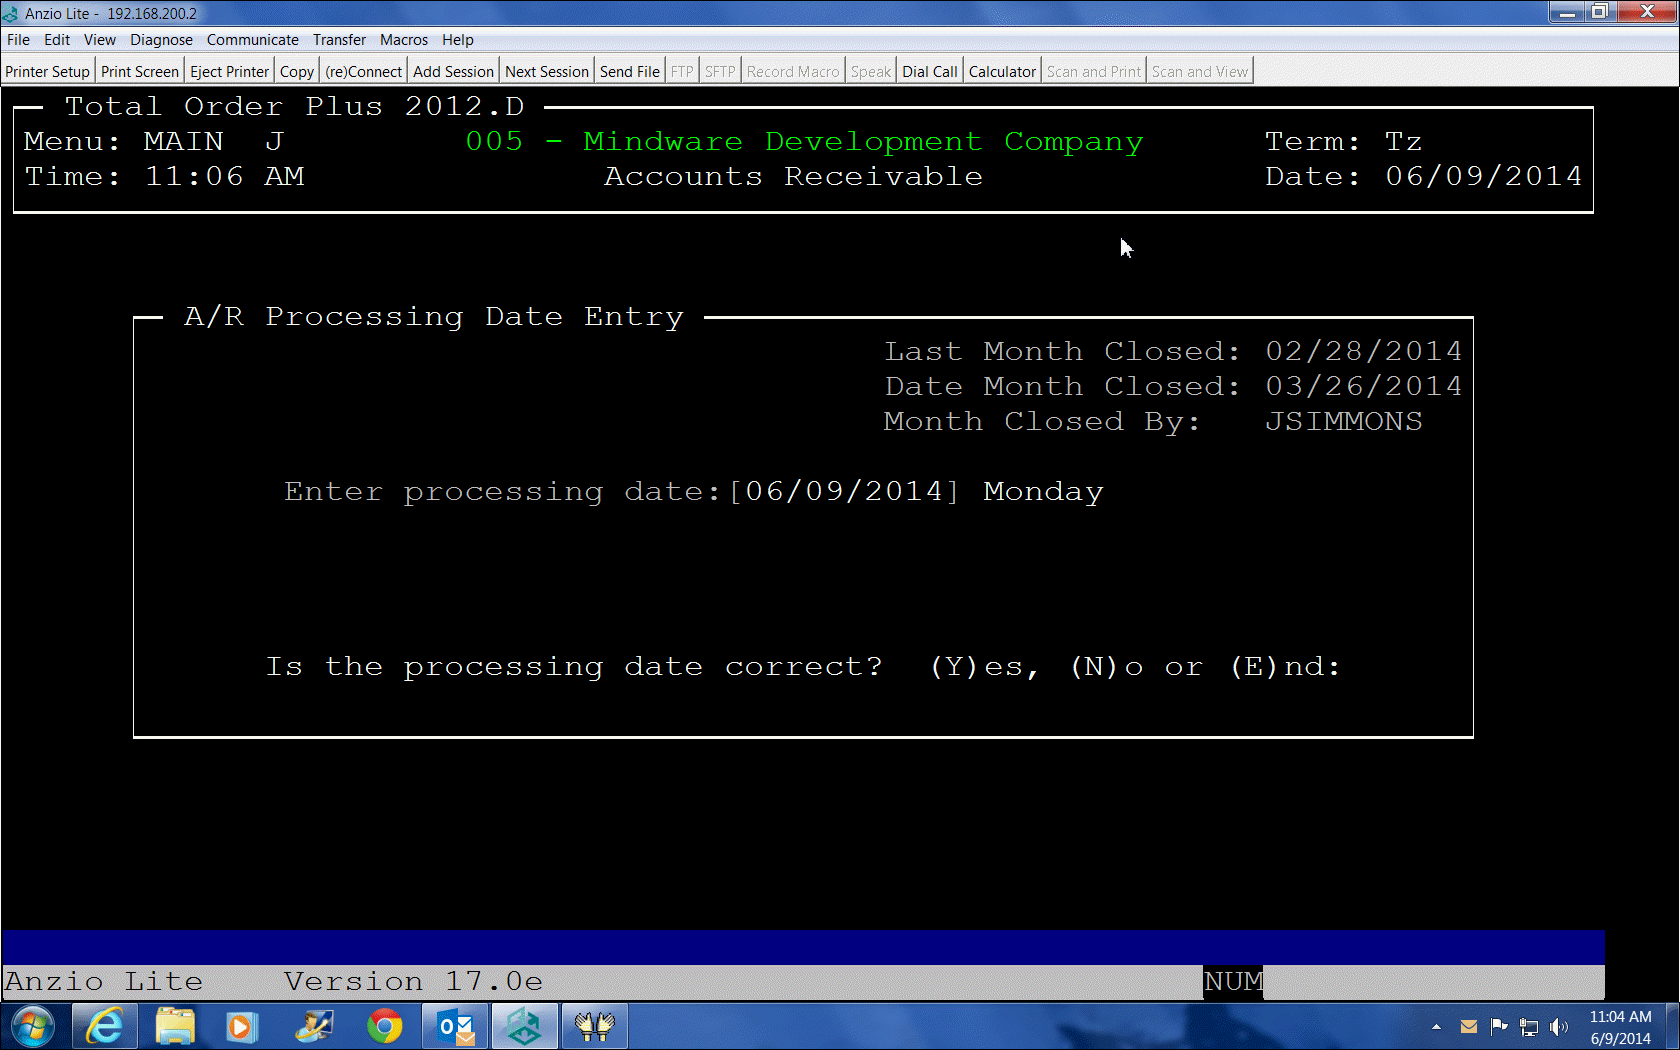
The application date is set for each module from any menu within the module by pressing the F5 key. Each module has its own application date. This date is used to post entries to the General Ledger, allowing postings to prior or future periods in one module without affecting other modules. The application date is used for the order and invoice date, statement date, purchase order date, etc. for each module.

The application date does not get changed automatically by the system and the user is responsible for maintaining the appropriate posting date. Below is the screen image you will see when you press F5 in any TOP module:

date_change


How to Create a User PDF Icon

Every user in Total Order Plus can have their own desktop icon that allows you to print and view forms and reports from your own PDF file. The file is created using your TOP login user name. Your PC must be mapped to the EXPORT folder (U Drive) on the server.

To create your icon, follow the steps below:

Right Click on your desktop to display a drop down list  ->  Select New  ->  Select  Shortcut

Type in the name of the file, folder, drive letter or Internet address or Click on Browse to select your option  (i.e.  U:\JSIMMONS.PDF  –  EXPORT drive letter+:\+login name+PDF extension)

Type in the name of your icon  ->   Click on Finish  ->  Your icon will display on your desktop

Notes:

If your browser is Microsoft Edge, You may have to right click on the icon and choose Adobe Reader to make it the default to open all PDF files.

To test creating a PDF file, your config.bbx file must contain an alias that allows the file creation. Contact Mindware Corporation to make sure this option is on your TOP printer menu:  ‘Create Adobe User PDF File ‘.

Notes:

You can create a shortcut to access any drive letter on the server – i.e. S for share drive, U for export. This will allow you quick access to these folders without having to open them using Explore.


Acer Hardware Warranty

Every Acer personal computer comes with either one year warranty or a three year warranty, depending on the model of the PC. The units with a three year warranty usually includes a limited first year onsite warranty.

In the event of a hardware issue during the warranty period, Acer does provide an end-user free support number:  800-816-2237.

When you contact technical support, you will need to provide them with the serial number and the model number of the unit (this is found on the back of the unit).

Most Acer LED monitors include a three year warranty. Serial number and model information is also found on the back of the unit.

Acer technical support will require you to have access to the unit so they can have you trouble shoot the issue while they are on the phone. If the issue is not resolved, you can either return the unit to Acer or find an Acer distributor/repair service that will validate the warranty.

How to Create a QR Code file

There are multiple software applications that can be used to create a QR (Quick Response) code file with an extension of png (Portible Network Graphics). Click on the link below and select one of the options.

http://freenuts.com/top-10-free-online-qr-code-generators/

Once you select one of the options, you will be asked for your company name and address, email address and the URL for your website. Once the information is entered, you will have the option to create the QR file and the option to save it to your PC.

The png file must be converted to a file that can be used in Total Order Plus on the invoice format 1 (using UnForm Version 7.0 and above). There may be other options on the Internet to convert the file but we use our UnForm vendor’s website www.synergetic-data.com and select the Image Conversion option. The converter will create 2 pdf files and 2 pcl files into a zip file. You can save the zip file on your PC and perform the unzip command.

Each file type has a portrait version and a landscape version. You will need to rename the pcl files to prn extensions. For example, you can use COMPANY NAME_QR.PRN and COMPANY NAME_QR.pdf as the file names (.pdf must be in lower case). These files must be located in the TOP/GRAPHICS folder in Total Order Plus.

Notes:

You can use the initials of your company name to keep it simple. For example, Mindware Corporation of America uses MCA_QR.PRN and MCA_QR.pdf.


How To Capture a TOP Screen

There are a few ways to capture system messages, screen messages and error messages within Total Order Plus to send via email for a support request. You can do a screen print  to a printer if you are using a terminal emulator with that option and fax the screen print to Mindware. You can capture a screen print onto your Windows clipboard and insert the screen image from the clipboard into your email. If you have a scanner that will create the image into a PDF file, you can attach the PDF to your email.

To capture your screen image to the clipboard, press the CTRL+ALT+ PrtScrn key on your keyboard and the image is attached to your clipboard. Once you create your email, you can click on the clipboard option, highlight the image in the clipboard that you want to insert and select the paste option.  Windows automatically inserts the screen image into the body of your email.

Total Order Plus Report Writer

The Total Order Plus Report Writer allows users to create their own reports to a printer or file output from the Total Order Plus data base. The file output can be imported into an Excel spreadsheet.

Files in each module are displayed for selection. Once the file is selected, you can select a range of data or you can filter the output by any field within a file. You have options to filter the data by fields that are ‘equal’, ‘greater than’, ‘greater than or equal to’, ‘less than’, ‘less than or equal to’ and ‘not equal to’. You can select a range or filter option or both, as well as select to print to a printer or export to a file. As each field is selected for the report, the print positions for each column displays on your screen. Each TOP module has a Report Writer selection. Follow these steps to create a report:

  • Select the Report Writer from any TOP report menu
  • The list of available file names will display in the File List
  • Use your up or down arrow keys, page up or down keys, or enter a letter to select the file name

Once the file is selected, the File Description name will display on your screen.

Filter Option:

Select R if you want to select a range of items (range of customers, inventory items, salespersons, etc. or if you want to select just one customer, one inventory item, one salesperson, etc.)

Select F if you want to filter the data by selecting certain data fields within the file

Select B which will allow you to use both the Range and Filter options

File Output:

Enter a Y if you want the output to be written to a text file

Notes:

The file name will be displayed on your screen and the text file will be created in the EXPORT folder on the U drive. You can override the file name but the ../EXPORT/ and the .TXT extension must remain.

Include Heading:

Type Y to include report headings

If you selected the (R)ange option, a Print Selection window will allow you to input a range of selections, i.e. customer, vendor, salesperson, inventory items, etc. If you want to select just one customer, item, etc., the first and last code will be the same.

Cursor will continue to the Field Selection screen.

The (F)ilter option will display the Filter Selection window.

Number:

A field sequence number will be assigned to each selection. Press the Enter key to accept

Field:

You will be able to select from a Field List window, each data item you want to use to select for your report. After selecting a field, you will be prompted with specific options to apply to each field you select to filter.

Function:

Select a function 1-6:   1=Equal, 2=Greater than, 3=Greater than or equal to, 4=Less than, 5=Less than or equal to, 6=Not equal to

Value:

Depending on which function you selected, you will enter a value for the selected field. As an example, if you selected a report to print by a specific salesperson, you would enter the salesperson code in the Value field. The report will filter the data only for that one salesperson.

If you selected to do a range and to filter the data, you will do both of the steps mentioned above.

Once you complete the steps above, you will proceed to the Field Selection window to begin selecting what data fields you want to print for this report, with an option to select all fields by using the F1 key. You must keep in mind, the report cannot exceed 132 print positions when printing to a printer. The number of columns used with each selection is displayed on your screen.

Number:

The field selection number automatically display – press the Enter key to accept

Field List:

A window displays all of the fields within the file that are available to print. Use your arrow keys to move the cursor up and down the selections or press the Enter key to include a field in your report or enter the alpha letter to insert

Press F1 to select all fields in the list

Field:

The name of the field that you selected will display. If you selected an incorrect field name, press F1 to return to the Field List or answer Yes to include the field in your report.

Once you have completed your selection, press F4 to either print the report or print the report to a file.

The TOP Printer Menu displays for you to select a printer for the report or the data will be written to your selected file name and the cursor will return to the TOP Report Menu.