Author Archives: Joanne Simmons

Install a printer in Windows 7 using an IP address

1. Click Start and select Devices and Printers.

2. Select Add a printer.

3. Select Add a local printer.

4. Select Create a new port.

5. Select Standard TCP/IP Port. Click Next.

6. Enter printer IP address in the Hostname or IP address (the Port name will default to the same IP address).

Windows 7 - Adding printer by IP address

7. Select the Query the printer and automatically select the driver to use option. Click Next.

8. Windows 7 should find the printer if the printer is on and configured correctly. You may have to specify more information. If prompted, Select the type of network adapter installed in the printer in the Device Type drop-down list. You can also click Custom to specify custom settings for the network printer. Click Next.

FedEx Ship Manager Installation

Install From CD-Rom

Will need to be version V.2285 or greater including integration option.

Close all programs on the PC

Insert FedEx Ship Manager Software -> Select Ok for English

Select Next for Welcome to the FedEx Ship Manager install Window

Select Yes for License Agreement Window

Select Next for Choose Destination Location Window

Select Next for FedEx Ship Manager Install Options Window (leave Network Option Blank)

Select Next for Select Program Folder Window

Wait for installation

Select Unblock from Windows Security Alert if message is displayed

Select Finish for Thank you for installing FedEx Ship Manager Window (Yes to restart computer)

Remove FedEx CD

Install Basis ODBC Driver

Use selection on Basis ODBC Driver for installation

Note:

If you have installed on same PC as UPS, you can skip this step.

Setup FedEx Ship Manager

If not yet configured, follow the steps below:

Start program by double clicking on the FedEx Ship Manager icon

Select Next for FedEx Manager Registration Window

Select printer option and select Next

Select Report Printer & Label Printer, then Next from FedEx Ship Manager Printer Configuration Window

Select Next for FedEx Ship Manager Communication Configuration

Select Next for FedEx Ship Manager Communication Configuration (Use Lan or IPS option)

Enter account information and select Next from FedEx Ship Manager Customer Information Window

Select international information & select Finish from FedEx Ship Manager Customer Information Window

Wait for Registration to complete

Select Ship or Exit from FedEx Ship Manager Window

Setup TOP Integration

Start FedEx Ship Manager if not running.

Select Integration from the menu bar

Select FedEx Integration Assistant

Select Continue for Introduction Window

Select Continue for Before You Begin Window

Select Import, then Continue from Integration Type Window

Select ODBC -> TOP_SHIPPING -> Continue from Source Window

Select Yes to all three questions -> Continue from Shipping Window

Select After I enter a Customer Reference -> Continue from the Lookup Window

Select Recipient -> Check the following fields -> Select Ok

Company                              Contact Name

Address 1                              Address 2

City                                        State/Province

Postal Code

ID                                           Country

Email

Shipment Notification

Select Package -> Check the following fields -> Select Ok

Declared Value                                    Customer Reference

Package Type

PO Number                                           Service Type

Select Sender then check the following fields -> Select Ok

Company                                              Address 1

Address 2                                              City

State/Province                                      Postal Code

Account Number

Select Continue from the Information Window

Select the Table, Field and Default options as below:

Package Information

Declared Value                  OE_SHIPTO         SHPMNT_VALUE

Package Type                     OE_SHIPTO         Customer Package

Service Type                         OE_SHIPTO         SERVICE_TYPE

PO Number                           OE_SHIPTO         PO_NO

Recipient Information

Recipient Company            OE_SHIPTO         SHIPTO_NAME

Recipient Contact               OE_SHIPTO         CC_NAME

Recipient Address 1            OE_SHIPTO         SHIPTO_ADD1

Recipient Address 2            OE_SHIPTO         SHIPTO_ADD2

Recipient City                      OE_SHIPTO         SHIPTO_CITY

Recipient State                     OE_SHIPTO         SHIPTO_STATE

Recipient Postal Code        OE_SHIPTO         SHIPTO_ZIP

Recipient ID                         OE_SHIPTO         ORDER_NO

Recipient Country             OE_SHIPTO            US – UNITED STATES

Recipient Email                   OE_SHIPTO         EMAIL_ADDR

Recipient Shipment             OE_SHIPTO         NOTIFY_FLG

Sender Information

Sender Company                OE_SHIPTO         RETURN_NAME

Sender Address 1 OE_SHIPTO         RETURN_ADD1

Sender Address 2 OE_SHIPTO         RETURN_ADD2

Sender City                           OE_SHIPTO         RETURN_CITY

Sender State                         OE_SHIPTO         RETURN_STATE

Sender Postal Code             OE_SHIPTO         RETURN_ZIP

Sender Account No             OE_SHIPTO         RECV_UPS_NO

Select Continue

Select Order Number for Customer Reference -> Select Ok

Select Continue from Conversion Window -> Select Save

Select Save from Save Integration Profile Window (Profile Name: MyProfile)

Select Finish

Select Integration from menu bar

Select MyProfile to display Customer Reference Input Window


Order Audit

TechLine

The Tech Line, by Joanne Simmons

Question:

There are times when an order, quote or invoice gets deleted or maybe the prices have been changed and it would be nice to know who deleted or changed pricing, etc . It would be helpful to have a way to know exactly what happened to a document in these situations.

Answer:

Total Order Plus has order audit trails in both order and invoice data entry.

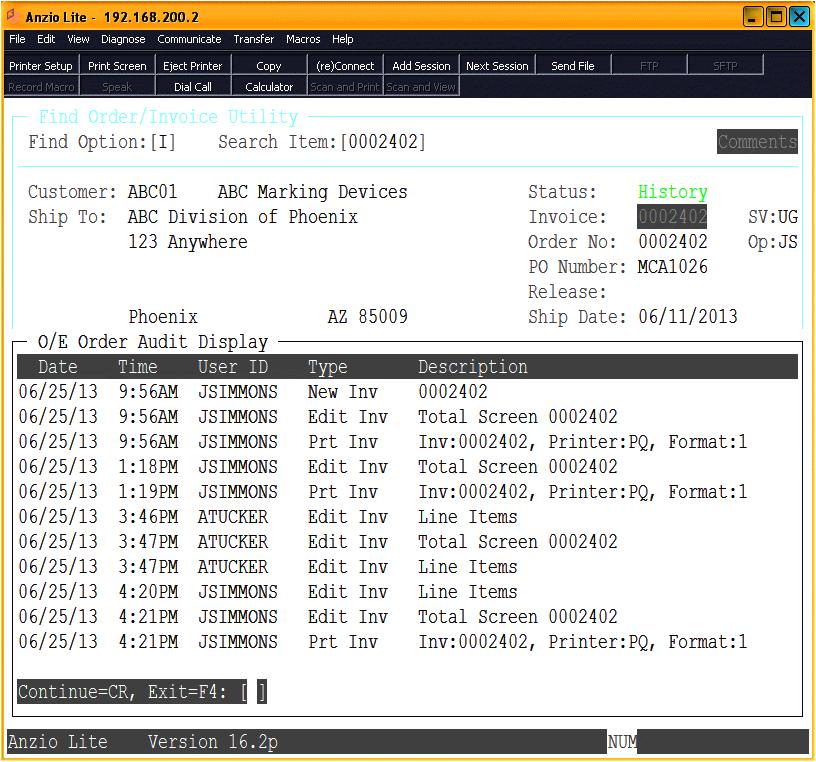
If you enter an order, quote or invoice on the Order Entry System Menu, there is now a new selection on the sub-menu –  ‘Order Audit’ and ‘Invoice Audit’. It will display every action that has been processed on that document.

You can also see the audit trail in the Find Order/Invoice Utility on an order, invoice or quote and history invoices. Below is an example of the Order Audit option.

OrderAudit

SCO Unix Shutdown Command

Prior to issuing the shutdown command, you must determine if all users have exited back to the SCO login prompt. Just because a workstation has been turned off, it doesn’t necessarily mean that they have logged off properly. To start the system shutdown, enter the following commands:

Login: root

Password: xxxxxx (ask system supervisor)

# who

The system should only display one user being logged in and that should be root. You can re-enter the who command until you see that everyone has logged off properly. When you are ready to continue, issue this command:

# shutdown -g0

Shutdown automatically executes the sync and haltsys command and can allow 0 to 15 minutes before the shutdown takes place, allowing users to complete the work they are doing prior to issuing the shutdown command. The example above (-g0) is for 0 minutes.

The shutdown is complete when you see this prompt:

** Safe To Power Off **

or

** Press Any Key to Re-Boot **

Press the Enter key to reboot. When the server comes back up, a message like below displays:

Boot:

Press the Enter key to continue. If the Enter key isn’t pushed after a short period of time, the boot process will automatically continue.

Type CTRL+D keys to proceed with normal startup (or give root password for system maintenance).

Press the Enter key at the system date and time display.

The system will automatically return each workstation to their SCO login prompt.

ALT+CTRL+F1 keys will return the screen to the normal SCO Unix scosysv character login prompt on the server. ALT+CTRL+F3 can be used as a secondary login.

Note:

If the system is shutdown incorrectly or loses power while users have data files open, there is a probability of damage being done to records within any given file, causing corrupt file integrity. You must either run a restore procedure from a backup processed before the shutdown or run file rebuild programs to try and correct the errors.


Which DVD Disc to Select for Backup

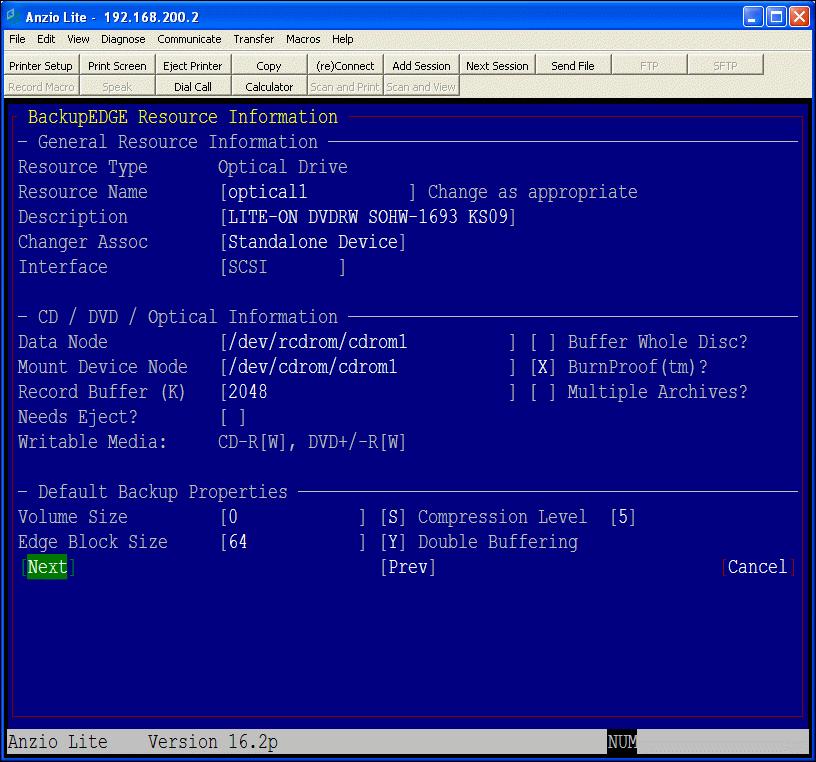
Our customer base uses BackupEdge 2.0 or 3.0 for their nightly backup which requires using either a CD-R, CD-RW, DVD-RW, etc. Which one to use can depend on the backup drive installed in your file server. Within BackupEdge, there is a menu selection that displays the specifications of the drive and lists the type of disc that is compatible with that particular drive. However, there have been instances where a drive is very ‘picky’ about what kind of disc it likes! Most drives prefer DVD-RW and they can be used in a weekly rotation. Older file servers and older versions of BackupEdge only use CD-R or CD-RW. The CD-R can only be used once whereas the CD-RW can also be used in a rotation.

There are different capacities of DVD’s to use for backup depending on the amount of data you specify in the setup of BackupEdge. TOP does not require much room unless your history files have not been purged on a regular basis. Most of our customers store reports in PDF format, which takes up more storage on the DVD, along with the contents of the ‘S” Drive (share drive). Each customer must decide which data is most important to back up on a nightly or monthly schedule to avoid having to use more than one DVD a night.

Notes:

If you have a Red Hat Linux server, it is possible that you have a Blu Ray DVD drive installed. You can check with Mindware for that information. If the drive is Blu Ray, we recommend using dual layer VERBATIM Blu- Ray Media  BD-RE DL  50GB 2X for best results.

Below is an example of BackupEdge drive specifications – see Writable Media:

DVD_BACKUPS


Ipconfig Command

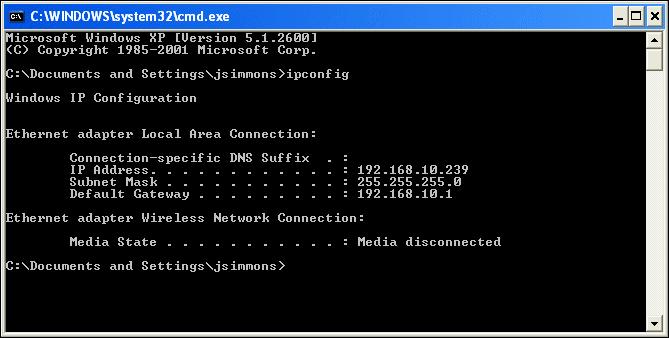
To find out what the LAN (Local Area Network) IP address is for your personal computer, you must get to the command prompt (DOS prompt):

Windows XP

Click Start -> Click Run -> Type cmd -> Click Ok

Windows 7

Click Start  ->  Type cmd in the Search programs and files window

Type ipconfig to see the following information:

dos_prompt

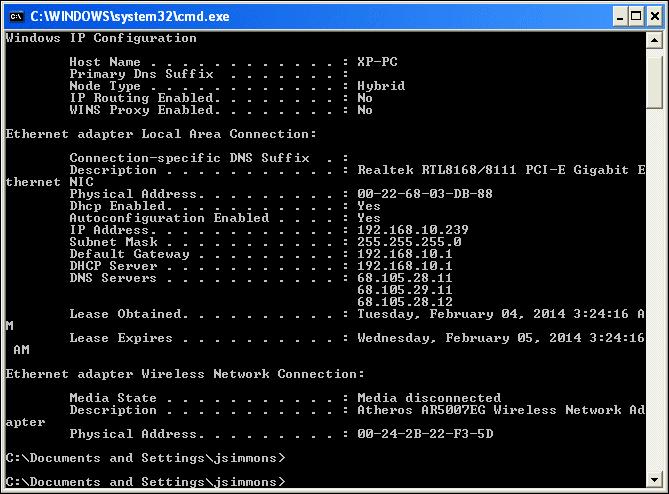
Type ipconfig /all to view additional IP information:

DOS_PROMPT_ALL


Type exit to return to your desktop.

Notes:

If you want to see your WAN (Wide Area Network) IP address, open your browser and type www.whatismyip.com

MailCall Login Name and Password

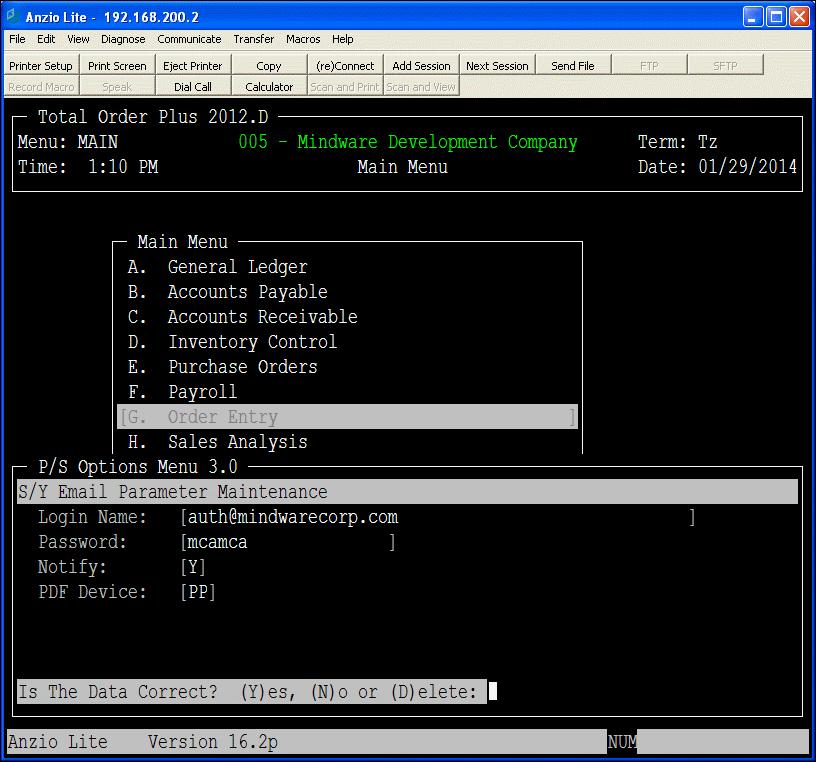
Customers using MailCall to email orders, quotes, invoices, purchase orders and statements should be aware of where the login name and password is maintained in Total Order Plus. Your Internet Provider may change the information or it will change if you decide to switch providers.

At the TOP Main Menu, type a ? to display a blank Options Menu window. Type PS for the Options Menu name to display the PS Options Menu 3.0 selections. You will select Email Parameters.

Type a valid email address and login name that you have given to your provider and can be verified when sending an email. You will enter a Y for Default Notification if you want to receive a notice when each email has been successfully transmitted. TOP has established PP as the PDF printer device name.

MAILCALL_PARAM

Payroll End of Year Closing Procedure

Many customers each year have issues in closing the Total Order Plus Payroll at the end of the year, leaving balances in the employee records that should have been cleared.

The system requires that the last month of the year and the last quarter of the year be closed prior to processing year-end procedures. The yearly earnings report and 1099 processing are options to the user. 1099 processing is usually done in the Accounts Payable module using the vendor masterfile information.

The W-2 Formatter can be maintained by the user. The formatter controls how the W-2 information is printed on certain lines on the form and  a specific row and column (right to left).

The Year-End Update clears all payroll figures for the year and removes all terminated employees. There are a couple of questions that MUST be answered Yes in order to properly close the year:

ARE YOU READY TO RUN THE YEAR-END PROCESSING? (Y-N)

HAVE YOU PRINTED THE YEARLY EARNINGS REGISTER? (YES-NO) (Optional)

ARE YOU READY TO PROCEED WITH THE YEAR END UPDATE? (YES-NO)

If you answer No to this question, you will see a warning message with an option to abort the year end closing. To proceed with the closing, you must answer No to abort.

ADJUST DEDUCTION GOALS BASED ON Y-T-D PAYMENTS?  (YES-NO)

You must answer Yes even if you do not have any deductions set up with goal amounts.

This concludes the year end procedure.

How to Use ‘MISC’ Cash Receipts Option

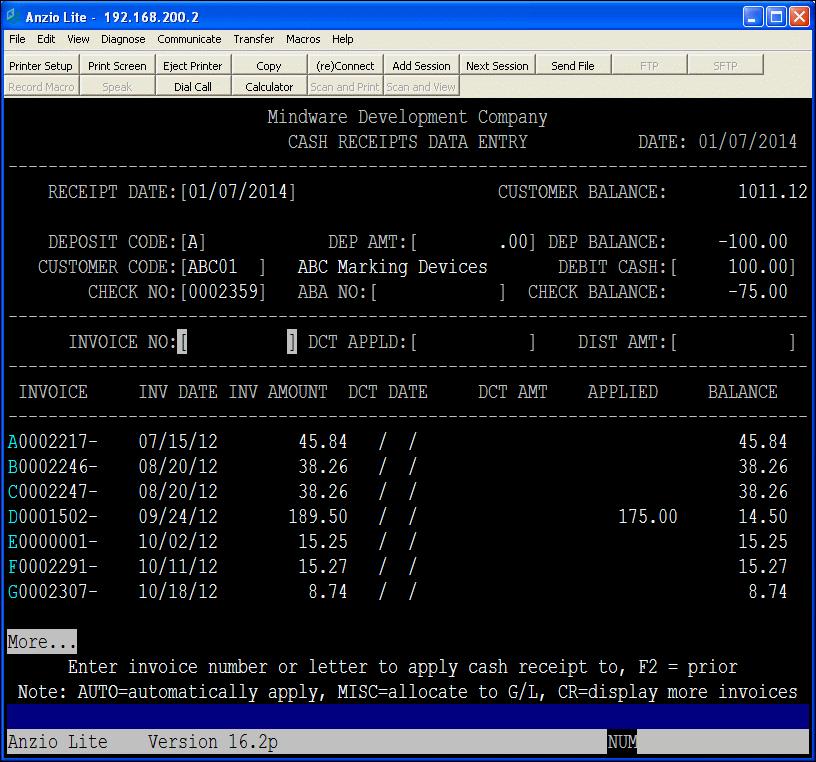
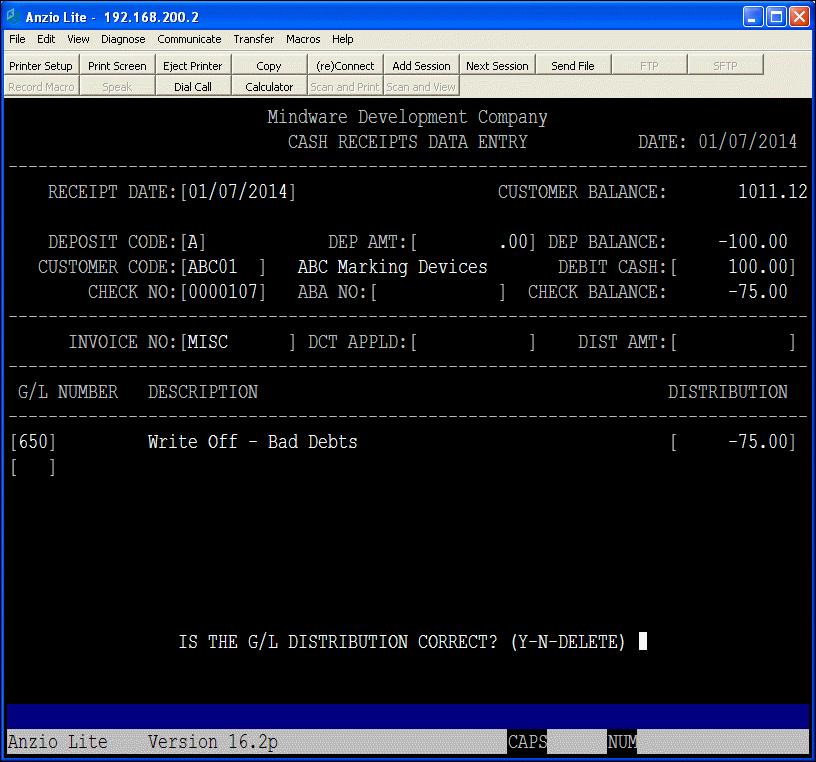
When entering cash receipts in TOP, there are instances when you need to allocate a receipt to a General Ledger account number. You may have an insurance refund check, a rent payment returned, a customer that will not pay an entire invoice or only pay a partial payment, a vendor that may refund a discount, etc. These instances are when you need to be able to distribute monies to a G/L account.

The screen below displays when you are at the Invoice Number field. Type MISC to display a second input screen.

AR_MISC_CASH

ar_misc_cash2

Setup Export From UPS WorldShip to TOP

To setup the export of shipping information from UPS WorldShip to Total Order Plus, you will need to map the V drive, Click on the link below for mapping instructions:

https://mindwarecorp.com/networking/mapping-drives-for-top/

The information is imported into the Total Order Plus invoice history file during the Order Entry End-of-Day processing. Information includes the carrier, tracking number, service type (i.e. UPS Ground), amount of shipping and the ship date. This information is available in the Find Order/Invoice Utility on the Order Entry System Menu.

Setup steps are listed below:

1.     Select Import/Export Data from WorldShip menu

2.     Select Create or edit import or export map

3.     Select Export data from WorldShip

4.     Select Export CSV

5.     Select Freight Shipment

6.     Enter TOP_IMPORT001 and select Create

7.     Add fields in the following order

Package:Reference 1

Shipment Info:Void Indicator

Shipment Info:Lead Tracking Number

Shipment Info:Service Type

Shipment Info:Total Shipment Reference Charge

Package:Reference 2

Package:Reference 3

8.     Select Define

9      Enter V:\CO001\UPS\UPS_CSV_EXPORT.csv

10   Select Save

11. Select Import/Export Data from WorldShip menu

12.  Select Automatic Export During End Of Day

13.  Select More

14.  Select TOP_IMPORT001

15.  Select EXPORT