Author Archives: Joanne Simmons

Reset Accounts Receivable Period-End Flag

Total Order Plus has added an option on the Accounts Receivable Period-End Processing menu that sets a flag when you begin the End-of-Month procedure. This prevents another user from accessing the Accounts Receivable module during this process until it is complete.

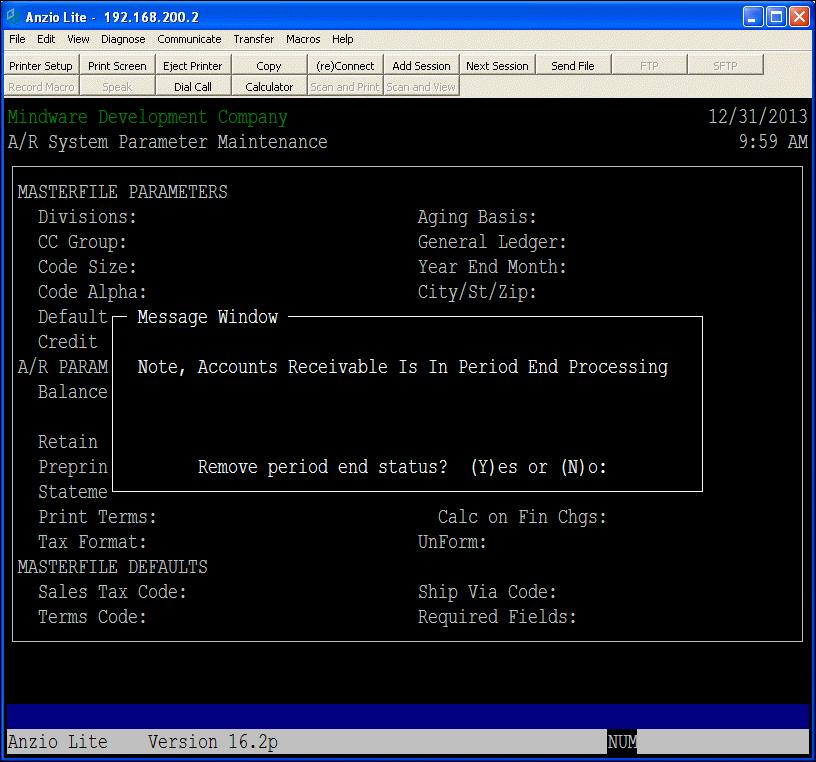
When you set the flag in Begin Period End Process menu selection, you will be asked ‘Set End-of-Period Status? (Y)es or (N)o – Note: This Will Lock Other Users Out Of Accounts Receivable’. If you do not want to continue closing the month, you must answer No to return to the menu. If you answer Yes, TOP sets the flag and does not remove it until the Period End is complete. You will see this message flashing on your screen once the flag is set –  ‘A/R Period-End Processing in Process’ and it will remain on your screen until the entire procedure is completed. If another user tries to access the A/R module during the closing, you will see the message below.

ar_end_of_month_flag

If you accidentally answer Yes, you can remove the flag by going to the A/R Definition Menu  ->  Select Accounts Receivable Parameters and answer Yes to remove the flag. The user that sets the flag is the only one that can remove the flag.

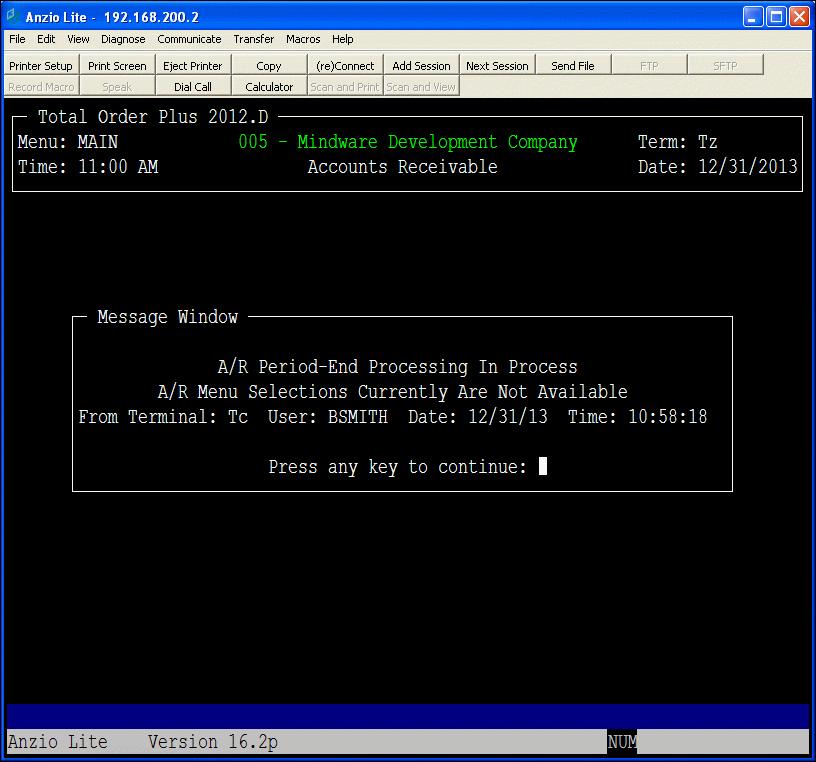
ar_end_of_month_flag


Password Protect Customer Credit Card Information

Some of our customers have been apprehensive about using Customer Card Maintenance on the Customer Sub-Menu. They do not want the credit card information to be available for all employees to see. Total Order Plus allows you to set up a password to prevent anyone without authorization to access the information.

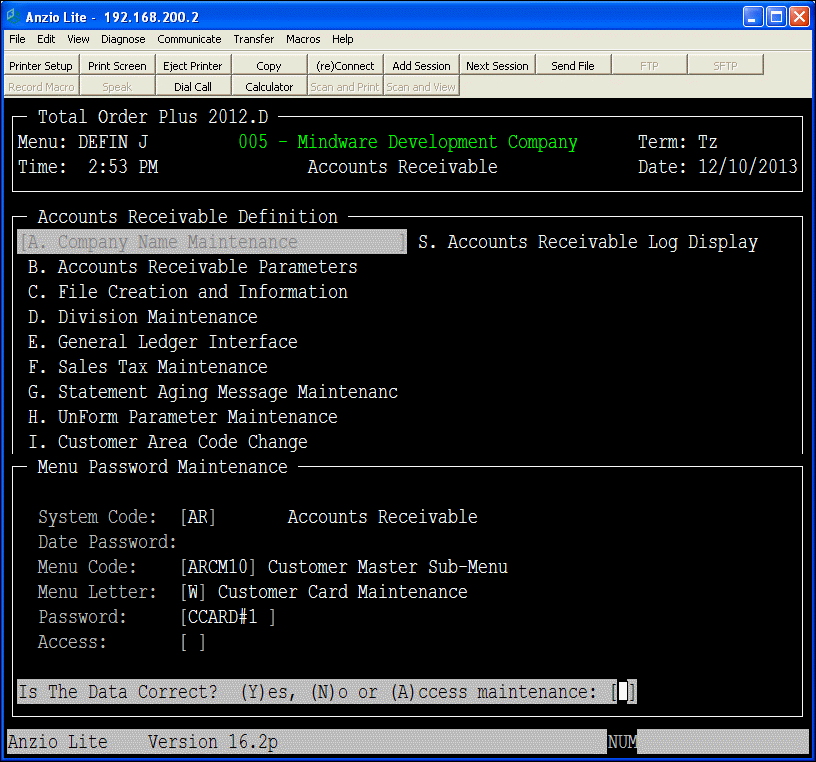
To set up the password, access the Total Order Plus Main Menu  ->   Accounts Receivable  ->  Accounts Receivable Definition Menu  ->  Password Maintenance.

The System Code is AR, Menu Code is ARCM10 and the Menu Letter will be W on the Customer Sub-Menu. Type your password for Customer Card Maintenance and leave the Access Code blank. Whenever anyone tries to access the maintenance program, they will need to be aware of the password in order to see the customer credit card information.

For more information on credit card security, click on the link below.

www.mindwarecorp.info/top-accounts-receivable/credit-card-access/

credit_card_passwd

Rasmussen Software Announces Release of Anzio Lite 17

Rasmussen Software has announced the release and immediate availability of Anzio Lite 17 and AnzioWin 17. Anzio version 17 is now available for download at www.anzio.com. This major update includes numerous improvements for work with Windows 8, touch screens, large screens, small screens, mobility and IPv6. Only in AnzioWin, it has enhancements to the Print Wizard engine, SSH backchannel printing, and image document management.

Anzio 17 runs on Windows XP and later, although some new features rely on enhancements in Vista and later. All versions of Anzio Lite and AnzioWin are 32-bit programs that run on 32-bit or 64-bit versions of Windows. Recent versions run on Windows 8 (not RT) as desktop programs, not as Metro apps.

They are offering a free upgrade until March 3, 2014 to customers who have purchased Anzio Lite 16 since July 1, 2013. Other users with any version of Anzio Lite can upgrade to version 17 at a special price. Upgrades are also available for a user wanting to upgrade from Anzio Lite to AnzioWin.

Call Mindware at 800-950-0401 or email [email protected] for upgrade and pricing information.

How To Access Your Backup Server

Customers with backup file servers need to make sure their automatic nightly backup is working properly. Weather, electrical outages or spikes, etc. can all affect the main file server and at the same time the backup server. Without checking on the situation at least once a week, there is no guarantee that you data is being transferred.

We recommend that you do a shutdown on the two file servers at least once a month. There is a certain procedure you need to use to shutdown both servers and in this order:

Shutdown the main file server and leave it at the ‘Press Any Key to Reboot’ message  ->   Shutdown the backup server,  ->  Reboot the backup server  ->  Reboot  the main server

To toggle back and forth between the two servers follow these instructions:

Press the Scroll Lock key twice  ->  Press the Up Arrow key to access the backup server login. The message SCO OpenServer Release (top2) will display on the backup server as the login prompt so you know you are on the correct server. You can login as root to do the shutdown from the # prompt.

Press the Scroll Lock key twice -> Press the Down Arrow key to return to the main server.

Note:

To see if the data on the backup server is current with the main server, you can login on the backup server and look at invoice history or the date on the Order Entry Menu.

Another way to access the backup server is to login on the main server as root. At the # prompt, enter telnet 192.168.1.3 to get to the backup server login.


Add Comments to History Invoice

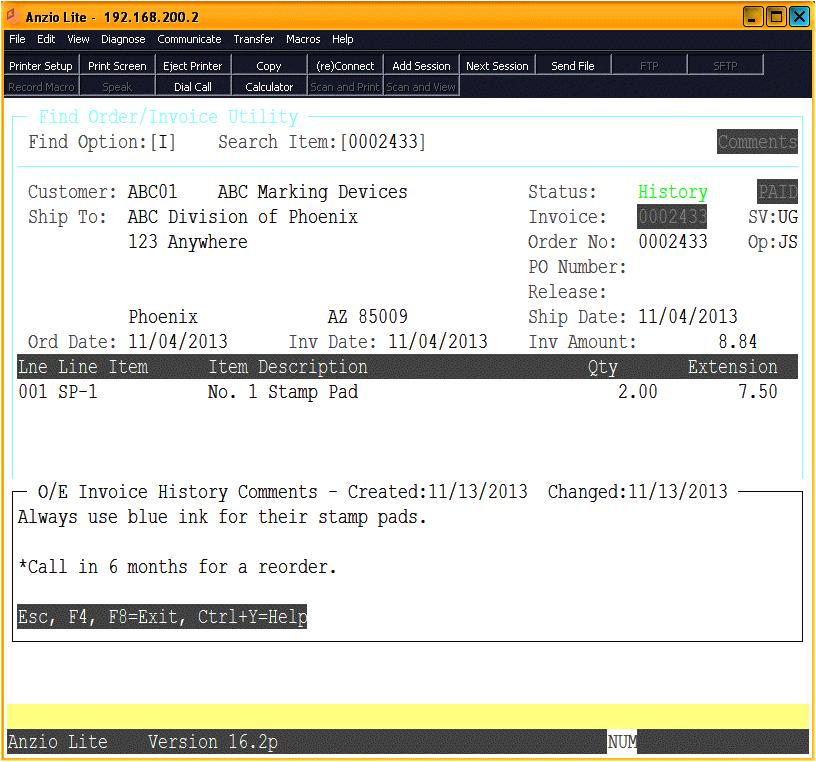
You have the option to enter comments to an order in Total Order Plus, which will be stored in the invoice history file. Perhaps an order that you wanted to enter comments is converted into an invoice and updated to the history file before you had a chance to enter your comments. Don’t worry it isn’t too late!

Select Order Entry on the TOP Main Menu -> Select Order Entry System Menu -> Select Find Order/Invoice Utility. Enter Find Option ‘I’ for invoice and the Search Item will be the invoice number. Begin the search until your invoice displays on your screen. You will have numerous selections at the bottom of your screen. You will select (C)omments. The O/E Invoice History Comments input window will allow you to enter multiple lines of text.

INV_HIST_COMMENTS

Sales Tax Only Credit Memo

The Sales Tax field on the Invoice Data Entry total screen does not allow access while entering an invoice. The sales tax amount is calculated automatically in Total Order Plus.

There are instances when you will need to credit or adjust the sales tax amount on an invoice. It may be due to a sales tax percentage change, an invoice processed before the change was made in TOP, tax was calculated on an item that should not have been taxable, etc. Regardless of the reason, TOP allows you to issue a credit invoice for sales tax only.

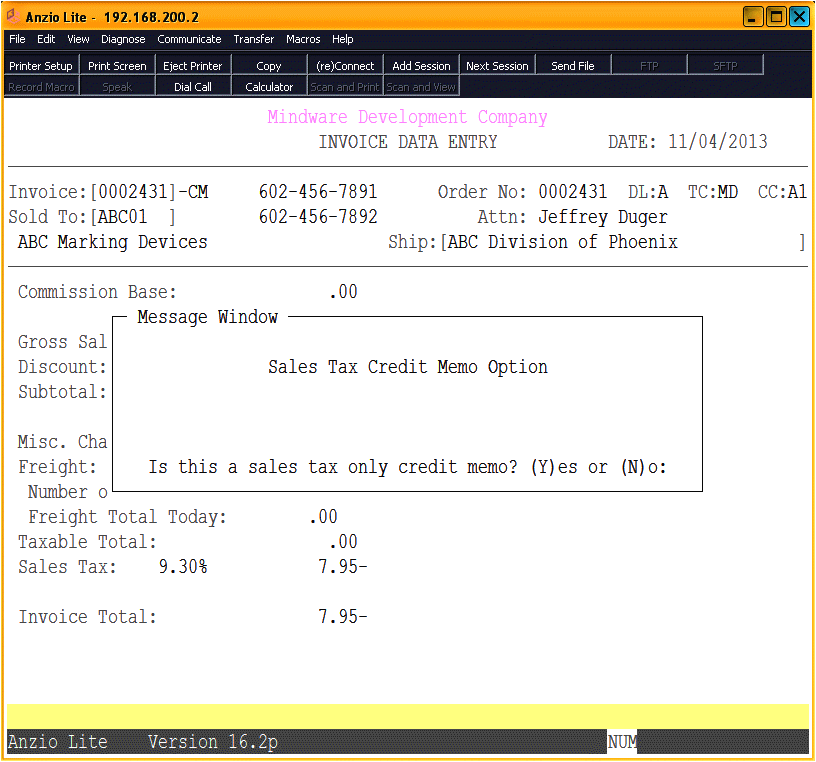
In Invoice Data Entry, you would enter ‘C’ at the invoice number to start the credit invoice process. TOP will assign an invoice number followed by a CM after the number. Once the customer code and ship to information is entered in the address portion of the invoice, you will proceed to the header portion to enter the information.

Once you get to the line detail input field, you MUST press F4 to bypass entering any line item information. TOP will display the total screen with the message shown below. Once you answer (Y)es to “Is this a sales tax only credit memo? (Y)es or (N)o”:, you will be able to enter the adjusted amount of sales tax. The amount will automatically display as a credit. tax_only_credit_inv

Accounts Receivable Credit Codes

TechLine

The Tech Line, by Joanne Simmons

Question:

Several of our customers are having credit issues on paying their invoices. Some of them are past due by many months, some are making partial payments, others on a payment plan, etc.  How can we designate which ones have these different issues?

Answer:

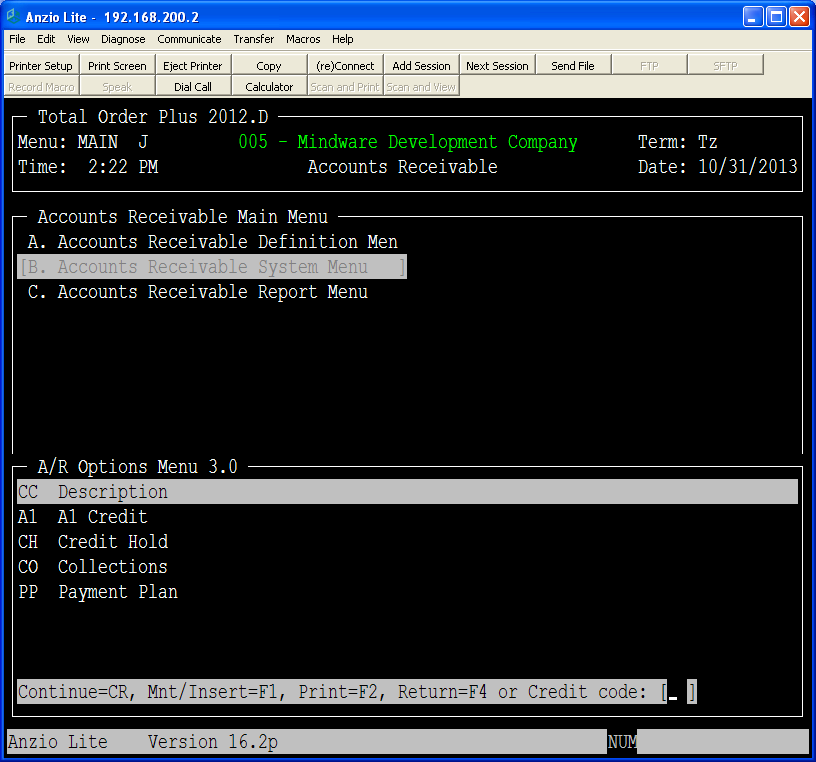
Total Order Plus allows you to set up various credit codes in Credit Code Maintenance on the A/R Options Menu. If you have a customer that is past due by many months, you should assign the credit code CH (Credit Hold) to their account by accessing the Credit Code field under Customer Status Maintenance on the Customer Master Sub-Menu. TOP will not allow any orders or invoices to be processed for that customer until the code is altered or removed. Any credit code that has a ‘C’ as the first character will be treated as a Credit Hold during Invoice Entry but not Order Entry.

CH can be automatically set using the Credit Hold Update on the A/R System Menu. It uses the Order Entry Terms Code Maintenance Credit Hold value for the number of days before putting an account on credit hold. There is an override flag in the Customer Master (Update CH) that allows you to bypass an account during the Credit Hold Update.

To categorize the other customers, you can set up multiple credit codes to describe their situation. For example, CO – Collections, PP – Payment Plan, WO – Write Off, etc.

AR_Credit_Code

Email Invoice Reminder

TechLine


The Tech Line, by Joanne Simmons

Question:

Several of our customers want their invoices sent via email. We have customer contact records set up with an email address for those customers that have requested it. When we are doing invoicing, we have no way of knowing which customers want their invoices sent by email or which ones want a hardcopy. Could there be a way to have a ‘reminder’?

Answer:

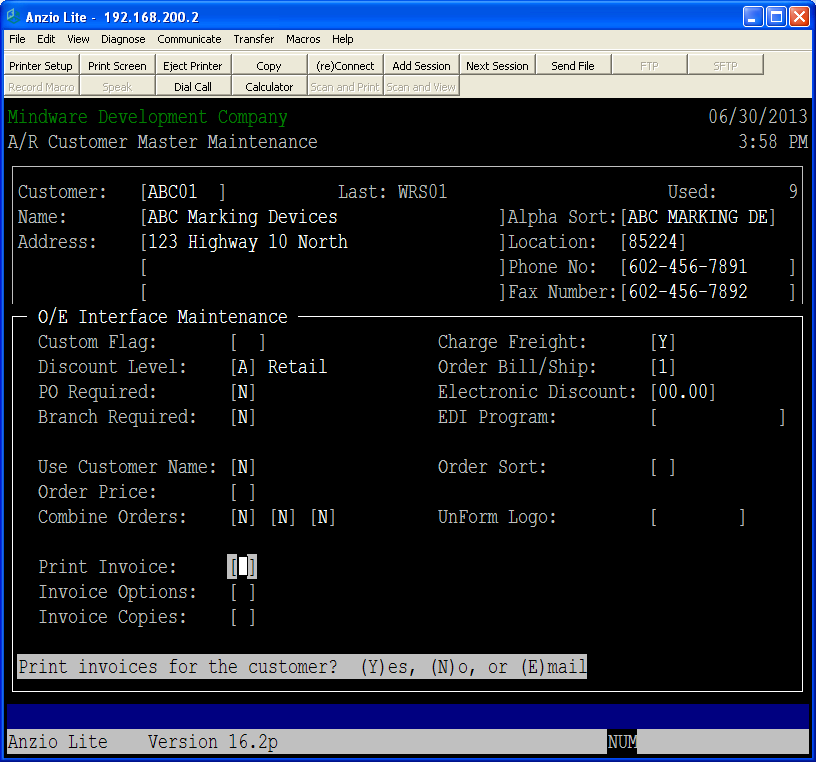
In Total Order Plus 2012, there has been a modification to the O/E Interface Maintenance on the customer sub-menu (See Below). In the Print Invoice field, you have the option to always print an invoice for this customer, not to print an invoice or email invoices to this customer. Once this flag is set, every time you enter an invoice the invoice sub-menu will either display ‘Print Invoice’ or ‘Email Invoice’.

AR_Cust_OE_Interface

UnForm Parameter Maintenance

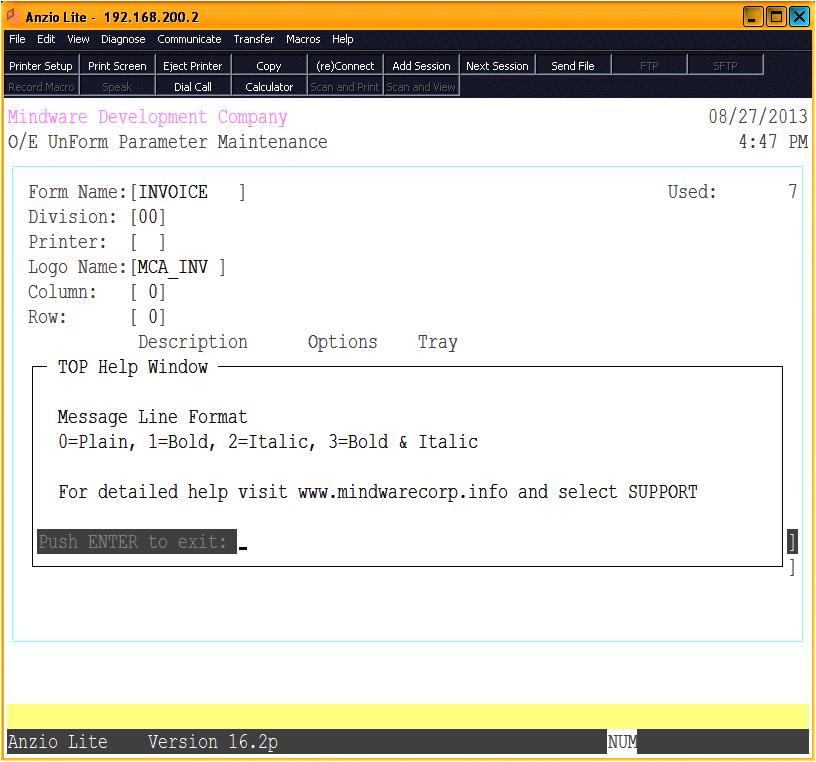
The Accounts Payable, Accounts Receivable, Purchase Order and Order Entry modules each have an UnForm Parameter Maintenance program on each of the above mentioned Definition Menus. You are able to set up parameters for each form you want printed in TOP:  checks, statements, purchase orders, orders, invoices and quotes.

Forms names to be used are displayed at the bottom of your screen: CHECK, PO, STATEMENT, ORDER, INVOICE and QUOTE. You can set up a maintenance screen for each division of your company, if applicable, and assign a specific printer for each form.

You can have a custom logo file made with your company information and assign column and line print positions of where you want the logo to print on each form.

You can have up to four copy descriptions, pricing or no pricing, screening or no screening and designate which paper tray on each printer.

You can enter up to two message lines and select either plain, bold or italic or a combination for the message lines format.

Notes:

To view the TOP Help Menu, you can press CTRL+Y at each input field to view the help options.

UNFORM_PARAM

Create RecoverEDGE Bootable Media

When BackupEDGE software is installed on your file server for nightly backup procedures, a bootable RecoverEdge DVD is created to be used in case a restore is ever necessary. The media contains the system configuration, printer designations, etc.

Periodically, updates are available from Microlite’s website whenever a new version of the software is released. Once an upgrade is downloaded and upgraded, you need to make a new RecoverEDGE DVD to update the information. It is a good idea to label the DVD with the date it was generated and the label ‘Bootable RecoverEdge Media’.

You receive a nightly backup summary printout. When it is necessary to make new media, you will see this message on the printout ‘RecoverEDGE Media is Out Of Date’. It only takes a few minutes to create the media compared to hours of time that would be needed to configure a new operating system.

Following are the instructions needed to create a RecoverEDGE DVD:

Insert a new DVD disc in the file server
Login to the file server as root -> Type edgemenu at the # prompt
Select Setup on the menu -> Select Make RecoverEDGE Media
Select Boot Media Type (i.e. dvd0, optical0) -> Select Make Media -> Select Continue

Medium Generation Status will display as the media is generated -> Follow the prompts on the screen

Select OK after ‘Bootable Medium Created Successfully’ message is displayed. Make sure to label the DVD ‘BackupEdge Bootable Media’ along with the date. Keep in a safe place.