Category Archives: Software

Advantages of Using Anzio Lite

Anzio Lite 17.x emulation software has many Features available for our users. Any customer that is using the Internet or importing order information from an email would find the features to be quite helpful and a real time saver, especially if a customer sends you an order via email, you can cut and paste the order information directly into a TOP order or invoice saving input time. Listed below are some of the features we think are outstanding:

  • You have the ability to click the ‘Copy’ button and the contents of your screen is captured and can be pasted into an email or document.
  • The ‘Print Screen’ button prints the contents of your screen to your primary printer. This feature can be used to print error messages in TOP and then can be emailed to Mindware for support.
  • You can set up any printer in Anzio Lite that is displayed in the Windows ‘Printer and Faxes’ list.
  • Both Telnet and SSH (Secure Shell) connections are supported, along with font and font size designations.
  • Many of our customers use multiple login sessions. Anzio Lite allows you to open multiple sessions by clicking the ‘Add Session’ button and then you have the ability to switch back and forth between the active sessions by clicking  ‘Next Session’.
  • You can setup user login name and password so when you log in you don’t have to enter the login name and Anzio Lite will verify the password to make sure it is correct.
  • You can prevent a user from exiting TOP by clicking on the Windows X box, leaving files open in TOP and causing ‘Error 0 – File Device Busy or Inaccessible’ message.
  • On multi-touch screens, we offer sizing and moving the main Anzio window; large screens can have up to 1000 columns of text, small screens users can control sizing of tool buttons for easier touch and a screen magnifier.

Using eFax Software

There are still a lot of customers whose end user clientele are using a fax machine and prefer receiving their orders, quotes, invoices and statements via that method.

There is a software service available that will allow you to send a document via a fax number and send it as an email attachment. You will be able to send or receive a fax from your computer, tablet or smartphone. To understand how the software works and for pricing, click on this link www.efax.com for more comprehensive information.

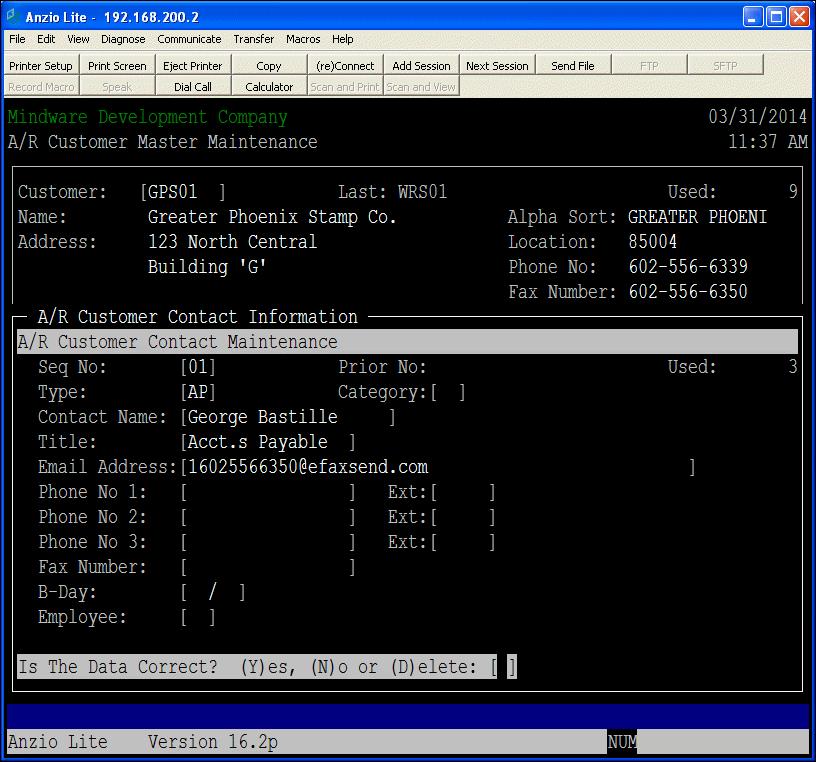
Below is an example of how you would set up a contact in Total Order Plus with an email address comprised of the customer’s fax number and the eFax send information.

EFAX

Anzio Lite ‘License Will Not Stick’ Windows 7/8/10

On some Windows 7, 8 and 10 systems, the problem of “license will not stick” occurs when Windows has UAC (user access control) enabled due to various combinations of security settings on the computer. It may also cause the user name and password not to be verified when the user logs in.

A quick solution to the problem is to run Anzio on elevated security privileges while registering Anzio by entering the Serial Number and License Code. The following steps should allow the license information to be accessed for all users with elevated privileges. Even though you may be logged in as an Administrator at the computer, this is the only way to make the Anzio license registration stick on Windows 7 and 8 computers.

1. Close all current active Anzio sessions

2. Move your mouse/cursor over to the Anzio icon on the desktop -> Right click on the mouse -> Select “Run as Administrator”

3. Re-enter your Anzio serial number and license code (under the Help menu, select on “Enter license number…”)

4. Close down Anzio then restart Anzio

FedEx Ship Manager Installation

Install From CD-Rom

Will need to be version V.2285 or greater including integration option.

Close all programs on the PC

Insert FedEx Ship Manager Software -> Select Ok for English

Select Next for Welcome to the FedEx Ship Manager install Window

Select Yes for License Agreement Window

Select Next for Choose Destination Location Window

Select Next for FedEx Ship Manager Install Options Window (leave Network Option Blank)

Select Next for Select Program Folder Window

Wait for installation

Select Unblock from Windows Security Alert if message is displayed

Select Finish for Thank you for installing FedEx Ship Manager Window (Yes to restart computer)

Remove FedEx CD

Install Basis ODBC Driver

Use selection on Basis ODBC Driver for installation

Note:

If you have installed on same PC as UPS, you can skip this step.

Setup FedEx Ship Manager

If not yet configured, follow the steps below:

Start program by double clicking on the FedEx Ship Manager icon

Select Next for FedEx Manager Registration Window

Select printer option and select Next

Select Report Printer & Label Printer, then Next from FedEx Ship Manager Printer Configuration Window

Select Next for FedEx Ship Manager Communication Configuration

Select Next for FedEx Ship Manager Communication Configuration (Use Lan or IPS option)

Enter account information and select Next from FedEx Ship Manager Customer Information Window

Select international information & select Finish from FedEx Ship Manager Customer Information Window

Wait for Registration to complete

Select Ship or Exit from FedEx Ship Manager Window

Setup TOP Integration

Start FedEx Ship Manager if not running.

Select Integration from the menu bar

Select FedEx Integration Assistant

Select Continue for Introduction Window

Select Continue for Before You Begin Window

Select Import, then Continue from Integration Type Window

Select ODBC -> TOP_SHIPPING -> Continue from Source Window

Select Yes to all three questions -> Continue from Shipping Window

Select After I enter a Customer Reference -> Continue from the Lookup Window

Select Recipient -> Check the following fields -> Select Ok

Company                              Contact Name

Address 1                              Address 2

City                                        State/Province

Postal Code

ID                                           Country

Email

Shipment Notification

Select Package -> Check the following fields -> Select Ok

Declared Value                                    Customer Reference

Package Type

PO Number                                           Service Type

Select Sender then check the following fields -> Select Ok

Company                                              Address 1

Address 2                                              City

State/Province                                      Postal Code

Account Number

Select Continue from the Information Window

Select the Table, Field and Default options as below:

Package Information

Declared Value                  OE_SHIPTO         SHPMNT_VALUE

Package Type                     OE_SHIPTO         Customer Package

Service Type                         OE_SHIPTO         SERVICE_TYPE

PO Number                           OE_SHIPTO         PO_NO

Recipient Information

Recipient Company            OE_SHIPTO         SHIPTO_NAME

Recipient Contact               OE_SHIPTO         CC_NAME

Recipient Address 1            OE_SHIPTO         SHIPTO_ADD1

Recipient Address 2            OE_SHIPTO         SHIPTO_ADD2

Recipient City                      OE_SHIPTO         SHIPTO_CITY

Recipient State                     OE_SHIPTO         SHIPTO_STATE

Recipient Postal Code        OE_SHIPTO         SHIPTO_ZIP

Recipient ID                         OE_SHIPTO         ORDER_NO

Recipient Country             OE_SHIPTO            US – UNITED STATES

Recipient Email                   OE_SHIPTO         EMAIL_ADDR

Recipient Shipment             OE_SHIPTO         NOTIFY_FLG

Sender Information

Sender Company                OE_SHIPTO         RETURN_NAME

Sender Address 1 OE_SHIPTO         RETURN_ADD1

Sender Address 2 OE_SHIPTO         RETURN_ADD2

Sender City                           OE_SHIPTO         RETURN_CITY

Sender State                         OE_SHIPTO         RETURN_STATE

Sender Postal Code             OE_SHIPTO         RETURN_ZIP

Sender Account No             OE_SHIPTO         RECV_UPS_NO

Select Continue

Select Order Number for Customer Reference -> Select Ok

Select Continue from Conversion Window -> Select Save

Select Save from Save Integration Profile Window (Profile Name: MyProfile)

Select Finish

Select Integration from menu bar

Select MyProfile to display Customer Reference Input Window


Which DVD Disc to Select for Backup

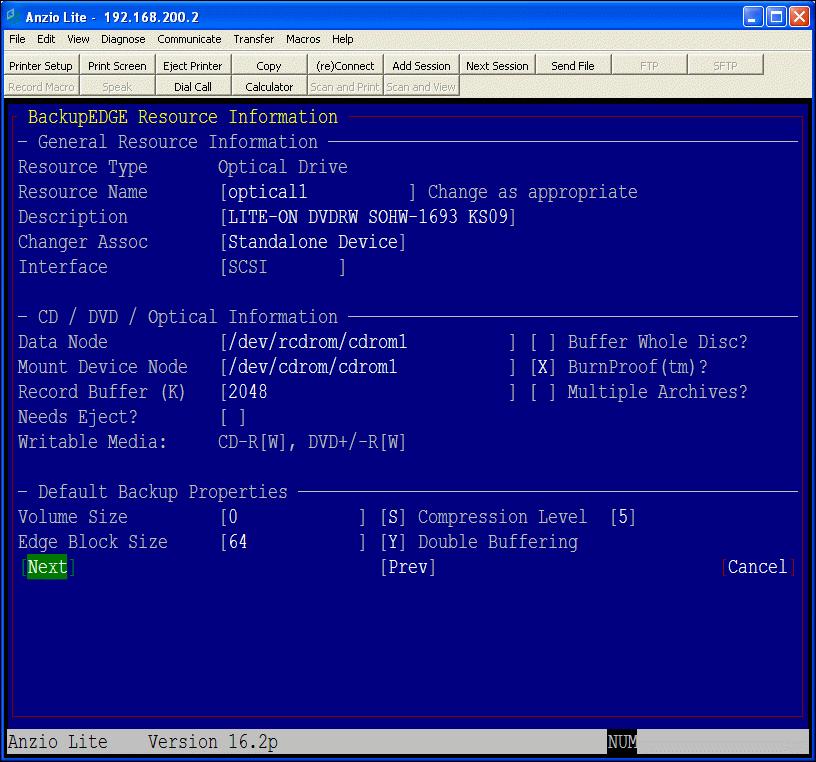
Our customer base uses BackupEdge 2.0 or 3.0 for their nightly backup which requires using either a CD-R, CD-RW, DVD-RW, etc. Which one to use can depend on the backup drive installed in your file server. Within BackupEdge, there is a menu selection that displays the specifications of the drive and lists the type of disc that is compatible with that particular drive. However, there have been instances where a drive is very ‘picky’ about what kind of disc it likes! Most drives prefer DVD-RW and they can be used in a weekly rotation. Older file servers and older versions of BackupEdge only use CD-R or CD-RW. The CD-R can only be used once whereas the CD-RW can also be used in a rotation.

There are different capacities of DVD’s to use for backup depending on the amount of data you specify in the setup of BackupEdge. TOP does not require much room unless your history files have not been purged on a regular basis. Most of our customers store reports in PDF format, which takes up more storage on the DVD, along with the contents of the ‘S” Drive (share drive). Each customer must decide which data is most important to back up on a nightly or monthly schedule to avoid having to use more than one DVD a night.

Notes:

If you have a Red Hat Linux server, it is possible that you have a Blu Ray DVD drive installed. You can check with Mindware for that information. If the drive is Blu Ray, we recommend using dual layer VERBATIM Blu- Ray Media  BD-RE DL  50GB 2X for best results.

Below is an example of BackupEdge drive specifications – see Writable Media:

DVD_BACKUPS


MailCall Login Name and Password

Customers using MailCall to email orders, quotes, invoices, purchase orders and statements should be aware of where the login name and password is maintained in Total Order Plus. Your Internet Provider may change the information or it will change if you decide to switch providers.

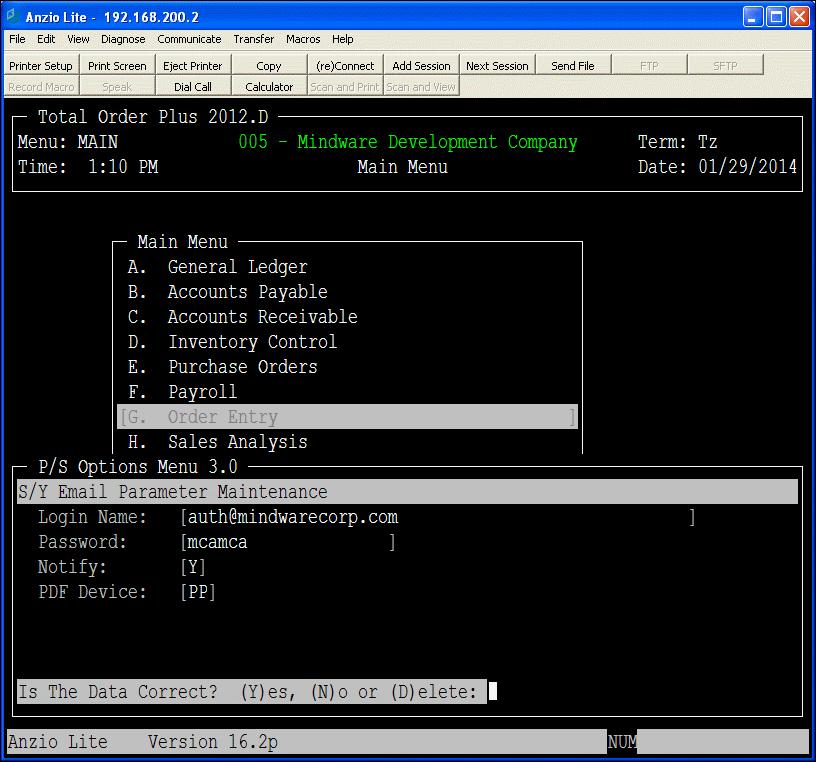
At the TOP Main Menu, type a ? to display a blank Options Menu window. Type PS for the Options Menu name to display the PS Options Menu 3.0 selections. You will select Email Parameters.

Type a valid email address and login name that you have given to your provider and can be verified when sending an email. You will enter a Y for Default Notification if you want to receive a notice when each email has been successfully transmitted. TOP has established PP as the PDF printer device name.

MAILCALL_PARAM

Rasmussen Software Announces Release of Anzio Lite 17

Rasmussen Software has announced the release and immediate availability of Anzio Lite 17 and AnzioWin 17. Anzio version 17 is now available for download at www.anzio.com. This major update includes numerous improvements for work with Windows 8, touch screens, large screens, small screens, mobility and IPv6. Only in AnzioWin, it has enhancements to the Print Wizard engine, SSH backchannel printing, and image document management.

Anzio 17 runs on Windows XP and later, although some new features rely on enhancements in Vista and later. All versions of Anzio Lite and AnzioWin are 32-bit programs that run on 32-bit or 64-bit versions of Windows. Recent versions run on Windows 8 (not RT) as desktop programs, not as Metro apps.

They are offering a free upgrade until March 3, 2014 to customers who have purchased Anzio Lite 16 since July 1, 2013. Other users with any version of Anzio Lite can upgrade to version 17 at a special price. Upgrades are also available for a user wanting to upgrade from Anzio Lite to AnzioWin.

Call Mindware at 800-950-0401 or email [email protected] for upgrade and pricing information.

Microsoft’s Security Essentials AntiVirus Installation

Microsoft has released their own antivirus software called Security Essentials or MSE. The nice thing about it is ‘it’s free’! It is designed primarily for smaller businesses (8-10 users) and can be installed with ease.

Please be aware that MSE cannot be installed on any Windows version except Windows XP SP2 or SP3, Windows Vista or Windows 7. If you have Windows 8 installed, you will need to read the information in the link below:

http://answers.microsoft.com/en-us/protect/forum/mse-protect_start/can-i-use-microsoft-security-essentials-with/34b26e6f-12a0-4bc7-b160-f3b2ff70b910

Notes:

If you allow the McAfee AntiVirus to expire before installing Microsoft AV, you don’t have to do Step 1.

For customers using McAfee Antivirus on your Sonicwall, follow these instructions to get the IP address of your PC:

1.  Click on Start  –>  Programs  –>  Accessories  –>  Command Prompt

Type the command  ipconfig to display your PC’s IP address  –>  This IP address will have to be excluded on the Sonicwall under Security Services –>  Client Antivirus  –>  Configure. Call Mindware if you need help with the exclusion.

2.  You will need to remove the McAfee Anti Virus on each PC.

Click on Start  –>  Settings  –>  Control Panel  –>  Add/Remove Programs

Highlight McAfee Virus Protection  –>  Click Remove

Now you are ready to install the new antivirus software. Log on to www.microsoft.com/security_essentials and click on Support before doing the dowload. There are videos that explains how to download the software, how to do an on demand scan and how to fix a threat when one is detected.

Once you click on the Download Now button, follow the prompts on your screen. If you are using Internet Explorer, a bar will display on your screen – click on the bar to continue. If you are using another browser, you will be asked what version of Windows you are using and then follow the prompts on your screen. The installation will make sure your PC passes all requirements for the installation.

horizontal rule

Things You May Not Know About TOP

Send Invitation From LogMeIn

To activate remote access on www.LogMeIn.com, you will need to set up a new account with a user name and password. Once you log in to your account, you will have the option to download LogMeIn software to your PC.

After the download is complete, a LogMeIn icon is displayed in the task bar on your desktop. Click on the icon and enable LogMeIn. You will see an option to Turn Off accessibility to your PC, Send an Invitation or to Share Files.

In order for a remote user to have access to your PC, you would click on Send an Invitation. The name of the invitation displays in the Title field and there is an option to set an expiration date for the invitation in days, hours and minutes. Click on Next -> Check ‘I will send the message myself’.

Click on Next and LogMeIn will create an invitation link. You can select to Copy the link to your clipboard or Create a new email to the remote user. If you select the clipboard option, you will need to create a new email to the remote user and insert the link in the body of the email from the Clipboard. If you selected to create a new email to a remote user, the link is automatically inserted into a newly created email, the subject of the email will display ‘Desktop Sharing link via LogMeIn.com’ and the link will display in the body of the email. Click on Send to transmit the invitation to the remote user.

Notes:

It is important that you set the expiration date to a reasonable amount of time so the invitation doesn’t expire before the remote user is logged off your PC. A specific amount of hours or days would be appropriate depending on the remote user’s needed time of access.


Anzio Lite Setup

For more information, click on Anzio Lite product information link.

Download And Install

Click on Anzio Download link on www.anzio.com -> Select latest version of Anzio Lite 17

Notes:

Anzio 16 users download version 16.3m under ‘Archives’

Save to temp folder on C drive (if folder not present create it)

Select Save  ->  Select OK

Select Open  ->  Select Run to display Install Wizard

Select Yes to License Agreement  ->  Select Next for Location

Select Next for Program Folder  ->  Select Finish

Setup Icon

Select Start -> Programs -> Anzio 17 -> Anzio Lite 17 (New Connection)

Select SCOANSI for terminal type if using SCO, select Linux if using Red Hat Linux

If using SCO, answer No to old style if SCO 5.0.7

Select Telnet from Communications Setup Window if local connection, select ssh if remote connection

Enter IP address for server (example for local connection, 192.168.1.2)  –> Click Connect

Select Yes for Please Verify SSH Key if using SSH

Enter login name and password

Select File  ->  Save Settings As  -> Use Total Order Plus for icon name

Slave Printer Setup

Start Anzio Lite

Select File -> Printer Setup -> In Print Level section select Spooler, on printer

Select OK

Disable X box to exit TOP

Start Anzio Lite -> Select Edit -> Select Advanced Options

Select Screen tab -> Uncheck System menu close box

Select File -> Select Save Settings -> Log out and log back in to take effect

Notes:

On some networks, Anzio Lite will automatically disconnect a user after a certain amount of idle time. You can increase the amount of time that Anzio Lite checks the connection by doing the following:

Click on Communicate -> Select Network -> Select Stay Alive and increase the time to 120 or greater -> Select File -> Save Settings